

Did you know that a character’s eyes can convey over 50% of their emotional expression in Japanese animation? This single feature holds immense power in defining personality and connecting with the audience.
I created this comprehensive guide to help artists master this crucial element of character design. Whether you’re just starting or looking to refine your skills, this resource breaks down the process into clear, manageable steps.
Stylized eyes for animated characters offer incredible creative freedom. They are not bound by the rules of hyper-realism. This allows for exaggerated shapes, vibrant colors, and unique details that bring a character to life.
Inside this tutorial, you will find foundational anatomy lessons, a detailed creation process, coloring techniques, and style variations. I also include recommendations for digital tools that I have personally tested and trust.
My goal is to make this artistic journey accessible and enjoyable. Mastering this skill opens a door to personal expression and deeper character development in your illustrations.
Key Takeaways
- Eyes are the most expressive feature for conveying character emotion.
- This guide is designed for artists at all skill levels.
- Stylized eyes allow for greater creative freedom than realistic ones.
- The tutorial covers anatomy, step-by-step creation, coloring, and styles.
- Personal tool recommendations are included for digital artists.
- The focus is on making the process enjoyable and accessible.
- This skill enhances personal expression in character design.
Introduction to Anime Eye Drawing
My artistic path took a significant turn when I began experimenting with stylized eye designs from manga and animation. This exploration opened a world of creative possibilities that differed greatly from traditional realistic approaches.
My Personal Journey with Anime Art
Creating expressive eyes for animated characters became my favorite artistic activity during my younger years. The process felt uniquely enjoyable and accessible compared to the pressures of photorealistic rendering.
This form of artistic expression offered perfect balance between creative freedom and technical simplicity. I could focus purely on emotional impact and stylistic choices rather than anatomical accuracy.
The meditative quality of this creative practice helped quiet my mind and encouraged artistic flow. This personal experience fuels my passion for sharing these techniques with others exploring this art form.how-to-draw-arms
Why Anime Eyes Matter in Character Design
In Japanese animation and comic art, eyes serve as the cornerstone of character development. They function as the primary vehicle for conveying emotion, personality, and distinctive qualities.
Stylized eyes communicate feelings more powerfully than realistic counterparts through exaggeration and artistic license. Mastering this essential feature enables artists to create compelling, memorable characters that resonate with audiences.
Understanding the significance of eye design helps appreciate the techniques covered in this guide. This knowledge motivates regular practice and deeper engagement with character creation.
Foundations: Anatomy, Shapes, and Proportions

The journey toward authentic anime character creation begins with understanding fundamental eye anatomy and proportions. I always emphasize starting with realistic structures before moving into stylization.how-to-draw-bunny
Understanding Realistic vs Anime Eye Structures
Realistic eye anatomy provides the essential framework for effective stylization. The iris, pupil, eyelids, and surrounding features form the basis of believable design.
Anime versions simplify these complex structures dramatically. They often eliminate details like tear ducts while maintaining recognizable eye features. This simplification allows for greater creative expression.
Common Shapes and Their Meanings
Shape psychology plays a crucial role in character design. Different geometric forms communicate specific personality traits instantly.
Thinking in basic shapes provides a clear starting point for construction. This approach aligns designs with character personality and story role effectively.
| Shape Type | Emotional Meaning | Character Application |
|---|---|---|
| Squares & Rectangles | Discipline, strength, security | Authority figures, military leaders |
| Circles & Ovals | Gentleness, mystery, magic | Protagonists, trustworthy characters |
| Triangles | Excitement, danger, stability | Strong or antagonistic roles |
Mastering these foundational elements ensures your character designs communicate effectively. The right shape choices make personalities instantly recognizable to viewers.
Step-by-Step Process: How to Draw Anime Eyes

The actual creation of stylized ocular features follows a logical progression that ensures proper proportion and emotional impact. I break this method into clear stages that build upon each other.
Constructing Upper and Lower Lids
Begin with the upper lid by creating a gentle curve resembling a hill. This establishes the primary shape and expression. The lower lid uses an inverted curve that complements the top.
These foundational lines create the basic framework. Use light, short strokes to build up the desired form gradually.how-to-draw-a-whale
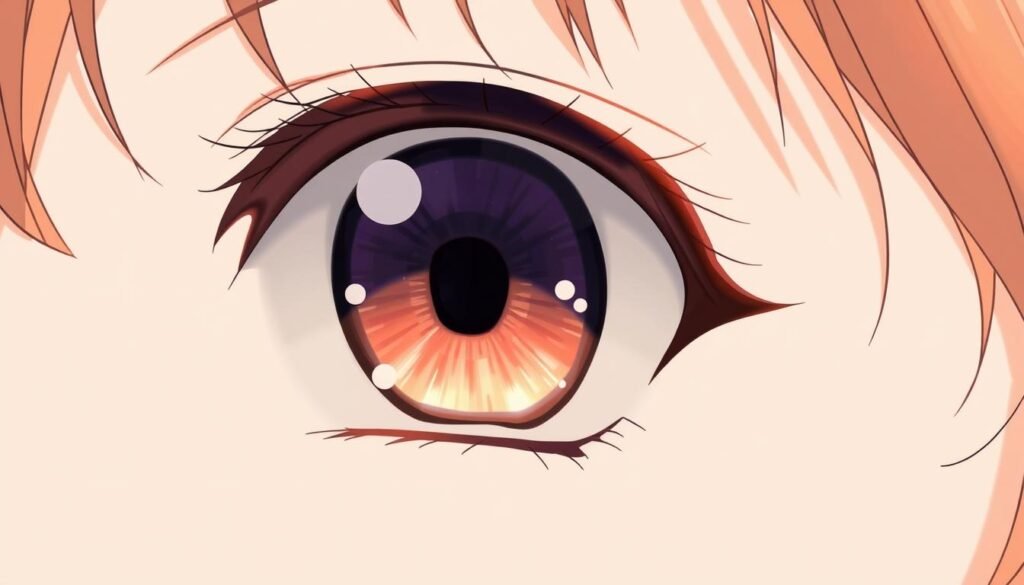
Defining the Iris, Pupil, and Light Reflections
Position an oval shape within the framework for the iris. Its placement significantly affects character expression. Add a dark spot in the center for the pupil.
Light reflections bring life to the feature. Draw small spots in the corner where illumination hits. These areas remain uncolored to simulate highlights.
| Step | Action | Key Details |
|---|---|---|
| 1-2 | Lid Construction | Curved lines establish basic shape and expression |
| 3-5 | Internal Elements | Oval iris, central pupil, corner light spots |
| 6-8 | Finishing Touches | Shading, eyelashes, creases, and eyebrows |
This technique works equally well in digital or traditional media. For additional guidance on character feature development, explore this comprehensive resource.
Coloring Techniques and Shading for Depth

Strategic color choices and shading techniques can elevate a simple sketch into a compelling, lifelike feature. I begin by selecting a base color that reflects the character’s personality and design aesthetic.
Layering is crucial for building dimension. I create a Multiply layer and use gentle watercolor brushes to add shadows starting from the top corner of the iris. Progressive darkening in this area creates natural depth.
Choosing Base Colors and Layering Shadows
Varying color spectrums within a single eye prevents monotony. For example, adding dark purple to blue eyes creates visual interest. The central pupil receives soft shadows and embracing lines to define its shape.
Light around the pupil makes this central part pop as the focal point. This technique draws viewer attention naturally to the most important area of the character’s eyes.
Enhancing Details with Highlights and Glow Effects
ADD GLOW layers with soft hairbrushes create delicate light reflections in the bottom corner. I achieve the signature half-moon effect by leaving tiny “teardrop” highlights following the contours.
GLOW DODGE layers produce sparkling lines at the top of the iris, suggesting moisture. OVERLAY layers add complementary color effects like purple tints for dynamic results.
I lock transparent pixels to color the lineart, picking hues from surrounding areas. Soft watercolor brushes blend everything seamlessly. Gaussian Blur on duplicated light layers creates authentic glowing effects that polish the final piece. For additional digital painting guidance, explore this comprehensive resource on advanced techniques.how-to-draw-animals-tiger
Exploring Different Styles and Expressions

The diversity of eye styles available to artists offers endless possibilities for character development. I encourage thinking carefully about what kind of eyes best suit your character before starting. This planning stage ensures effective results.
Creating Emotive Eyes through Shape and Color
Subtle changes to eyelid curves, iris size, and highlight intensity dramatically alter emotional messages. A tense eyebrow with a relaxed, shining eye conveys worry or longing. Vertically arched eyebrows with closed eyes clearly indicate happiness.
Aggressive expressions feature no shine, white irises, and reduced pupils. These elements instantly communicate anger. Suspicion, shock, and sadness each have distinct configurations that skilled artists can master.
Adjusting Techniques for Male and Female Anime Eyes
While fundamental techniques remain consistent, gender differences exist. Female eyes typically feature longer lashes, pronounced highlights, and rounder shapes. Male ones tend to be narrower and more angular.
Artists can interchange these styles by adjusting proportions and shape angularity. Exploring various types—from large round ones to narrow sharp ones—expands your artistic repertoire. This comprehensive resource offers additional style exploration guidance.
Tools, Tips, and Digital Techniques in Anime Drawing

Equipment selection plays a crucial role in determining the quality and efficiency of your character design workflow. Modern tools have made digital creation accessible to artists at all levels.
Essential Brushes, Programs, and Equipment
Beginners can start with affordable $30 tablets, while Wacom devices offer reliable entry points. I recommend Paint Tool Sai for newcomers due to its intuitive interface.
Photoshop provides advanced control for experienced creators. In Clip Studio Paint, specific brushes excel for different tasks.how-to-draw-a-mermaid
| Program | Best For | Key Features | Learning Curve |
|---|---|---|---|
| Paint Tool Sai | Beginners | Simple interface, stable lines | Low |
| Clip Studio Paint | Manga artists | Specialized brushes, comic tools | Medium |
| Photoshop | Professionals | Advanced layers, effects | High |
My favorite brushes include the G-pen for clean line work and Smooth Watercolor for blending. The Hairbrush soft creates beautiful light effects.
Integrating Traditional and Digital Methods
The fundamental technique remains identical across media. Light, short strokes build dimension naturally whether using pencil or stylus.
Many artists sketch traditionally then refine digitally. This hybrid approach combines the spontaneity of paper with digital flexibility. For comprehensive guidance, explore this detailed resource on character feature development.
Digital skills are valuable for professional pursuits or enjoyable hobbies. Consistent practice with both methods helps discover your preferred workflow.
Conclusion
Creating expressive anime eyes truly brings characters to life. The intricate details in the iris, pupil, and overall shape convey personality and emotion powerfully.
This comprehensive tutorial has covered foundational techniques from basic shapes to advanced coloring. Clean line work forms the structural foundation for compelling eyes.
Strategic placement of light and color choices transforms flat drawings into dimensional features. I encourage bold experimentation with different styles—there is no single correct approach.
Drawing these expressive eye features serves as both artistic practice and meditative flow. This process quiets the mind while developing valuable skills.
I hope this guide empowers you to start creating memorable anime characters with confidence. Revisit sections as needed and embrace the creative journey ahead.


