

Did you know that over 85% of people believe they lack the natural talent for art? This common misconception often prevents them from even picking up a pencil. I’m here to show you that creating beautiful artwork is a skill anyone can learn.
This guide is your accessible resource for learning to create floral illustrations. You do not need any prior experience or a special background. The process is designed for complete beginners.
Floral subjects are an ideal starting point for building foundational skills. They combine simple shapes with organic, flowing forms. Mastering these elements provides a strong base for all future artistic endeavors.
I will break down complex botanical structures into clear, manageable stages. My approach ensures you can follow along without feeling overwhelmed. We will cover essential tools, basic techniques, and simple enhancement strategies.
Many beginners worry about making mistakes or not getting it “right.” I want to reassure you that the journey is part of the fun. With the right guidance, creating impressive flower drawings is entirely achievable.
Key Takeaways
- Artistic skill is learned, not an innate talent.
- Flowers are perfect for beginners due to their simple shapes.
- This guide breaks the process into easy-to-follow steps.
- Anyone can create beautiful drawings with proper guidance.
- The skills learned here apply to many other drawing subjects.
- Essential tools and techniques will be clearly explained.
Understanding Basic Drawing Foundations
The secret to drawing realistic subjects lies in breaking them down into their simplest components. This approach transforms complex forms into manageable elements that anyone can master.
Essential Tools and Materials
Starting with the right equipment makes the process smoother. I recommend pencils of varying hardness—HB for sketching, 2B for general work, and 4B for darker shadows. Quality erasers and smooth drawing paper complete your basic setup.
Optional tools like blending stumps and colored pencils enhance your creative options. These materials work together to build confidence as you progress.
| Tool Type | Primary Use | Skill Level |
|---|---|---|
| HB Pencil | Initial sketching | Beginner |
| 2B Pencil | General drawing | All levels |
| 4B Pencil | Shadows & depth | Intermediate |
| Blending Stump | Smooth transitions | Advanced |
Simple Forms and Basic Shapes
Every complex subject begins with fundamental shapes. Circles, ovals, cylinders, and cones form the building blocks of natural structures. When you learn to draw using these forms, you can create virtually anything.
This method applies to diverse subjects—from people and animals to architectural elements. Understanding light and shadow transforms flat shapes into three-dimensional forms. Consistent practice with these foundations helps you learn draw techniques efficiently.
Video lessons and printable worksheets break down each step clearly. This structured approach eliminates confusion while building essential skills progressively.
How to Draw a Flower Easy for Beginners

The journey from simple circles to a completed blossom is simpler than you might imagine. This process builds directly on the foundational shapes we discussed earlier.how-to-draw-a-flamingo
You will find that with a clear sequence, creating a pleasing floral sketch is an accessible goal.
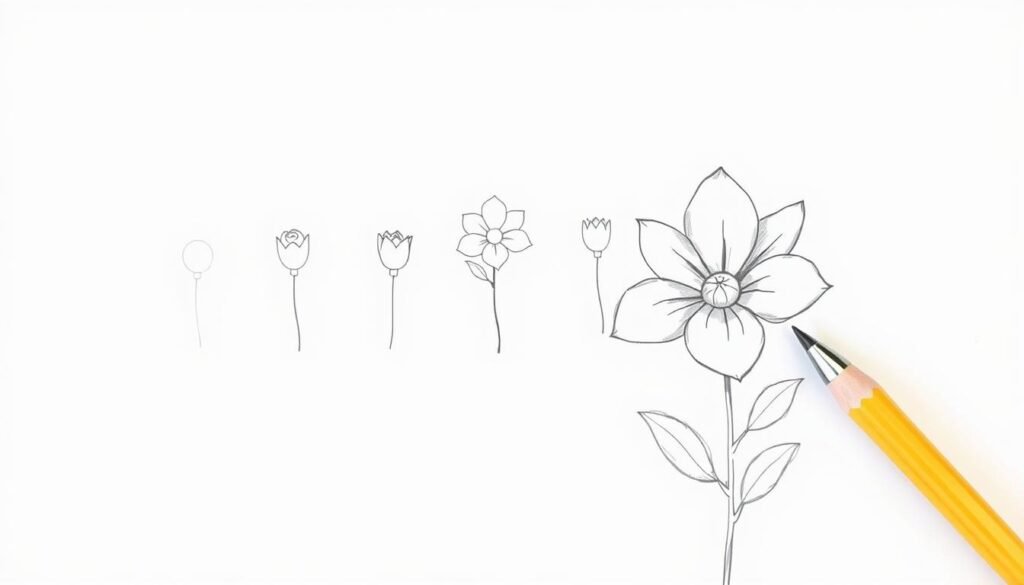
A Step-by-Step Process
Begin with a small circle for the center of your flower. Around this center, sketch five evenly-spaced ovals to form the basic petal structure.
The next step involves refining these shapes. Add gentle curves to the petals to give them a natural, organic appearance instead of a rigid look.
Now, add a stem using two curved lines and attach simple leaf shapes. This completes the core structure. Finally, use light shading to suggest depth, focusing on shadows beneath petals.
Tips for Avoiding Common Mistakes
A common error is making petals too uniform. Nature has variation, so allow for slight differences in size and shape. Avoid heavy, dark lines initially; start with light strokes.
Taking time to observe real flowers before you finalize your lines is invaluable. Consistent practice is the most reliable path to improvement.
Even a small amount of time spent each day can yield really good results quickly. For further guidance, explore this resource on how to master floral illustrations.
Remember, every attempt builds valuable experience. Don’t be discouraged by early efforts; each one brings you closer to your goal.how-to-draw-a-hat
Enhancing Your Flower Drawing Skills

Elevating your botanical artwork involves developing an eye for the small characteristics that bring subjects to life. This progression transforms basic outlines into convincing representations.
Incorporating Details and Textures
Observation is crucial for capturing authentic details. Study real flowers or quality photographs to notice subtle variations. Look for vein patterns on petals and texture differences between species.
Different techniques create various surface qualities. Cross-hatching builds shadow depth. Stippling suggests pollen or rough textures. Gentle blending produces smooth, light-catching surfaces.
| Technique | Best For | Skill Level |
|---|---|---|
| Cross-hatching | Shadow areas | Intermediate |
| Stippling | Pollen centers | Beginner |
| Blending | Smooth petals | All levels |
| Layering | Depth creation | Advanced |
Dedicate time to studying specific flower parts like stamens and pistils. Consistent practice with these elements develops hand control. This leads to really good precision in your work.
Experiment with different media for varied effects. Charcoal creates soft shadows. Fine liners produce crisp botanical details. Balance remains key—details should enhance without overwhelming your composition.
Conclusion
The path to creating beautiful floral artwork is paved with consistent practice and a willingness to learn from each attempt. This guide has shown that successful flower drawing relies on mastering basic shapes, following a clear step process, and gradually building details as skills develop.
This artistic skill remains accessible to people of all experience levels. With patience and regular practice, anyone can create impressive botanical illustrations. The foundational techniques covered here apply to increasingly complex flowers and other natural subjects.
Remember that artistic growth happens at individual paces. Comparing early attempts with later work reveals meaningful progress. View each drawing session as valuable learning that builds essential skills.
I’m confident these methods will help you create beautiful flower artwork. The structured approach makes this creative pursuit achievable for everyone willing to practice consistently.how-to-draw-a-cowboy-hat


