

Did you know that engaging in creative activities like sketching can significantly reduce stress levels? This comprehensive tutorial is designed to unlock that calming, creative potential for everyone.
I believe that creating beautiful flower illustrations is a skill accessible to all. You do not need innate talent, just a willingness to learn and practice. This guide will prove it.
My method focuses on building confidence. We start with the absolute basics. To begin your artistic journey, you only need a few simple tools: a blank sheet of paper and a reliable pencil. This foundational approach makes it easy to learn and apply each step.
The elegant tulip is a perfect subject for beginners. Its clear, cup-like form teaches fundamental principles of shape and dimension. I will break the process into simple stages, making the entire drawing experience manageable and rewarding. By the final step, you will have created a realistic blossom with impressive depth.
Key Takeaways
- This guide is designed for artists of all skill levels, especially beginners.
- The tulip’s simple structure makes it an ideal flower for learning foundational techniques.
- You only need basic supplies like paper and a pencil to get started.
- The process is broken down into easy-to-follow, manageable steps.
- Drawing is a learnable skill that improves with practice and guidance.
- You will learn to create a tulip drawing with proper proportions and a 3D form.
Understanding the Botanical Anatomy of a Tulip
Before your pencil touches the paper, a clear mental picture of the tulip’s form is essential. I find that knowing the names and roles of each part builds a solid foundation for your artwork. This knowledge transforms a simple sketch into an informed and realistic representation.
Exploring the Flower’s Structure and Elements
The main flower is a cup-shaped bloom sitting atop a cylindrical stem. Long, ribbon-like leaves cluster at its base. At the center of this elegant structure are the reproductive parts.
A single tulip typically has six petal-like structures. These are arranged in two layers:
- Three outer tepals are often narrower and more pointed.
- Three inner petals are usually broader.
They radiate from the center in a perfectly symmetrical pattern. This radial symmetry is a key feature of many flowers.
The Role of Petals, Stem, and Leaves
The stem provides crucial support, connecting the bloom to the plant’s base. Notice how it may thicken slightly where leaves attach. Each leaf is long and lance-shaped, thinner at the top and wider at the bottom.
Understanding this anatomy is the first step toward creating accurate detailed botanical illustrations. When you recognize how the parts connect, your tulip drawings will naturally gain authenticity and depth.
Step-by-Step Instructions: How to Draw a Tulip

Now we move from understanding the flower’s form to the active creation of your artwork. I will guide you through each step with clear, simple instructions. This method builds your drawing systematically, ensuring a confident and successful result.
Sketching the Basic Shapes and Guidelines
Start with a light, wide circle near the top of your paper. This shape is a guideline for the bloom’s top. Leave ample space below it.how-to-draw-a-boat
From the circle‘s left point, sketch a slightly curved line downwards. Repeat this on the right side, mirroring the curve. You are establishing the flower’s basic cone structure.
Defining Curves, Petals, and Detailed Lines
Continue the left line by curving it inward. Do the same on the right side, ensuring the two lines do not touch at the bottom. Connect them with a downward curve to form the cup shape.how-to-draw-an-owl
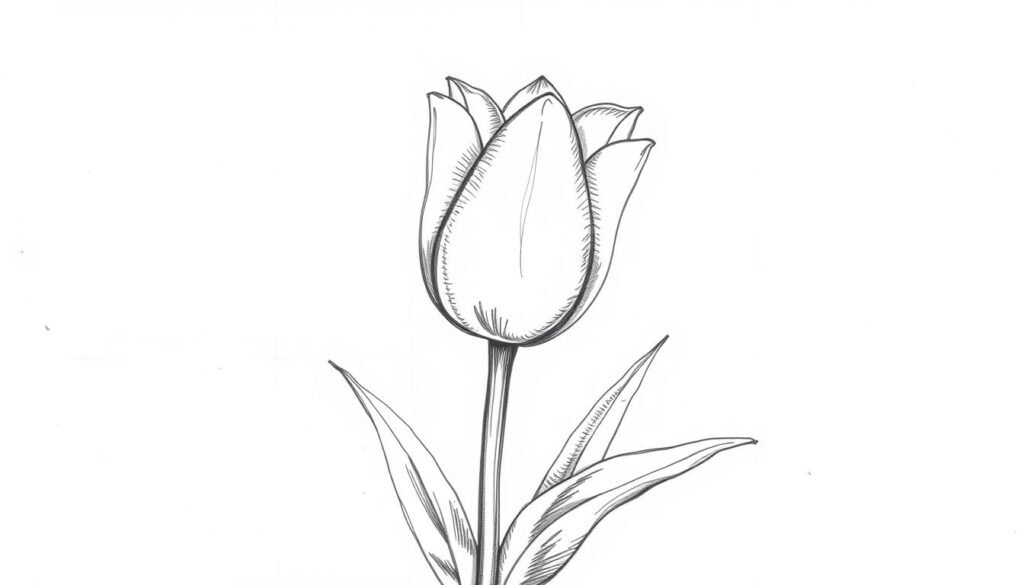
Now, define the front petals. On the right side, draw an upward curved line connecting to the initial guideline. Add the left front petal similarly. The middle petal starts between them and arcs upward.
Add the stem with two vertical, gently curving lines. Attach long, graceful leaf shapes that are thinner at the top. This foundational approach is perfect for developing your floral drawing skills.
Adding Shadows and Enhancing Depth
Refine your sketch by adding subtle vein lines to each petal. These lines should follow the natural curve of the shape.
Observe how the petals overlap. This overlapping is key to creating a sense of depth. With the basic structure complete, your illustration is ready for the final artistic enhancements.
Advanced Techniques and Creative Enhancements

Elevating your botanical artwork requires mastering advanced techniques that bring drawings to life. These methods transform basic sketches into professional illustrations with depth and realism.
Incorporating Perspective and Light Source
Perspective creates the illusion of three-dimensional space on flat paper. Observe your subject from multiple angles before starting. Sketch quick thumbnails to capture essential characteristics.
Establish a consistent light source direction, such as upper left. This determines where highlights and shadows appear. The concave side of each petal receives shading on one side with a highlighted edge.
Add shadows to the opposite side of the light source. Darken the insides and lower parts using small strokes that follow natural forms. This technique builds convincing depth.how-to-draw-waves
Experimenting with Color, Shading, and Texture
Tulips offer many different color possibilities across thousands of varieties. Build up color gradually in light layers using colored pencils. Switch frequently between colors in your palette.
Burnishing with cream color or colorless blender eliminates paper texture. It adds luminescence to your artwork. Use a sharp pencil to add fine details and enhance contrast in shadow areas.
These advanced methods will significantly improve your floral sketches. They bring professional quality to botanical illustrations.
Conclusion
Mastering the tulip illustration represents more than just creating a beautiful flower drawing. You have successfully learned to break down complex botanical forms into manageable steps. This systematic approach proves that artistic skill develops through practice and guidance.
Each flower you create reinforces your understanding of three-dimensional form. Pay attention to how petals overlap and how the stem supports the bloom. Even leaves contribute to the overall balance. These principles transfer to other botanical subjects.
Continue practicing with different tulips varieties and perspectives. Embrace natural variations in your work—they add authenticity. The satisfaction of creating realistic artwork will inspire your ongoing artistic journey.how-to-draw-a-cloud
Learn drawing as a lifelong skill that brings creative fulfillment. Your completed drawing demonstrates that anyone can develop artistic abilities with proper instruction and dedication.


