

Did you know that medieval castles contain some of the most mathematically precise architectural designs in history? These structures were built with geometric principles that artists can leverage to create stunning castle art.
I’ve developed a comprehensive approach to creating beautiful castle illustrations that capture the magical essence of fantasy architecture. My method makes this artistic pursuit accessible to creators at every skill level.
This tutorial breaks down complex castle structures into manageable steps anyone can follow. I focus on the fundamental shapes that form the foundation of impressive fortress illustrations.
My guidance helps artists develop confidence in their abilities while producing finished pieces worth displaying. The techniques I share have been refined over time to achieve that enchanting, storybook quality.
Creating remarkable fortress art doesn’t require advanced skills—just patience, practice, and proper direction. Anyone can learn to illustrate castles effectively with the right systematic approach.
Key Takeaways
- Medieval castles follow precise geometric patterns that simplify the drawing process
- Complex fortress structures can be broken down into basic, manageable shapes
- This approach works for artists at all experience levels
- Proper technique development builds confidence in artistic abilities
- Systematic methods produce professional-looking results
- Patience and practice are more important than innate talent
- Understanding underlying structures creates more authentic castle illustrations
Introduction: Embarking on My Castle Drawing Journey
Translating the grandeur of medieval architecture onto paper became my artistic passion after discovering its geometric foundations. This systematic approach transformed complex fortress structures into manageable creative projects.
My fascination with these majestic buildings began with their commanding presence in historical landscapes. I realized that breaking down elaborate designs into basic shapes makes the entire process more approachable for artists at any level.
| Approach | Benefits | Skill Level Required |
|---|---|---|
| Systematic Shape Breakdown | Builds confidence through gradual progress | Beginner to Advanced |
| Intuitive Freehand Method | Allows creative freedom | Intermediate to Expert |
| Geometric Foundation Focus | Ensures structural accuracy | All Levels |
Over time, I discovered this method combines architectural precision with imaginative expression. The journey teaches patience while developing fundamental skills applicable to many subjects.
Successful fortress illustration starts with understanding basic geometric shapes. This systematic method transforms an intimidating subject into an enjoyable creative experience that builds confidence with each step.
Gathering Supplies and Setting Up My Workspace

Before any creative work begins, I meticulously organize my drawing tools and environment. This preparation phase significantly impacts the quality and efficiency of my artistic process.
I always start with selecting the perfect paper for my project. Medium-weight sketch paper handles repeated erasing while maintaining integrity for detailed work. The right surface makes all the difference in achieving professional results.
My pencil selection follows a strategic approach. HB or 2B pencils create ideal initial guidelines—visible yet easily adjustable. I keep multiple hardness grades nearby for different stages of the artwork.
| Pencil Type | Best Use | Line Quality |
|---|---|---|
| H or 2H | Light preliminary sketching | Fine, easily erasable |
| HB or 2B | Main construction lines | Balanced visibility |
| 4B or 6B | Final details and shading | Rich, dark lines |
Workspace organization extends beyond materials. A flat, well-lit surface with ample arm movement space ensures comfortable working conditions. Reference materials stay within easy view without disrupting creative flow.
I test each pencil on scrap paper first to verify line weight suitability. Having a quality eraser and all tools within arm’s reach maintains momentum throughout the creative session.
Foundations: Outlining Basic Castle Shapes and Structure

The structural integrity of any fortress artwork begins with precise shape placement. I establish the framework using fundamental geometric forms that create a balanced composition.
Sketching the Ground Curve, Doorway, and Base Shapes
My initial line work starts with a gentle curve at the bottom of the page. This represents the ground plane where the structure will rest. I position a square shape slightly off-center to serve as the main entrance.
An oval-like form connects to the ground line, forming the central wall section. This foundational shape anchors the entire castle composition and establishes proper proportions.
Planning Towers, Rectangles, and Battlements Layout
For vertical elements, I add rectangle shapes on both sides of the central door. The left tower uses a simple rectangular form, while the right features a rectangle topped with a triangle.
I refine the entrance by sketching a second outline inside the original square. This creates depth for the door frame. Battlements—those distinctive rectangular blocks—complete the top wall section.
| Shape Type | Structural Function | Visual Impact |
|---|---|---|
| Ground Curve Line | Establishes foundation plane | Creates stability and perspective |
| Square/Rectangle | Forms walls and towers | Provides architectural solidity |
| Triangle Shape | Tops towers and roofs | Adds vertical emphasis |
This systematic approach to shape organization ensures a cohesive fortress structure. Each geometric element serves both functional and aesthetic purposes in the final castle illustration.
Step-by-Step Guide: How to Draw a Castle

Building the castle’s vertical elements transforms the basic foundation into a recognizable fortress silhouette. My systematic approach ensures each new component integrates seamlessly with existing structures.
Drawing Major Elements: Towers, Door, and Walls
Step three expands the left side with battlements atop the initial rectangle. I then construct another tower using rectangle and triangle forms for architectural balance.
On the far right, I add a rectangular section with defensive battlements. This creates symmetrical weight distribution across the composition.
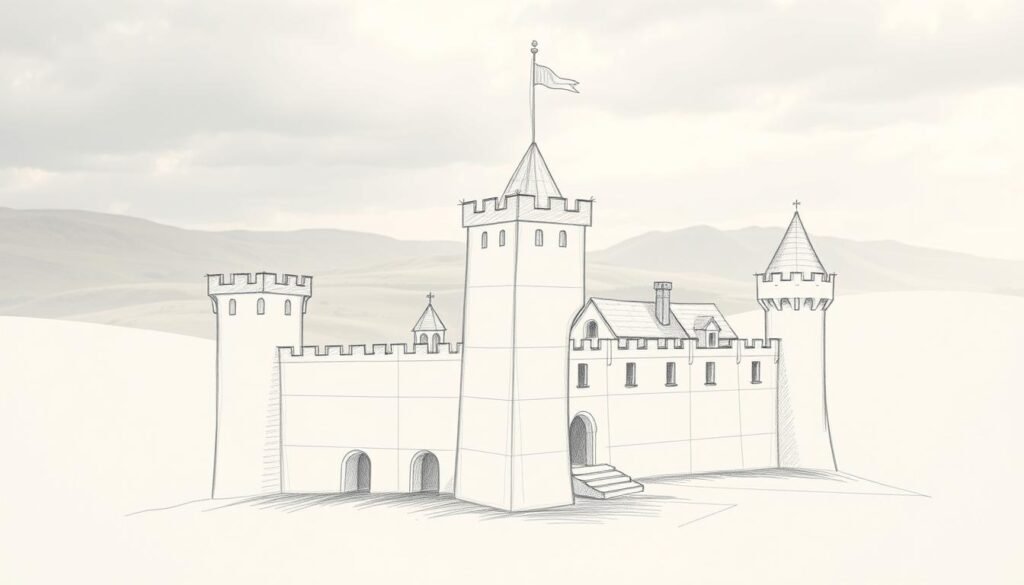
Step four introduces the two tallest towers that dominate the skyline. I position one directly above the doorway, extending upward with a pointed triangle top.
The second tower sits slightly behind the first, creating depth through strategic layering. Both structures use the same rectangle-and-triangle technique for consistency.
Detailing with Brick Patterns, Windows, and Flags
Step five brings texture to the surfaces with scattered rectangular brick patterns. I avoid drawing every stone, instead suggesting masonry with selective placement.
Window openings appear as simple arcs with flat ledges beneath them. I position these at varying heights on towers and walls for visual interest.
The final touches include horizontal lines inside the door shape for plank details. Wavy flags atop the tallest towers inject movement and personality into the fortress.
By step seven, the structure stands complete with clear edge definition across all parts. The castle now awaits shading or coloring treatments.
Integrating Design Inspirations and Reference Techniques

The magic in a castle illustration often comes from the careful fusion of real-world reference and stylistic flair. My design process deliberately blends historical architecture with fantastical elements. This way of working creates artwork that feels both believable and enchanting.
Infusing a Disney-Feel through Smooth Curves and Shapes
I incorporate a distinct Disney aesthetic by prioritizing graceful, flowing lines. Towers feature elegant, tapering shapes instead of rigid geometric forms. This approach softens the structure and injects a storybook quality.
Curved rooflines and wavy flags are key details I study from animated castles. These elements introduce movement and personality. The overall design maintains a playful, inviting feel.
Studying this reference material is not about copying. It is about understanding the way proportions are slightly exaggerated for appeal. My drawing benefits from these inspired choices.
Using Neuschwanstein Castle as a Creative Reference
For architectural authenticity, I turn to landmarks like Neuschwanstein Castle. This real-world reference provides a foundation in genuine proportions and details. It teaches the relationship between tower heights, wall thickness, and decorative elements.
Analyzing such castles informs my design decisions, ensuring structural logic. The romantic spires and intricate features of Neuschwanstein are a perfect starting point. I then interpret these elements with a more fantastical touch.
| Reference Source | Key Contribution | Application in My Work |
|---|---|---|
| Disney Castle Aesthetic | Whimsical curves, exaggerated proportions | Softening lines, adding playful details |
| Neuschwanstein Castle | Authentic architectural logic and scale | Establishing believable proportions and structure |
| Personal Synthesis | Blending realism and fantasy | Creating a unique, enchanting final castle illustration |
This dual reference strategy is central to my creative process. For more castle illustration inspirations, exploring diverse styles is invaluable. The final design stands on a foundation of study and imaginative interpretation.
Finishing Touches: Shading, Textures, and Final Art Details

My artistic process culminates in the application of textures and atmospheric details that give the fortress its character. This final part of my tutorial transforms the basic outline into dimensional art.
I establish a consistent light source first. The sides of towers facing away receive darker tones. This creates depth and makes the structure appear solid.
For wall textures, I use varied pencil strokes. These suggest rough stone surfaces without drawing every brick. The approach saves time while achieving realistic results.
| Finishing Technique | Application Area | Visual Impact | Tool Recommendation |
|---|---|---|---|
| Gradual Shading | Tower sides, recessed areas | Creates three-dimensional form | 2B-4B pencils |
| Texture Strokes | Wall surfaces, stone patterns | Adds realism and tactile quality | Sharp HB pencil |
| Highlight Emphasis | Top sections, raised elements | Enhances light source effect | Kneaded eraser |
| Environmental Framing | Base surroundings, foreground | Grounds the structure in space | Various pencil grades |
I add simple trees around the base. These environmental elements frame the architecture beautifully. The trees don’t need complex details—basic shapes with textured foliage work perfectly.
The top portions of towers receive careful attention. I ensure flags and battlements have crisp edges. This refinement phase brings clarity to the entire composition.
This final part of the process allows personal style to emerge. For more inspiration on completing fantasy architecture, check out my advanced shading techniques. These finishing details elevate the sketch into a complete artistic statement.
Conclusion
Seeing your completed fortress artwork emerge from simple geometric forms is a rewarding creative experience. This systematic method proves that impressive results come from following clear, progressive steps.
Your finished castle demonstrates how foundational shapes build into complex architectural details. The way this tutorial structures the process ensures success for artists at any level.
I encourage you to revisit these steps multiple times. Each new castle drawing will strengthen your skills and boost confidence. Take time to experiment with different designs and personal touches.
This foundation opens doors to endless creative possibilities. Your artistic journey has just begun with this significant achievement.


