

Did you know the directors of How to Train Your Dragon were so meticulous that they created a rule: a wet dragon head can’t light its fire? This attention to detail is what makes Toothless, the last known Night Fury, such an unforgettable character.
His unique design, from dark grey scales to expressive green eyes, presents a fantastic artistic challenge. This comprehensive guide is designed to help you capture his likeness, whether you’re a beginner or an experienced artist.
We will break down his iconic features, like bat-like wings and a fishtail-shaped tail. You’ll learn to construct his form using basic shapes, mastering proportions and injecting personality into your artwork.
This tutorial is structured to build your skills progressively. For a deeper dive into the process, explore our detailed how to draw toothless resource. Let’s begin this creative journey to bring the king of dragons to life on your page.
Key Takeaways
- Toothless is a beloved character from How to Train Your Dragon with a very distinct and memorable design.
- This guide focuses on fundamental artistic principles like shape construction and proportion.
- The tutorial is structured to be accessible for artists of all skill levels.
- You will learn to capture Toothless’s unique personality, not just his physical appearance.
- Mastering this dragon can improve your overall drawing skills.
Introduction and Drawing Fundamentals
The Night Fury dragon represents one of animation’s most beloved character designs. As Hiccup’s loyal companion in the How to Train Your Dragon franchise, this creature ended the war between Vikings and dragons. His status as the last of his species adds depth to his portrayal.how-to-get-better-at-drawing
Who is Toothless? Exploring the Iconic Dragon
This character’s physicality combines several distinctive elements. His dark grey body features large green eyes that convey remarkable emotion. The bat-like wings show detailed membrane structures, while his namesake retractable teeth add unique character.
Understanding these features helps create an authentic representation. The fishtail-shaped tail completes his recognizable silhouette.
Basic Shapes, Proportions, and the Art of Outlining
Breaking down complex forms into simple shapes is essential for accurate depiction. Circles form the foundation for the head, while elongated ovals create the body structure. Smaller ovals establish leg placement.
Proper proportions ensure recognizable results. The relationship between head size and body length matters significantly. Wing positioning relative to the torso creates balanced composition.
Starting with light guide lines establishes correct proportions before finalizing details. Facial guide lines (vertical and horizontal crosses) position eyes and features symmetrically. This approach creates a solid foundation for advanced techniques.
Understanding draconic anatomy—from wing membranes to scale patterns—enhances believability. These fundamentals apply whether creating cartoon interpretations or realistic renderings.
Preparing Your Drawing Materials

Your artistic journey begins with the fundamentals: selecting the proper pencil and creating an ideal workspace. Having the right supplies saves time and frustration, allowing you to focus on technique. This guide ensures you have everything required for this creative step.
Essential Tools: Pencils, Erasers, and More
A range of graphite pencils is crucial for a detailed drawing. Each grade serves a specific purpose, from light sketching to deep shadows.
Softer pencils create darker, richer tones. This is perfect for capturing the dark scales of your subject.
| Pencil Grade | Hardness/Softness | Primary Use |
|---|---|---|
| 5H | Very Hard | Light, erasable guide lines |
| HB | Medium | General sketching and medium tones |
| 2B – 4B | Soft | Core shading and darker values |
| 5B – 8B | Very Soft | Deepest shadows and black accents |
Beyond the pencil, other tools are vital. A kneaded eraser lifts graphite for highlights. A blending stump smooths shades for a professional finish.
A sharpener maintains fine points for details like scales. A simple tip: printer paper works well for practice.how-to-draw-a-labubu
Setting Up Your Workspace for Success
An organized space enhances your workflow. Ensure you have good, direct light on your paper. This prevents eye strain and helps you see subtle details.
Keep your tools within easy reach. Position your reference image where you can see it clearly. Give yourself enough uninterrupted time to work through each stage without rushing.
How to Draw Toothless

Now we reach the core of our artistic mission. I will present two distinct paths for your creative journey. Choose the method that best matches your skill level and desired outcome.
Method 1: Cartoon Style Drawing Approach
This first method is perfect for beginners. It focuses on creating a friendly, expressive version of the character. We use simple shapes to build the form.
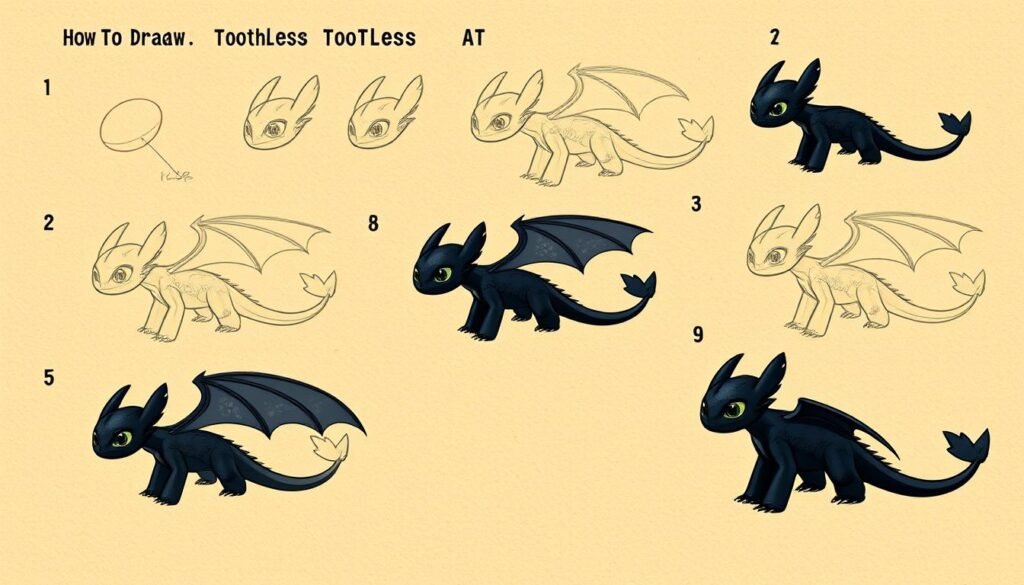
Start with a medium circle near the top of your paper for the head. Add a stretched, vertical egg-shaped oval that intersects the circle to form the body. This is your foundational step.
Next, construct the legs using small egg-shaped ovals at the base of the larger body oval. Add facial guide lines with a simple cross pattern. This helps place the eyes and nose accurately for this cartoon style.
Define the character’s big ears and horns. Create a lizard scale impression with dashed lines from the forehead back. Outline the bat-like folded wings and trace the legs with sharp claws.
Finally, erase your construction lines. Prepare for the final stage where you will color the entire form dark grey. For more step-by-step details, this drawing tutorial is an excellent resource.
Method 2: Realistic Detail and Scale Techniques
The second approach is for artists seeking a lifelike representation. It emphasizes texture, anatomical accuracy, and detailed scales.
Begin by positioning a large horizontal oval for the head. Sketch a larger diagonal oval intersecting it to create the body. Use a light 5H pencil for these initial contours.
Draw pine-nut shaped ovals for the legs. Sketch guide lines for the wings and the protruding tail with its fishtail-shaped tip.
Switch to a sharper pencil to add realistic details. Draw scales on the temples and paws. Thicken the wing membrane veins with a 3B pencil. Define the facial features and a subtle smile.
The final step is to carefully erase all construction lines. Your detailed outline is now ready for advanced shading and coloring techniques.
Advanced Techniques and Tips for Dragon Drawings

Professional dragon illustrations achieve their stunning realism through carefully layered techniques that build upon fundamental skills. These methods transform basic outlines into dynamic, three-dimensional representations.
Adding Textures, Shading, and Dynamic Lines
Strategic shading creates depth and form in your artwork. Begin with even hatching across the dragon’s body using an HB pencil. Smooth these strokes with a blending stump for uniform tones.
Darken specific areas to enhance dimensionality. Use an 8B pencil for the darkest shadows like the mouth. Apply a 5B pencil along wing membrane veins for mid-tone contrast.how-to-draw-a-rainbow
| Pencil Grade | Application Area | Visual Effect |
|---|---|---|
| HB | Base body shading | Uniform mid-tones |
| 5B | Wing veins, scale details | Medium shadows |
| 8B | Mouth, deep shadows | Maximum contrast |
Coloring, Highlights, and Enhancing the Lizard Scale Effect
Create realistic scale texture using dashed lines on the head and body. Vary your line weight to suggest different surface textures. Thicker lines work well for shadowed areas.
Establish a consistent light source before adding color. Highlight areas closest to the light with lighter tones. This approach works for various dragon drawing styles.
Common Mistakes and Practical Tips from Experienced Artists
Avoid proportion errors by carefully measuring head-to-body ratios. Take your time with each step rather than rushing. Testing color shades on scrap paper prevents unwanted results on your final piece.
Remember that practice develops confidence. Each attempt reveals new details about character proportions and personality expression.
Conclusion
Every completed artwork represents a significant milestone in an artist’s ongoing development. You now possess two distinct methods for capturing this beloved character’s essence.
The fundamental techniques you’ve practiced—shape construction, proportion mastery, and texture rendering—apply to countless fantasy creatures. These skills form a solid foundation for expanding your artistic repertoire.
Remember that consistent practice is the essential policy for improvement. Many people find their initial attempts challenging, but each session builds confidence. Even professional artists continue refining their approach with every new dragon creation.
Consider exploring different poses or characters from the How to Train Your Dragon universe. Sharing your work with fellow artists provides valuable feedback and inspiration.
Your creative journey has taken an important step forward. Embrace the process, and continue developing your unique artistic voice.how-to-how-to-draw-a-unicorn


