

Did you know that over 85% of aspiring artists cite the human form as their biggest challenge? Capturing the male figure, with its distinct proportions and structure, often feels like a monumental task.
Many creative individuals passionate about art find mastering this skill essential. I understand the hesitation. The intricate physical features can seem overwhelming at first glance.
This guide is designed to change that perspective. I will break down the entire process into simple, manageable steps. You will learn that creating a realistic male form is more accessible than you might think.
We will start with basic wireframe techniques to build a solid foundation. Then, we will move on to accurate proportions and defining facial features. Finally, we will add those finishing details that bring your character art to life.
My approach focuses on transforming complex anatomy into easy-to-understand shapes. This method makes the tutorial suitable for beginners, yet it offers valuable insights for those looking to refine their technique. With some practice and patience, you can master this fundamental aspect of art.
Key Takeaways
- Mastering the male figure is a fundamental skill for character art and figure drawing.
- The process can be simplified by breaking down complex anatomy into basic shapes.
- This tutorial uses a step-by-step approach, starting with a wireframe foundation.
- Learning accurate proportions is key to creating a realistic-looking man.
- The guide is designed for beginners but offers value for artists at any level.
- Practice and patience are essential for developing this artistic skill.
Introduction to Figure Drawing for Men
Artistic representation of men hinges on a clear understanding of proportions and angles not found in female figures. The male body typically features a broader shoulder structure and a more angular silhouette overall.how-to-draw-a-bear
Key details like the Adam’s apple and the potential for facial hair are essential visual markers. Even subtler aspects, such as thicker eyebrows and a more defined jawline, contribute significantly to a masculine appearance.
Historical art provides a powerful foundation for this study. Masterpieces like Michelangelo’s David exemplify the classical pursuit of capturing idealized male beauty through careful attention to anatomy and proportions.
Grasping these foundational concepts is the first step toward creating compelling art. This knowledge prepares you for the practical techniques of drawing the male figure that follow. Understanding the “why” behind the shapes makes the “how” of sketching much more intuitive.
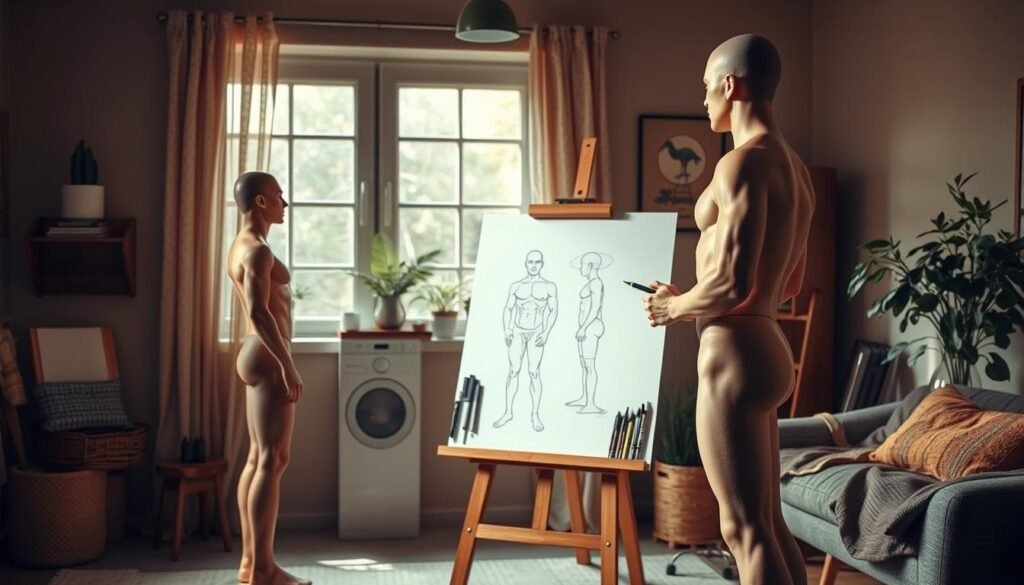
how to draw a man – A Step-by-Step Starting Point

Every successful artistic creation begins with a solid foundation, and for figure work, that foundation is preparation. This initial phase involves gathering your tools and establishing a guide on your paper.
Proper setup prevents common frustrations and allows you to focus on the creative process. I will guide you through these essential first steps.how-to-draw-hair
Understanding the Basic Wireframe
Think of the wireframe as the skeleton of your artwork. This simple stick figure approach breaks down complex human anatomy into manageable lines and shapes.
It serves as a flexible guide for proportions before you add detail. You can easily adjust this foundation to ensure your figure looks balanced and natural.
One excellent exercise for developing this skill is blind contour drawing. This technique trains your eye to communicate directly with your hand, improving coordination.
Setting Up Your Paper and Tools
Begin with a clean sheet of paper and a sharp pencil. Having an eraser and sharpener nearby is crucial for a smooth workflow.
The first marks on your paper are critical reference lines. Draw a light vertical line intersecting a horizontal line across the center of your page.how-to-draw-a-car
Position the head outline on the vertical section above the horizontal line. Starting at the upper part of the paper guarantees enough space for the entire standing figure.
Essential Drawing Tools Comparison
| Tool | Primary Use | Recommendation for Beginners |
|---|---|---|
| Pencil | Creating initial lines and shading | HB or 2B grade for versatility |
| Paper | Drawing surface | Medium-weight sketch paper |
| Eraser | Correcting mistakes | Kneaded eraser for gentle lifting |
| Sharpener | Maintaining a fine point | Hand-crank sharpener for control |
Building the Wireframe and Basic Shapes

Transforming a blank page into a dynamic figure begins with a skeleton of basic shapes and guiding lines. This foundational stage establishes proportion, posture, and balance for the entire character. I focus on constructing this framework using simple geometric forms.how-to-draw-a-star
Sketching the Stick Figure and Guidelines
Start with an oval for the head, making the top and bottom slightly flat. Place this outline in the upper portion of your paper. This shape forms the core of the character’s identity.
Directly underneath, sketch an oval for the torso. Connect it to the head with short lines for the neck. For the hips, use a rounded square shape. This combination creates the central mass of the body.
Next, use simple lines to represent the arms and legs. Attach the arms directly to the torso with parallel angled lines. These sticks define the pose and limb direction before adding volume.
For a cartoonish style, keep all shapes and angles soft and round. A realistic approach benefits from more angular forms. Remember, arm length should reach approximately mid-thigh when the figure is standing.
This wireframe stage is meant to be loose and adjustable. Make corrections now rather than after adding detailed features. Lightly sketch guidelines that will help position facial features and body details accurately in later steps.
Detailing the Head and Facial Features

The face serves as the emotional centerpiece of any character illustration. Proper construction begins with strategic guideline placement that ensures balanced proportions.how-to-draw-a-turkey
Start with a circular shape for the head foundation. Intersect this with a horizontal line across the middle for eye positioning and a vertical line down the center for nasal alignment.
Creating the Head, Eyes, and Nose
Position oval shapes overlapping the horizontal guide to form the eyes. Add curved lines above each for eyelids. Use bold, curved strokes to create characteristically thick eyebrows.
Follow the vertical line to construct the nasal structure. An “L”-shaped curved line provides a simple yet effective foundation. This technique works for both cartoon and realistic styles.
Defining the Mouth, Ears, and Expression
Create the mouth using a long curved line with short extensions at each end. Adjust this curve to vary expressions from neutral to smiling. The ears appear as semicircles on each side of the head.
Perspective affects ear visibility—the far ear appears less prominent when the head turns. Add internal curved lines to suggest realistic ear details without complexity.
For dynamic eyes, place small circles within each oval as highlights. Shade the remaining eye area to create depth. These subtle details transform static features into expressive elements.
Constructing the Body, Arms, and Legs

The human form’s complexity becomes manageable when you systematically build the body from the neck down. This stage focuses on translating the wireframe into a solid, proportional figure with realistic details.
I begin by extending two lines downward from the head to form the neck. At the base, a pair of parallel curved lines connected at the ends creates the shirt’s collar.how-to-draw-a-bird
Outlining the Torso and Shoulders
Long, curved lines extend from the collar to form the shoulders. I emphasize angular lines here to suggest the underlying trapezius muscles and collar bone. This creates the characteristically broad shoulder structure.
Next, I use curved lines to outline the rectangular shape of the torso. A narrow, curved rectangle below indicates the shirt’s hem. Contour lines suggest fabric folds, adding realism to the clothing.
Drawing Limbs with Accurate Proportions
For the arms, I sketch pairs of curved lines. In a crossed position, hands and fingers are partially hidden, outlined with simple curves. Contouring the underarm area defines the shirt’s fit.
The legs are formed with parallel lines that curve slightly outward for a natural look. A short horizontal line at the bottom of each leg completes the pants. Overlapping lines at the bottom suggest fabric folds.
Essential Body Proportion Guidelines
| Body Part | Proportional Relationship | Key Consideration |
|---|---|---|
| Arms | Length should reach approximately mid-thigh. | Ensure natural hanging position or dynamic pose. |
| Legs | Length is roughly equal to head and torso combined. | Curve lines outward slightly for a realistic structure. |
| Hands | Size should be proportional to the face. | Use simple curves for fingers in complex poses. |
Adding Clothes, Hair, and Unique Character Details

Personalizing your figure with clothing and hair details completes the transformation from anatomy study to character art. These elements communicate personality and background without a single word.how-to-draw-a-cow
I begin with the clothing framework. For the shirt, I add a collar using curved lines and define the hem. Pockets on pants get outlined with gentle curves, while a small rectangle indicates the fly.
Framing the Clothing and Accessories
Shoes require careful attention. I outline the tongue, body, and sole using flowing curves. Short lines across the tongue create realistic laces. These details ground your character in their environment.
Clothing choices reveal personality. A graphic tee suggests casual style, while formal wear communicates professionalism. Every element should feel intentional.
The right accessories can tell a complete story about who your character is and what they value.
Clothing Style Comparison
| Style | Key Features | Character Impression |
|---|---|---|
| Casual | T-shirt, jeans, sneakers | Approachable, relaxed |
| Formal | Dress shirt, slacks, leather shoes | Professional, sophisticated |
| Active | Athletic wear, trainers | Energetic, sporty |
Infusing Personality with Hair and Facial Details
The hair starts from the top of the ears. I use overlapping curved lines that meet at points to form natural locks. Thick, pointed clumps add texture and movement.
For facial features, consider adding a beard or mustache to enhance the character’s age or style. The nose and other features can be refined with subtle shading.
Different poses affect how hair falls around the face. Study reference images to understand natural movement patterns. This attention to details makes your artwork believable.
Remember that consistency matters across all elements. Balance the level of detail between clothing, hair, and accessories. For more advanced techniques, explore this comprehensive character design guide.
Techniques, Tips, and Troubleshooting in Figure Drawing

Refining your artistic skills involves targeted practice and learning to overcome common hurdles. This section focuses on methods to enhance accuracy and develop your unique style.how-to-draw-godzilla
One powerful exercise is the warm-up pose. Set a timer for 30 to 60 seconds per pose. This forces you to capture essential gestures and proportions quickly, without overthinking details.
Repetitive practice builds muscle memory. It trains your eye and hand to work together efficiently. This foundation makes subsequent, more detailed work flow much easier.
Improving Proportions and Refining Details
Always begin with basic lines and shapes. A rough stick figure is the best first step. It allows you to visualize the entire character and correct any proportion issues early.
Using references is crucial. Look at photographs of people in a similar pose. Even for cartoon styles, real-life observation ensures believable proportions.
Struggling is a normal part of the artistic process. Every artist encounters challenges. Persistence and consistent practice are the true keys to improvement.how-to-draw-a-raccoon
For creative expansion, try altering the pose or facial expression. Add other characters or a background to build a complete scene. This guide is your starting point for ongoing development in your art.
Conclusion
Mastering figure construction opens doors to endless creative storytelling possibilities. You have progressed from basic wireframe to detailed character art through this comprehensive tutorial.
Celebrate your accomplishment! Share your finished picture on social media to build confidence and receive valuable feedback. Remember the skin tone formula: mix red, yellow, brown, and white in varying proportions.
This guide provides a solid foundation for continued growth. Practice different poses and settings to develop your unique style. Return to this page whenever you need a refresher on these fundamental steps.
Your artistic journey has just begun. With consistent practice, you will create increasingly sophisticated artwork featuring diverse people and charactershow-toraw-a-monster


