

Drawing realistic lips can seem tough, but it’s easier with the right techniques and tools. In this guide, I’ll show you how to make beautiful, lifelike lips in your art.
Knowing lip anatomy is key to drawing stunning lips. By learning the structure and proportions, you can make your lips look more real and appealing. For more details on techniques and tools, check out my previous article on drawing lips.
Key Takeaways
- Understand the anatomy of the lips to draw them more realistically
- Use the right drawing tools, such as soft pencils and erasers, to achieve the desired effect
- Apply shading techniques to create depth and dimension
- Smudging can help achieve soft, blended gradations
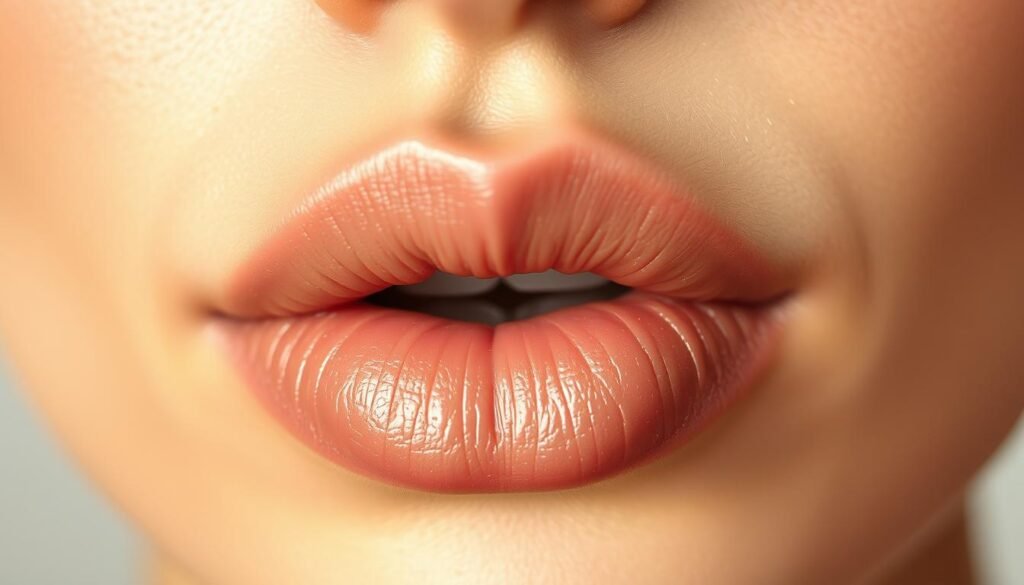
- Pay attention to the darkest areas, such as the corners and the area below the bottom lip
Understanding Lip Anatomy
To draw amazing lips, you need to know their structure. It’s important to understand how lips are made and how they differ for everyone.
Lips are complex, made of skin, muscles, and mucous membranes. The top and bottom lips have unique features that shape their look.
The Structure of the Lips
The lips have several layers, including outer skin, muscles, and inner mucous membrane. The orbicularis oris muscle is key in lip movement and shape. Knowing how this muscle works with the skin and mucous membrane is crucial for realistic lip drawings.
Common Shapes and Variations
Lips vary in shape and size, and knowing these differences is key. Some common types include:
- Thin lips
- Full lips
- Lips with a pronounced Cupid’s bow
- Lips with a less defined shape
By studying these variations, you can draw more realistic and diverse lips.
Learning to notice and draw these lip differences takes time. It requires practice and patience.
Essential Drawing Tools
Having the right tools is key to making your lip artwork look real and engaging. The quality of your drawings really depends on the tools you choose.

To get the details and texture right in your lip drawings, you’ll need some important tools. You’ll need pencils, erasers, and the right paper.
Recommended Pencils and Erasers
For lip drawings, you need different pencils to get the shading and texture right. I suggest using a set of graphite pencils that includes:
- HB Pencils for general sketching and outlining
- 2B-6B Pencils for shading and creating depth
Erasers are also crucial for fixing mistakes and adding highlights. A kneaded eraser is great because it can be shaped to erase small spots.
Types of Paper for Practice
The paper you use can really change how your drawings look. For lip drawings, I suggest using paper that is:
- Smooth to help with fine details
- Toothsome for better shading and texture
Good options include cartridge paper and sketchbook paper with at least 80 gsm.
By getting these essential tools, you’ll be ready to create amazing lip drawings. Your skill and creativity will shine through.
Sketching the Basic Outline
A well-crafted outline is key to a realistic lip drawing. It’s important to break down the lips into their basic parts.
Starting with Simple Shapes
Start by sketching simple shapes for the lips’ structure. This method ensures accurate and proportional drawings. Using simple shapes like circles, triangles, or curves helps map the lip area well.
Defining the Upper and Lower Lips
After the basic shape, focus on the upper and lower lips. The upper lip has a more defined curve, known as the Cupid’s bow. The lower lip is usually fuller. These details make your lip drawing more realistic and appealing.
To improve your sketch, pay attention to the lip proportions and contours. With practice, you’ll get better at capturing the lip’s essence with confidence.
Adding Detail to the Lips
Adding detail to the lips is key to making a drawing look real and interesting. It’s important to focus on the small features that make the lips unique.
The philtrum, the groove between the nose and the upper lip, is very important. Getting this detail right is crucial for a realistic drawing.
Focus on the Philtrum
The philtrum’s shape and depth can change a lot from person to person. To draw it well, watch how it fits with the rest of the face. Paying attention to its shape and how it meets the Cupid’s bow adds depth to your drawing.
Capturing the Cupid’s Bow
The Cupid’s bow, the curved shape of the upper lip, is also very important. Its peaks and troughs need to be carefully drawn to show the lips’ unique character. The way you draw the Cupid’s bow can greatly affect the lips’ expression and realism.
By paying attention to these details, you can make your lip drawings more than just simple pictures. They can become detailed and engaging artworks.
Shading Techniques for Depth
Shading techniques are key to making your lip drawings look three-dimensional. Learning these techniques helps add depth and dimension. This makes your artwork more realistic and engaging.
Understanding light and shadow is crucial. Light sources greatly impact how your subject looks. Capturing the light and shadow play is essential for a convincing lip representation.
Light and Shadow Fundamentals
Knowing how light interacts with the lips is vital. The shape and volume of the lips are defined by light. This creates highlights and shadows.
- Identify the light source in your drawing to determine where highlights and shadows will fall.
- Observe how the light source affects the lips, creating areas of brightness and darkness.
- Use a range of shading techniques to capture the subtleties of light and shadow on the lips.

Using Blending Tools Effectively
Blending tools, like blending stumps or tortillon, help with smooth transitions. They create a more realistic and nuanced lip representation. For more on drawing realistic lips, check out this guide.
To use blending tools effectively:
- Start by applying a base layer of shading to the lips.
- Use a blending tool to gently smooth out the shading, creating a gradual transition between shades.
- Repeat the process, building up layers of shading and blending to achieve the desired level of depth and dimension.
By mastering shading techniques and using blending tools effectively, you can create stunning lip drawings. These drawings capture the subtleties of light and shadow beautifully.
Color Theory for Lips
Understanding color theory is key for drawing lips that pop. The right color can turn a dull drawing into a lively one. It’s all about capturing the essence of lips.

Choosing the Right Shades
Choosing the right shades is crucial for lip drawings. You need to observe the natural lip colors and use them in your art. Lips come in many shades, from deep reds and pinks to soft flesh tones.
Consider the skin tone of your subject when picking shades. Cooler skin tones look great with blue-based reds, while warmer skin tones do well with yellow-based reds. Try out different shades to find the perfect one.
Mixing Colors for Realism
Mixing colors is an art, and it’s essential for lip drawings. Start with a base color that matches the lip tone. Then, add layers of different shades to add depth.
Adding a bit of the complementary color to shadows can make them look more realistic. For example, adding green to red lips can make them stand out.
Mastering color choice and mixing can elevate your lip drawings. They’ll become more engaging and visually stunning.
Creating Gloss and Shine
Getting the gloss and shine right is key to drawing realistic lips. It’s important to know how to add highlights and use white for depth. This makes your artwork look more realistic.
Let’s look at some highlighting techniques for a glossy look. Highlights are usually on the upper lip, like the Cupid’s bow, and on the lower lip. This is where light naturally hits.
Highlighting Techniques
- Find the light source in your drawing to know where to place highlights.
- Use a sharp pencil or fine-tip marker for precise highlights.
- Apply gentle pressure to avoid damaging the paper or creating texture.
For more detailed guidance on drawing techniques, check out Lemon8 App. It has great resources for artists.
Using White for Effect
White or light-colored pencils and markers can really make your lips look glossy. White gel pens are great for sharp, bright highlights.
Here are some tips for using white effectively:
- Layer your colors carefully to keep the white vibrant.
- Blend the edges of white highlights with the colors around for a smooth look.
- Try different white shades or textures to get the gloss you want.

Mastering these techniques will make your lip drawings look more realistic and sophisticated. They’ll be more engaging and visually appealing.
Practicing Different Lip Styles
The art of drawing lips is diverse, and trying different styles is crucial. It helps you find your unique voice. By exploring various lip styles, you can improve your artistic skills and build a varied portfolio.

Natural vs. Dramatic Lips
Lip styles mainly fall into two categories: natural and dramatic. Natural lips have soft contours and subtle shading, aiming for a realistic look. Dramatic lips, on the other hand, are bold and colorful, used to express strong emotions.
To draw natural lips, use soft curves and gentle color gradations. For dramatic lips, bold strokes and bright shading are key. For more on drawing lips, check out this tutorial.
Stylized Designs and Their Appeal
Stylized lip designs let artists be creative and unique. These can range from simple outlines to detailed, decorative styles. They are loved for showing off personality and creativity.
Practicing stylized lip designs helps you create your own style. It’s about finding your way, whether you aim for realism or something more abstract. The key is to keep practicing and be open to trying new things.
Observation and Reference
As an artist, I’ve learned that observing and using references are key to drawing lips well. By watching the shape, texture, and color of lips, you can make your drawings more lifelike and detailed.
Using photos as guides is a great way to get better at drawing lips. Photos show the structure and look of lips from different angles and lights. Choose photos that are clear and detailed to help you capture the subtleties of lips.
Using Photos as Guides
When using photos, focus on the shape and size of the lips. See how light affects the lips, creating highlights and shadows. This helps you decide on shading and colors for your drawings.
Collect photos of different lip styles, shapes, and expressions. This helps you understand lip anatomy better. It lets you draw lips in many situations.
Studying Real-Life Lips
Looking at real lips can also teach you a lot. Watch how lips change when someone speaks or shows emotions. Notice the small differences in color and texture that make your drawings more interesting.
Study lips in different settings and lights. This helps you understand how lips interact with their surroundings. It also helps you draw these interactions better.
| Observation Techniques | Benefits for Lip Drawing |
|---|---|
| Using photos as guides | Provides detailed look at lip structure and characteristics |
| Studying real-life lips | Offers insights into lip movement and expression |
| Combining both techniques | Enhances overall understanding and drawing accuracy |
By using both observation and reference, you can make your lip drawings more accurate and realistic. Whether you’re drawing from photos or observing real lips, the key is to be patient, persistent, and detailed.
Common Mistakes to Avoid
When drawing lips, knowing common mistakes is key. Lips are a face’s defining feature. Their accurate drawing can greatly improve a portrait’s quality.
Creating believable lips means avoiding two big errors. These are overemphasizing details and ignoring proportions and symmetry.
Overemphasizing Details
One mistake is focusing too much on lip details. This can make lips look unnatural or cartoonish.
- Avoid sharp lines for lip contours.
- Don’t overdo shading; too dark can look wrong.
- Keep lip texture subtle; avoid too much detail.
Proportions and Symmetry Issues
Getting the proportions and symmetry right is also crucial. Wrong proportions can make lips look off-balance.
- Make sure upper and lower lips match.
- Check symmetry around the Cupid’s bow and lower lip curve.
- Use reference images for accuracy.
By avoiding these mistakes, you can improve your lip drawing skills. This will make your drawings more realistic and appealing.
Advanced Lip Drawing Techniques
Improving lip drawings means diving into advanced techniques. This includes using digital tools and mixed media. Artists always seek to improve their skills and explore new possibilities.
Digital tools have greatly changed drawing. They offer precision and flexibility. This makes it easier to create detailed and realistic lip drawings.
Using Digital Tools for Precision
Digital drawing software has many benefits. It lets artists undo and redo strokes easily, work with layers, and achieve high detail. Adobe Photoshop and Procreate are popular tools with various brushes and features.
When drawing lips digitally, it’s key to use tools well. A graphics tablet can help with expressive line work and precise strokes.
Exploring Mixed Media Approaches
Mixed media offers a new way to create interesting lip drawings. Combining traditional and digital methods can add depth and interest.
For example, start with a pencil sketch and then add digital colors or shading. This contrast can make your work stand out. Try using watercolors, pastels, or collage to add more depth.
The secret to mastering advanced lip drawing is to keep exploring. Always practice and try new tools and methods.
Experimenting with Expressions
To draw stunning lips, you need to grasp the subtleties of different lip expressions. These expressions are key to showing emotions in art. They are essential for artists to master.
Exploring lip drawing, trying out various expressions can add depth to your artwork. The secret to realistic lip expressions is understanding human emotions and how they change the lips’ shape.
Happy vs. Sad Lips
The difference between happy and sad lips is in their curve and tension. Happy lips curve up, showing a relaxed smile. Sad lips droop down, showing sadness or sorrow.
Seeing these differences helps you draw emotions well. Happy lips show a relaxed face, while sad lips show a tense face.
Lips in Motion
Showing lips in motion is a challenge. It needs to show the lips’ movement while keeping the drawing real. Lips can show many things, from small smiles to big laughs or speech.
To draw lips moving well, you must study how lips change shape in different expressions. Watch how they curl, stretch, or compress. See how these changes affect the face.
Artist and instructor says, “Knowing how lips move is key to realistic expressions.”
“The lips are one of the most expressive features of the face, and mastering their movement can elevate your artwork to new heights.”
Gathering Feedback on Your Work
Getting feedback is key in my artistic journey. It helps me improve my lip drawings. I’ve learned that feedback is vital for spotting areas to get better.
Joining art communities is a great way to get feedback. These groups let artists share their work and get critiques. I connect with others through online forums, social media, or local clubs. They offer valuable insights into my art.
Joining Art Communities
Being part of art communities has changed my game. I share my work and get feedback. I also see how others create, which inspires me.
- I connect with artists who know the ups and downs of art.
- I get to participate in critiques and get feedback on my work.
- I see different styles and techniques that spark new ideas.
Seeking Constructive Criticism
Constructive criticism is what really helps me grow. I look for feedback that is specific, objective, and actionable. This kind of feedback helps me pinpoint areas to improve and make changes.
To make the most of constructive criticism, I:
- Stay open to feedback, even if it’s hard to hear.
- Ask specific questions to get detailed feedback.
- Use the feedback to improve my technique.
By joining art communities and seeking constructive criticism, I keep improving. It takes patience, humility, and a desire to learn. But the results are worth it.
Continuing Education in Lip Drawing
Continuing education is key for artists to improve and stay inspired. The art world changes, and artists must keep up with new techniques and trends. This is crucial for drawing amazing lips.
Online Courses and Workshops
Online courses and workshops are great for learning lip drawing. They offer flexibility, a variety of teaching styles, and lessons from experts. I find online learning comfortable, allowing me to practice at my own speed.
Popular online platforms, like tutorials on lip drawing techniques, are very helpful. They offer new insights and skills to improve your art.
Recommended Books for Artists
Recommended books are also valuable for artists. They provide deep knowledge and can be a reference for years. Look for books on realism, anatomy, and technique.
- Step-by-step guides in books are very useful.
- Books by famous artists offer insights into different styles and techniques.
By using online courses, workshops, and recommended books, artists can make a detailed learning plan. This plan supports their growth and development in lip drawing.
Building a Portfolio of Lip Drawings
As I work on improving my lip drawing skills, I see how crucial it is to show my best work. A well-made portfolio not only shows my talent but also brings new chances my way.
Curating Your Best Lip Drawings
To make a strong portfolio, I pick a variety of lip drawings. I aim to show my skill in capturing different lip shapes, expressions, and textures. This makes my portfolio interesting and true to my artistic talent.
Displaying Art Professionally
When I display my lip drawings, I think about the look and feel of my portfolio. I make sure it’s clean and the images are top-notch. This way, I create a professional look that showcases my art well and makes a strong impression.


