

Did you know drawing can help reduce stress and boost your brain? Drawing a fish is one of the easiest and most fun things to do. With a basic understanding of fish anatomy and the right tools, anyone can draw a fish.
I’ll show you simple steps to start drawing. Knowing the basic shape of a fish and where its fins and scales are is key. You can check out a step-by-step guide on how to draw for more details.
By following these easy steps and practicing often, you’ll make beautiful fish drawings. Let’s explore the world of drawing together.
Key Takeaways
- Understand the basic anatomy of a fish
- Learn the simple steps to draw a fish
- Practice regularly to improve your drawing skills
- Use the right tools for drawing
- Refer to step-by-step guides for detailed instructions
Understanding Fish Anatomy
To draw a fish well, knowing its anatomy is key. Fish vary in shape and size but share common features. These are important for artists to learn.
Key Features of Fish
Key fish features include their body shape, fins, and scales. Body shapes differ, from sleek for fast swimmers to round for slow ones.
Fish have various fins like dorsal, anal, and caudal fins. These fins help with movement and balance. Scales protect and reduce friction when swimming.
Common Types of Fish
Many fish types exist, each with its own traits. Common ones are salmon, tuna, and goldfish. Knowing these helps artists draw each type accurately.
| Type of Fish | Body Shape | Distinctive Features |
|---|---|---|
| Salmon | Streamlined | Prominent dorsal fin, pink or red color |
| Tuna | Torpedo-shaped | Fast-swimming, metallic blue color |
| Goldfish | Rounded | Variety of colors, flowing fins |
Shapes and Structures
Fish shapes and structures vary greatly. Fish in fast waters have sleek bodies. Those in slow waters have fancy fins.
“The diversity of fish shapes and structures is a testament to their adaptability and the complex ecosystems they inhabit.”
Understanding fish anatomy helps artists draw better. They can make fish drawings more realistic and interesting.
Tools You Will Need
Getting the right drawing supplies is the first step to learn how to draw a fish. The right tools can greatly improve your artwork’s quality.
Essential Drawing Supplies
To begin drawing fish, you’ll need some basic supplies. These include:
- A set of graphite pencils (HB, 2B, 4B, 6B)
- A sketchbook or drawing paper
- An eraser (kneaded or white vinyl)
- A sharpener
These essential drawing supplies will help you create a solid foundation for your fish drawings.
Recommended Pencils and Papers
Start with a range of graphite pencils. For paper, choose something smooth and heavy. This will handle different drawing techniques well. Try hot-pressed or cold-pressed paper for different textures.
For more detailed work, check out The Virtual Instructor. They offer tips on using various tools and techniques.
Optional Supplies for Detail
Once you’re comfortable with the basics, add more supplies. These might include:
- Colored pencils or markers
- Ink and brushes
- Blending stumps or tortillon
These optional supplies can add depth and detail to your fish drawings. They let you try different styles and techniques.

By investing in the right tools and practicing regularly, you’ll master drawing fish.
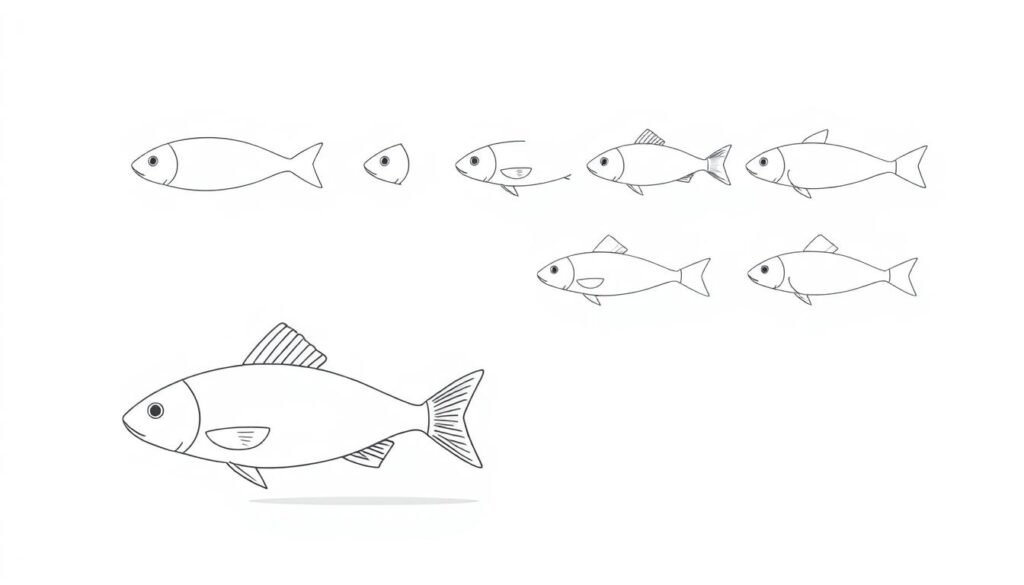
Basic Fish Shapes
Learning the basic shapes of a fish is key to a great drawing. When I start, I focus on the overall shape first. Then, I add details later.
Drawing Simple Bodies
To draw a simple fish body, start with an oval or egg shape. This is the base of your fish. Keep it simple and don’t add too many details yet. The oval shape helps set the fish’s proportions.
Adding Fins and Tails
After the basic body, add fins and tails. Fins are usually triangular and go on top and bottom. The tail is forked and can be rounded or pointed. Try out different fin and tail shapes to find what looks best.
Experimenting with Different Styles
Don’t be shy to try different fish styles. You can draw realistic, cartoonish, or anything in between. The most important thing is to have fun and be creative. Experiment with shapes and proportions to find what works for you.
By mastering basic fish shapes and trying different styles, you’ll get better at drawing fish. Your drawings will become more engaging and realistic.
Step-by-Step Guide: Drawing a Cartoon Fish
Cartoon fish are fun to draw, offering many ways to express yourself. They are great for both beginners and experienced artists. Drawing a cartoon fish can be a fun and engaging project.
Outlining the Shape
To draw a cartoon fish, start with its basic shape. Use simple shapes like circles, ovals, or triangles to get the proportions right. Start with a rough outline and refine it as you add details.

Adding Eyes and Expressions
The eyes are key in any cartoon character, including your fish. Large, expressive eyes can add a lot of personality. Try different eye shapes and expressions to make your fish unique.
You can also add eyebrows or a mouth to enhance the expression. Remember, simplicity is important in cartoon drawing. Don’t be afraid to keep things simple and bold.
Coloring Your Cartoon Fish
After outlining and adding facial features, it’s time to add color. Choose bright, vibrant colors to make your fish stand out. Use markers, colored pencils, or digital drawing software to bring your fish to life.
Think about the background and how your fish will look in it. You can have a simple background or a complex underwater scene, depending on your vision.
Step-by-Step Guide: Drawing a Realistic Fish
Watching real fish is key to drawing them realistically. You must know their anatomy and draw their features well.
Observing Real Fish References
Begin by watching real fish, either in person or in photos. Look at their body shape, fin structure, and scale texture. Notice how light reflects on their bodies to get their texture and detail right.
Artist John Smith says, “Observation is crucial for realistic drawings. The more you watch, the more you’ll grasp the subject’s subtleties.”
“The best drawings come from a deep understanding of the subject, gained through careful observation.”

Capturing Texture and Detail
To get a fish’s texture and detail, learn its anatomy. Study its scales, fins, and other features. Use different pencils for various textures and shading.
| Pencil Type | Effect | Use Case |
|---|---|---|
| HB | Medium line | Outlining |
| 2B | Slightly darker | Shading scales |
| 4B | Dark shading | Deep shadows |
Shading Techniques to Try
Shading is key for a realistic fish drawing. Try hatching and cross-hatching to add depth. Play with line density and direction to show the fish’s texture.
Some good shading methods include:
- Hatching: Using parallel lines for shading.
- Cross-hatching: Layering lines at different angles.
- Stippling: Making shading with dots.
With practice and observing real fish, you can draw a realistic fish. It will show the fish’s details and textures well.
Color Theory for Fish Drawing
To make your fish drawings look real and engaging, you need to learn about color theory. It’s a set of rules for mixing colors in a way that looks good together. It helps you see how colors work with each other.
Understanding Color Schemes
A color scheme is a group of colors used in a piece of art. For fish drawings, you might use monochromatic, complementary, or analogous schemes.
- Monochromatic schemes use different shades of one color, making everything look connected.
- Complementary schemes mix colors that are opposite each other on the color wheel, creating a strong contrast.
- Analogous schemes use colors next to each other on the color wheel, making the transition between colors smooth.
How to Choose Your Fish Colors
Picking the right colors for your fish drawing depends on the fish’s type and where it lives. For example, koi fish are known for their bright oranges and whites. You can find inspiration in this tutorial on drawing koi fish.
Looking at real fish or pictures can help you pick the best colors. Think about the lighting and the natural colors of the fish’s home.
Blending Techniques for Realism
Blending colors is key to making your fish drawings look real. Using wet-on-wet and layering techniques can help you blend colors smoothly.
| Technique | Description | Effect |
|---|---|---|
| Wet-on-wet | Applying wet paint to wet paper | Smooth, blended colors |
| Layering | Building up layers of paint or colored pencil | Deep, rich colors with texture |

By using color theory, you can make your fish drawings look better and more real. Try out different color schemes and blending methods to see what works best for you.
Adding Background Elements
Adding background elements to your fish drawing can make it more interesting. A good background adds depth and context. This makes your artwork more engaging.
Creating an Underwater Scene
To create an underwater scene, think about where your fish lives. Consider the water’s texture, lighting, and what’s around it like plants and rocks. Start by sketching the basic layout of your underwater scene, thinking about where your fish and other elements will go.

Incorporating Plants and Rocks
Adding plants and rocks can make your scene more interesting. Choose plants that are typical of the fish’s habitat, like coral or seaweed. Rocks can help create hiding spots for your fish or add texture.
| Element | Purpose | Tips |
|---|---|---|
| Plants | Add variety and hide fish | Choose plants typical of the fish’s habitat |
| Rocks | Create hiding places and add texture | Use rocks to create depth and interest |
| Water Texture | Create a sense of movement | Use soft strokes to suggest water movement |
Using Color to Create Depth
Color can help create depth in your underwater scene. Cooler colors tend to recede, while warmer colors advance. Use this to make the background cooler and the foreground warmer, creating depth.
By adding these background elements, you can make your fish drawing more dynamic. Try different techniques and elements to see what works best for your artwork.
Drawing Fish in Motion
To draw fish in motion, you need to observe, practice, and use certain techniques. It’s key to know how fish look and move in water.
Techniques for Action Poses
Here are some tips for drawing fish in action:
- Watch how fish move in aquariums or videos.
- Do quick sketches to get the feel of their movement.
- Practice drawing fish from different angles to see their shape.
John Smith, a famous marine life artist, said, “The secret to drawing fish in motion is to show their fluid movement, not just their shape.”
“The fluidity of water and the movement of fish are intertwined; capturing this relationship is crucial for a realistic depiction.”
Capturing Movement with Lines
Lines are key to showing movement. To draw fish in motion well:
- Use flowing lines to show the fish’s direction and speed.
- Change line weights to add depth and dimension.
- Practice gesture drawing to loosen up your lines and capture the fish’s energy.

Tips for Dynamic Composition
A dynamic composition makes your drawing more interesting. Here are some tips:
| Technique | Description |
|---|---|
| Use of Negative Space | Allows the viewer’s eye to move freely around the composition. |
| Overlapping Elements | Creates a sense of depth and layering. |
| Directional Lines | Guides the viewer’s eye through the drawing. |
By using these techniques, you can make your drawings more dynamic and engaging. This will grab the viewer’s attention.
Common Mistakes and How to Fix Them
To get better at drawing fish, you need to spot and fix common errors. Many beginners make these mistakes. But, with practice and the right techniques, you can fix them easily.
Proportion Errors to Watch Out For
One big mistake is getting the proportions wrong. It’s important to make sure the body, fins, and tail match up well. This is true for both realistic and cartoonish drawings.
- Measure your fish drawing to ensure the body is in proportion to the fins and tail.
- Pay attention to the size and placement of the eyes and other facial features.
- Use reference images to get a better understanding of fish anatomy.
| Common Proportion Errors | Correction Tips |
|---|---|
| Oversized fins | Compare fin size to body size in reference images. |
| Incorrectly placed eyes | Measure the distance between the eyes and the snout. |
| Tail too small or too large | Observe how the tail relates to the body’s length. |
Tips for Improving Your Lines
Improving your lines can make your fish drawings look better. Practice drawing different types of lines. Try smooth lines for a cartoon look or jagged lines for realism.
Experiment with various pencil techniques to get the right line quality. A softer pencil, like 2B or 4B, can make your lines darker and more expressive.

Enhancing Overall Composition
A well-composed drawing can make your fish pop. Think about where you place your fish and how it looks with the background.
- Use the rule of thirds to place your fish off-center for a more dynamic composition.
- Experiment with different backgrounds, such as underwater scenes or abstract patterns.
- Pay attention to negative space around your fish to create a balanced composition.
By fixing common mistakes and using these tips, you can improve your fish drawings. This will also boost your overall artistic skills.
Resources for Further Learning
To keep improving your drawing skills, you need the right learning resources. We’ve covered techniques for drawing fish, from anatomy to backgrounds. Now, it’s time to explore more of the art world.
Books for Beginners
Start with books that offer detailed guides on drawing and anatomy. “The New Drawing on the Right Side of the Brain” by Betty Edwards is a great choice for beginners.
Online Tutorials
Websites like Proko, New Masters Academy, and Skillshare have lots of tutorials and courses. They keep you updated with new techniques and trends.
Joining Art Communities
Being in art communities can really motivate you. Look for online forums like Reddit’s r/learndrawing, or local art groups. Share your work and learn from others. It keeps you inspired and helps you get better.


