

Did you know the human mouth is the second most viewed facial feature after the eyes? This simple fact reveals why mastering mouth anatomy is essential for creating compelling characters. When viewers study a portrait or illustration, they instinctively focus on the lips and surrounding structures to interpret emotion and intention.how-to-draw-a-bald-eagle
The mouth serves as a primary focal point in character design, conveying the majority of emotional expression in your artwork. Unlike other facial features, lips possess complex volumes and subtle forms that challenge even experienced artists. However, the key to success lies not in expensive tools but in developing fundamental skills.
I’ve discovered that consistent practice yields remarkable results. A single gesture sketch can be completed in under 20 seconds, meaning you can create twelve studies in just four minutes of daily work. This efficient approach builds muscle memory and anatomical understanding faster than most artists realize.
In this comprehensive guide, I’ll share essential techniques that transform how you approach facial anatomy. You’ll learn construction methods, expression variations, and practical tips gathered from professional sources. The skills you develop here will enhance every face you create moving forward.
Key Takeaways
- The mouth is the second most important focal point in facial expressions after the eyes
- Mastering mouth anatomy requires understanding complex volumes and subtle forms
- Simple tools like graphite pencils are sufficient for developing essential skills
- Brief daily practice sessions can lead to significant improvement over time
- Mouth drawing combines anatomical knowledge with construction techniques
- Consistent practice builds muscle memory faster than most artists expect
- These skills will enhance all your character and portrait work
Introduction to Realistic Mouth Drawing
The complexity of mouth anatomy presents unique challenges for artists learning facial expressions. These semi-rounded forms wrap around the face’s cylindrical structure, creating difficult perspective issues.how-to-draw-a-cactus
Overview of Drawing Mouths and Their Importance
In narrative art, characters frequently speak, making the mouth a natural attention point. Viewers instinctively focus on lips to interpret emotion and intention.
Different people show remarkable variation in lip structure. Observing real individuals provides invaluable reference for artistic growth.
Understanding the Challenges and Tools Involved
Tool selection matters less than skill development. Whether using a graphite pencil or digital tablet, focus remains on the drawing process itself.
Patience proves essential when learning this skill. Beginners should approach mouth anatomy gradually, building understanding over time.
“Mastery comes through volume of work—hundreds of sketches from life, memory, and imagination build the necessary finesse.”
| Learning Method | Focus Area | Recommended Frequency |
|---|---|---|
| Life Observation | Realistic proportions | Daily practice |
| Photographic Reference | Anatomical details | 3-4 times weekly |
| Imaginative Work | Creative expression | As needed |
This comprehensive method for learning lip construction emphasizes understanding volumes over tool dependency. Consistent practice develops the artistic experience needed for convincing results.
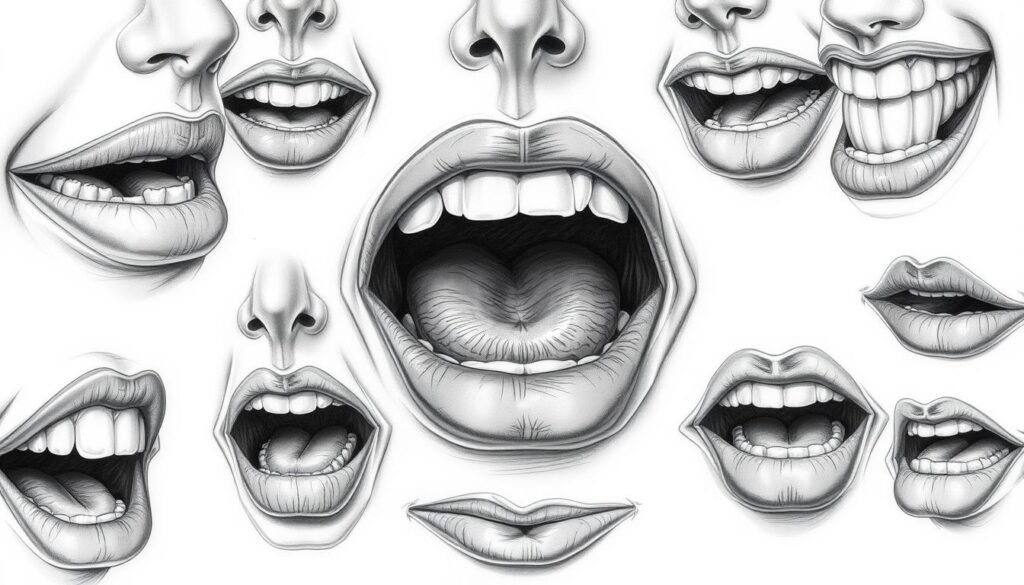
Understanding the Anatomy and Structure of the Mouth

Breaking down the structure of the mouth into simple, geometric forms is the first step toward mastering its realistic depiction. I find it helpful to think of the lips as five distinct sections that wedge together. This framework simplifies the complex curvature.how-do-you-draw-mouths
Anatomical Landmarks and Volumes
The most critical landmark is the philtrum, the vertical groove connecting the nose to the upper lip. Understanding volumes is essential. The area above the lips slants back, the upper lip faces down, the lower lip faces up, and the area below slants back. This creates a light-and-shadow pattern like a mountain range.
Dimples at the corners are usually in shadow and act as anchor points. The underlying dental structure resembles a sphere, influencing the mouth‘s rounded form.
Key Elements: Upper Lip, Lower Lip, and Philtrum
Schematically, the upper lip resembles a stretched “M” shape, while the lower lip looks like a wide “W”. Rounding their corners makes them appear more natural. The center line of the mouth often has a subtle “S” curve from a three-quarter view.
Proportions provide a reliable guide. The corners of the mouth align vertically with the pupils. The face divides into thirds, with equal distance from the nose base to the bottom of the lower lip and from there to the chin. These rules are vital for proper placement in any digital art software.
| Lip Part | Simplified Shape | Lighting (Top Light) |
|---|---|---|
| Area Above Lips | Slanted Plane | Lit |
| Upper Lip | M-shape | Shadow |
| Lower Lip | W-shape | Lit |
| Area Below Lips | Slanted Plane | Shadow |
Mastering “how do you draw mouths” Techniques

Foundation techniques using spheres and ovoids establish proper mouth volume immediately. This approach creates three-dimensional forms rather than flat shapes pasted onto the face.
Constructing with Spheres and Ovoids
I recommend starting with three equal-sized spheres. The top sphere defines the upper lip volume while two lower spheres create the lower lip’s rounded form.how-to-draw-a-football-helmet
These spheres touch without intersecting. The line between lips curves around all three shapes, creating natural contours. This method works for any viewing angle.
Some artists prefer ovoid shapes as an alternative. The philtrum occupies the top half of the upper ovoid. The lower lip outline follows ovoid contours more closely.
Adapting Techniques for Different Facial Angles
In profile views, the upper sphere protrudes forward. The connecting line tilts diagonally rather than remaining vertical.
Three-quarter views require marking the central line of symmetry. The foreshortened side appears at least twice as short as the other side.
When drawing from below, horizontal lines become oval shapes. The three spheres form a miniature pyramid structure.
Critical rule: Keep all horizontal facial lines parallel. This maintains proper perspective across challenging angles.
Once you understand these construction principles, you can tackle any mouth from any point of view with confidence.
Practical Step-by-Step Approaches and Sketching Tips

Effective mouth sketching combines construction guidelines with confident line work in a logical sequence. I follow a systematic six-step process that ensures proper volume and proportion from start to finish.how-to-draw-a-frog-easy
Gesture Sketches and Quick Drawing Methods
The first step establishes a cylindrical grid using light pencil pressure. This guide acknowledges the rounded denture sphere beneath the lips. Step two marks the center line with a characteristic peak/valley curve.
Step three commits to the actual mouth opening with full pressure. This middle line aligns perfectly with the valley point in your guide. The upper lip comes next in just a few confident strokes.
Constructing the bottom lip involves overlapping strokes that indicate its two-part structure. This technique creates natural volume and form. Step six adds shadows beneath the lips and at the corners using hatching techniques.
Maintaining parallel relationships ensures proper facial construction. The line where the nose connects to the face should align with the line through the mouth’s corners. This fundamental rule creates cohesive facial proportions.
Rapid gesture sketches completed in 20 seconds each build essential skills quickly. You can study twelve different mouths in just four minutes of practice. This quantity-over-quality approach eliminates time constraints as an excuse for limited practice.
Ink drawing builds confidence and precision since mistakes cannot be erased. The real secret to skillful mouth rendering remains consistent practice from various reference sources.
Analyzing Styles, Expressions, and Artistic Variations

Lip configuration serves as a primary tool for communicating emotional states in character design. The subtle manipulation of shapes creates distinct personalities and moods.
Experimenting with Lip Shapes for Various Emotions
Different emotions require specific lip treatments. Joy lifts the corners upward while sadness pulls them downward. Anger often reveals teeth with an open configuration.
Subtle variations create nuanced expressions. A slightly parted mouth suggests thoughtfulness. Tightly pressed lips indicate determination or tension.
| Emotion | Lip Shape | Corner Position | Additional Features |
|---|---|---|---|
| Joy | Curved upward | Raised | Teeth may show |
| Sadness | Downturned | Lowered | Bottom lip may quiver |
| Anger | Open wide | Pulled back | Teeth and gums visible |
| Surprise | Oval shape | Neutral | Lower jaw drops |
Integrating Expression into Character Design
Character personality shines through mouth design. Small lips often suit reserved personalities. Larger mouths suggest expressive, outgoing characters.
Gender distinctions influence lip rendering. Masculine characters typically feature thinner lips with sharper planes. Feminine designs employ fuller, more compact shapes.
Different artistic styles interpret mouths uniquely. Anime uses simplified forms while realism captures intricate details. This character expression guide explores various approaches.
Conclusion
Creating believable facial features demands attention to the intricate relationships between mouth, nose, and surrounding structures. These forms present genuine challenges where subtle variations in lines and shapes separate amateur from professional work. Begin by practicing lips in neutral positions before advancing to complex expressions.
Study diverse reference material to expand your visual library. While breaking features apart benefits learning, remember the face functions as a complete unit. Regular practice sessions over time prove more effective than occasional intensive efforts.
Think of each sketch as experience points toward mastery. Internalize key concepts like the three-sphere construction for volume and the critical proportional relationships. The distance from nose base to bottom lip equals that from lip to chin.
Keep horizontal lines parallel and align mouth corners with pupils. Understanding how the center line curves around three-dimensional forms creates convincing depth. Master these anatomical landmarks and construction techniques.
You will confidently render mouths from any angle. Consistent effort guarantees progress in your artistic journey.how-to-draw-a-elf


