

Did you know that over 100,000 commercial flights take off daily worldwide? That’s more than one aircraft in the sky every second. These engineering marvels have captured human imagination for over a century.
I’m excited to share my comprehensive approach to creating aviation artwork. This method blends artistic technique with appreciation for aircraft design. You’ll discover that capturing these flying machines on paper is more accessible than you might think.
My tutorial guides you through the complete creative process. We start with basic shapes and progress to detailed rendering. The final result will be a colored masterpiece you can proudly display.
This artistic journey doesn’t require advanced skills. You only need patience and willingness to follow systematic steps. I’ve designed this guide for artists at all experience levels.
Whether you’re new to sketching or refining your techniques, this approach works. You’ll gain professional insights into aircraft structure and aerodynamics. Understanding these elements helps create more authentic aviation art.
By the end, you’ll possess the confidence to render various aircraft types. You might even design your own unique flying machines. This skill combines technical precision with creative expression beautifully.
Key Takeaways
- Master the fundamental shapes that form all aircraft designs
- Learn systematic steps from basic outline to detailed rendering
- Understand aircraft engineering principles for authentic artwork
- Develop skills applicable to various airplane types and styles
- Gain confidence to create original aviation illustrations
- Combine technical accuracy with artistic creativity
- Complete a finished colored masterpiece by following the guide
Introduction: Unlocking the World of Aviation Art
Creating aviation artwork begins with understanding the fundamental shapes that define aircraft design. This artistic journey transforms complex engineering into accessible visual expression.
Overview of the Drawing Process
My systematic approach breaks down aircraft into basic geometric forms. This method ensures proper proportions before adding intricate details.
Each step builds upon the previous one, creating a logical progression. You’ll establish the fuselage shape first, then add wings and tail sections.
Essential Tools and Materials
Quality materials make the creative process smoother. I recommend starting with these fundamental items for your aviation artwork.
| Tool | Primary Purpose | Recommended Type | Alternative Options |
|---|---|---|---|
| Drawing Paper | Sketching foundation | Medium-weight sketch paper | Printer paper, notebook |
| Pencil | Initial sketching | HB or #2 pencil | Mechanical pencil |
| Eraser | Correcting mistakes | Kneaded eraser | Vinyl or plastic eraser |
| Coloring Tools | Final artwork | Colored pencils | Markers, crayons, watercolors |
These tools provide everything needed for successful aviation illustration. The right materials support your creative vision throughout each step.
Understanding the Basic Shapes and Structural Elements

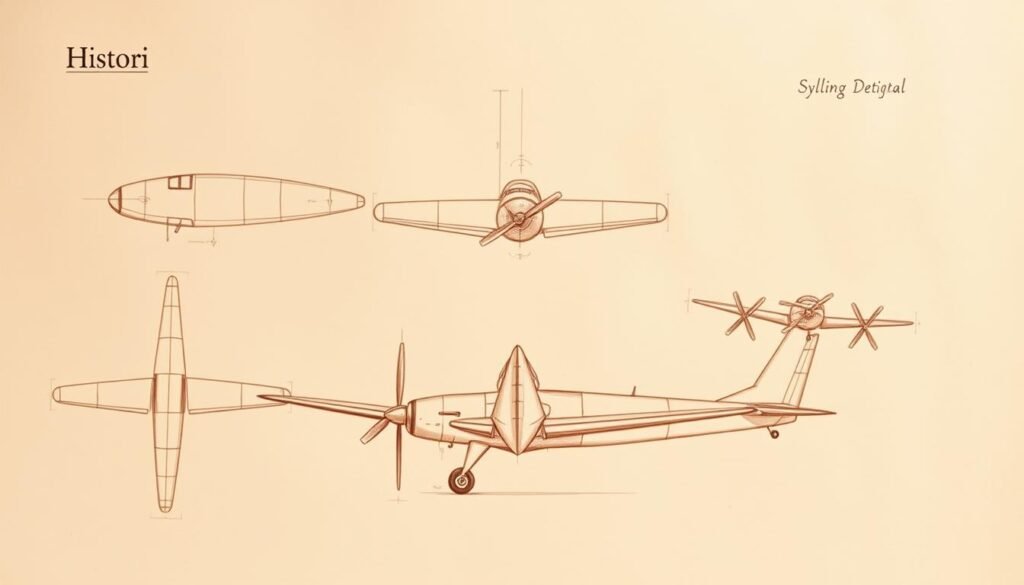
The secret to realistic aircraft artwork lies in recognizing the basic forms that compose these flying machines. I approach every aviation illustration by breaking down complex structures into manageable geometric components.
Key Components: Ovals, Lines, and Curves
I always begin with the fundamental observation that aircraft are constructed from simple shapes. The primary form is a long, thin oval positioned near the paper’s center. This creates the fuselage foundation.
Establishing spatial awareness is crucial before marking the paper. I recommend pointing to the middle with your finger or pencil. This simple technique helps gauge available space without requiring exact measurements.
The basic structure incorporates curved lines for aerodynamic contours. A curved horizontal line forms the nose section, while a sharply curved vertical line defines the tail area. These curved elements create the plane’s distinctive profile.
Establishing Guidelines for Accurate Proportions
Proper proportion begins with light, adjustable sketches. I use minimal pencil pressure during this initial stage. This allows easy erasure or modification as the artwork develops.
The key structural elements include various geometric forms working together:
| Geometric Shape | Aircraft Application | Primary Purpose |
|---|---|---|
| Oval/Cylinder | Fuselage & Engines | Main body structure |
| Rectangle/Trapezoid | Wings & Stabilizers | Lift and balance surfaces |
| Triangle | Nose & Wing Components | Aerodynamic efficiency |
| Curved Lines | Contours & Transitions | Streamlined appearance |
Leaving appropriate space between elements prevents crowding. This ensures wings, tail, and engines have adequate room. The systematic approach creates a solid foundation for detailed work.
This methodical breakdown makes aviation art accessible for all skill levels. For additional guidance on fundamental techniques, explore this comprehensive airplane drawing resource that builds upon these basic principles.
Step-by-Step Guide: how to draw a airplane

The transition from basic shapes to a complete aircraft happens through systematic layering. I integrate methods suitable for both beginners and experienced artists.
Integrating Multiple Methods for Beginners and Experts
My approach combines geometric construction with observational techniques. This dual method ensures accuracy while encouraging artistic expression.
I begin with the front section using an oval shape. The left part receives a curved line to form the nose contour. This establishes the plane’s directional flow.
The body extends backward with a semi-rectangular form. This creates the main fuselage structure. Proper proportion is maintained throughout this initial phase.
| Drawing Approach | Beginner Focus | Expert Enhancement |
|---|---|---|
| Geometric Construction | Basic shape recognition | Precise proportional relationships |
| Line Quality | Confident stroke development | Varied pressure for depth effect |
| Perspective Handling | Simple overlapping forms | Advanced spatial awareness |
Detailed Instructions from Nose to Tail
The tail section incorporates a triangular form for the rear part. A trapezoid shape above creates the vertical stabilizer. These elements provide balance to the overall design.
Wings emerge as semi-trapezoidal forms extending from the body. The main wings curve slightly backward following aerodynamic principles. Smaller stabilizers appear at the tail section.
Engine placement involves oval shapes beneath the wings. I typically position two visible engines on one side. A third, smaller engine suggests perspective on the opposite side.
Each component connects logically to create a cohesive aircraft structure. This systematic method ensures successful results. For additional perspective techniques, consult this comprehensive airplane drawing resource.
Add Details to Enhance Realism and Creativity

This phase transforms your basic outline into a convincing aircraft. I focus on the critical elements that inject personality and authenticity.
Incorporating Windows, Wings, and Engine Details
I begin with the cockpit. A bent rectangle shape defines the main window area. For a rounded look, I sketch an oval at the front indent, adding a line through the middle to separate the panels.
Passenger windows come next. I draw a horizontal line of small circles along the middle of the fuselage. Consistent spacing is key for a realistic appearance.
Structural lines add depth. A line along the bottom edge of the body defines the fuselage. On the tail, a triangle shape marks where an airline logo would sit.
Wings and tail surfaces receive fine lines to suggest panels and flaps. For the engines, I add circular intakes and lines indicating the housing. This completes the mechanical look.
A door behind the cockpit adds functional realism. This comprehensive detailed airplane drawing guide offers excellent visual references for these steps.
Refining Lines and Erasing Unnecessary Sketches
With all details in place, the final step is refinement. I carefully erase the initial construction lines and guidelines. This leaves a clean, polished outline.
This is also the perfect time for personalization. You might add specific branding or adapt the design to resemble a favorite model. Your unique vision makes the artwork truly yours.
Coloring and Final Touches to Bring Your Drawing to Life

Color application represents the final creative stage where your aircraft drawing gains personality and dimension. This step transforms technical lines into vibrant aviation artwork.
Applying Color Theory and Techniques
I recommend keeping a color wheel nearby for reference. Understanding primary colors helps create harmonious secondary shades.
For this airplane drawing, I work systematically from the main body to wing tail sections. Consistent application ensures professional results.
Colored pencils offer excellent control for detailed work. They allow layering to achieve depth and realistic shading effects.
Personalizing Your Airplane with Creative Elements
This is where your artistic vision shines. I often research real aircraft for inspiration while adding unique touches.
Consider creating custom logos or decorative patterns along the fuselage. The horizontal line provides a natural division for color schemes.
Small details like passenger faces in windows add character. Background elements complete the scene, making your plane look like it’s soaring through space.
Conclusion
Aviation art stands as a unique intersection where engineering precision meets creative expression. This comprehensive guide has equipped you with the confidence to approach aircraft illustration with both accuracy and personal style.
The systematic approach transforms complex subjects into manageable steps. From establishing the basic fuselage with a horizontal line to adding detailed components, each phase builds your skills. This method creates space for artistic growth while maintaining structural integrity.
Every completed airplane drawing represents significant progress in your artistic journey. Continue practicing these techniques across different aircraft types. Develop your unique approach to aviation artwork.
Your creative potential in airplane illustration is limitless. Apply these foundational principles to explore new artistic horizons with confidence and passion.


