

Drawing a realistic face can seem hard, but it’s doable with the right methods. The human brain is great at spotting faces, so getting the proportions right is key. A well-drawn face can show emotion and capture a person’s essence.
I’ll show you how to master drawing a face. We’ll cover facial proportions and adding the last details. With practice and patience, you can make captivating portraits that grab the viewer’s attention.
Key Takeaways
- Understand the importance of facial proportions
- Learn the basic steps to draw a realistic face
- Discover tips for adding details and expression
- Practice techniques to improve your skills
- Create captivating portraits with confidence
Understanding Facial Proportions
Getting the proportions right is key for a realistic facial drawing. Facial proportions are the measurements that define how different facial features relate to each other. Knowing these proportions is vital for creating a balanced and harmonious face.
The Importance of Proportions
Proportions in facial drawing are about the size and placement of facial features. Getting them right makes a drawing look more realistic and pleasing. As Leonardo da Vinci said,
“The proportions of the human body are the key to understanding the proportions of the face.”
This shows how crucial it is to get the proportions right.
Key Measurements to Remember
To draw a face accurately, remember it’s divided into three parts: the forehead, mid-face, and lower face. The eyes sit between the upper and middle thirds. The distance between the eyes is roughly the width of one eye. The nose is in line with the bottom of the ears, and the mouth is about one-third of the way down from the nose to the chin.
- The face is divided into three equal parts.
- The eyes are between the upper and middle thirds.
- The distance between the eyes is about one eye width.
Common Mistakes in Proportions
Misjudging the size and placement of features is a common mistake. For example, making the eyes too large or too small can distort the face. Another mistake is not aligning features correctly, like placing the mouth too high or too low. Knowing these pitfalls can help you avoid them and create a more realistic drawing.
Tip: Practice measuring the proportions of different faces to improve your understanding and skill. Using a grid can also help in achieving accurate proportions.
By mastering facial proportions, you’ll be able to draw faces that are not only realistic but also engaging. Remember, practice is key to improving your skills in drawing facial proportions.
Tools and Materials Needed
The right drawing supplies are key to capturing a face’s subtleties. Drawing tools go beyond convenience; they improve your artwork’s quality.
Essential Drawing Supplies
To draw a face, you need basic supplies. These include pencils, erasers, and a sharpener. Graphite pencils are essential for varying lines and shading. Start with a set from HB to 6B.
Erasers are vital for fixing mistakes and adding highlights. A kneaded eraser is great for erasing small areas. Also, a pencil sharpener keeps your pencils sharp.
Recommended Sketchbooks and Papers
The quality of your sketchbook or paper matters a lot. Choose sketchbooks with acid-free, high-quality paper. This paper works well with graphite and charcoal.
Consider the size and binding of your sketchbook. A larger sketchbook offers more space, but a smaller one is easier to carry. Some sketchbooks have sewn binding, which keeps pages flat for easier drawing.

Choosing the Right Pencils
Picking the right pencils is crucial for your drawing. Graphite pencils vary in hardness, from 9H to 9B. Harder pencils make lighter lines, while softer ones create darker lines.
For faces, use different pencils for various effects. Begin with an HB pencil for basic lines. Then, use softer pencils like 2B, 4B, 6B for shading and depth.
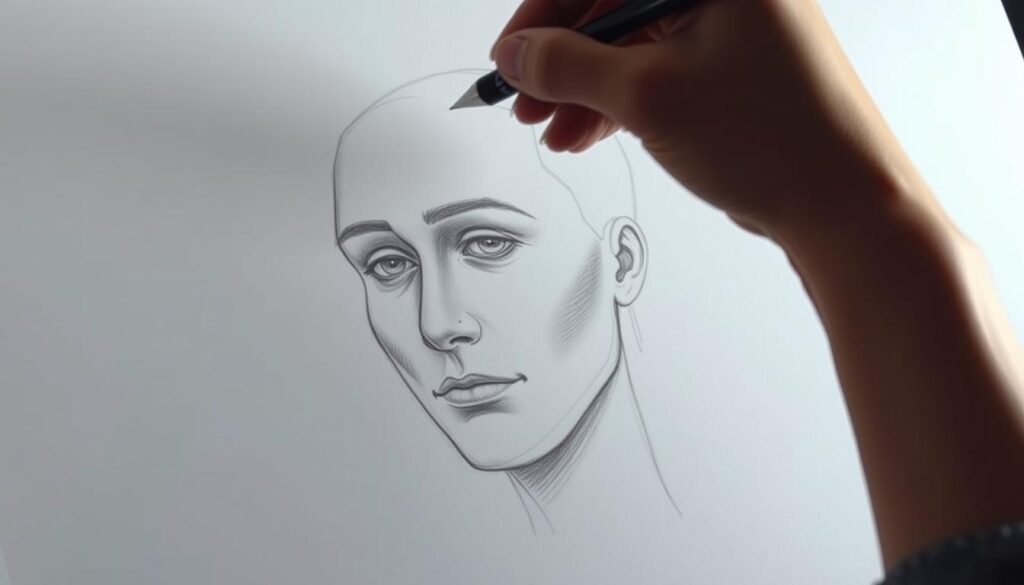
Sketching the Outline of a Face
The first step in drawing a face is to sketch its outline. You need to understand the face’s structure. This step is key to creating a realistic portrait.
Starting with Basic Shapes
To start, use basic shapes to sketch the facial outline. The face can be broken down into simple shapes like circles, ovals, and lines. These shapes help in getting the features right. For example, the face’s shape is often an oval, with the head being a circle.
Establishing the Midline
It’s important to establish the midline for symmetry. The midline goes straight through the face’s center, splitting it into two halves. This line helps place facial features correctly. By making sure features on both sides are symmetrical, you get a more realistic portrait.
Refining the Facial Outline
After setting up the basic shapes and midline, refine the outline. Add more details, define the jawline, and adjust proportions if needed. Getting these details right is key to capturing the subject’s unique features. Refining also means softening or adjusting lines for a more natural look.
By following these steps, you lay a solid foundation for your portrait. This makes it easier to add detailed features and achieve a realistic look.
Facial Features: Eyes
Capturing the essence of the eyes is crucial in portrait drawing. The eyes are key to showing emotion and life in a portrait.

Eye Shapes and Sizes
Eyes vary in shape and size, and knowing these differences is vital. They can be almond-shaped, round, or angular. The size of the eyes in relation to the face is also important; one eye’s width fits between the two.
To draw eyes accurately, observe these traits:
- The shape of the eye socket
- The curvature of the upper and lower eyelids
- The color and texture of the iris and pupil
For more on facial proportions, including eye placement, visit this resource on facial proportions.
Placing the Eyes Correctly
Getting the eyes’ placement right is key for a realistic portrait. Eyes are usually one eye-width apart. The distance from the top of the head to the eyes is about the same as from the eyes to the chin’s bottom.
| Measurement | Description |
|---|---|
| Eye Width | The average width of an eye is about 1/5 of the face width |
| Inter-Eye Distance | One eye width apart |
Adding Detail and Expression
Adding detail to the eyes means drawing the iris, pupil, and eyelids right. The eyes’ expression comes from the eyelids’ shape and the gaze direction.
“The eyes are the most expressive feature of the face, and capturing their expression is key to a compelling portrait.”
To show different emotions, focus on:
- The angle of the eyebrows
- The curvature of the eyelids
- The direction and focus of the pupil
Mastering these aspects helps create portraits that are not just realistic but also emotionally engaging.
Drawing the Nose
The nose is a key feature of the face. Learning to draw it well is important for artists. It’s about understanding its structure and how it varies from person to person.

Different Nose Types
Noses come in many shapes and sizes. Knowing these differences is key for realistic drawings. For example, the Roman nose has a big bridge, and the snub nose is short with a rounded tip.
There’s also the hooked nose with its unique curve and the straight nose without much curve. Knowing these types helps make your drawings more accurate and personal.
Key Points of Reference
When drawing the nose, focus on a few key points. These are the nose bridge, the nostrils, and the nose tip. The angle and shape of these features greatly affect the nose’s look.
- The nose bridge can be straight, curved, or humped.
- The nostrils vary in size and shape, influencing the nose’s overall appearance.
- The nose tip can be rounded, pointed, or upturned.
Techniques for Realism
To draw a realistic nose, focus on the small details and shading. Use different pencil grades to add depth. Start with a light outline and then darken areas like the nostrils and the shadow under the nose.
Blending techniques are also crucial for a smooth look. Softly blend the nose’s edges with the face for a natural appearance.
Perfecting the Lips
To draw lips that captivate, you must first understand their details. The lips are a key feature of the face. Getting them right is crucial for a realistic portrait.

Understanding Lip Anatomy
The anatomy of the lips includes the vermillion border and the Cupid’s bow. These are the outline and the curve of the upper lip. Knowing these elements is key to drawing realistic lips.
For a deeper look at facial proportions, including the lips, check out this guide to face proportions. It offers insights into measurements and ratios that shape facial features.
Various Lip Shapes
Lips vary in shape and size, from thin to full. Each type needs a specific approach to capture its unique look. Thin lips require subtle lines and minimal shading. Full lips need more shading and texture.
Artist and instructor note, “The way lips are drawn can significantly affect the overall expression of a portrait.”
“The lips are not just a feature; they are a key to the entire expression of the face.”
Techniques for Conveying Texture
Conveying lip texture involves shading and line work. Using different pencil grades can achieve the right texture and realism. Soft pencils (B or 2B) are good for smooth transitions. Harder pencils (H or 2H) are better for defining outlines and details.
To add depth, observe how light interacts with the lips. Highlighting curves and contours with gentle shading makes them look more real.
Adding Ears to Your Drawing
When drawing a face, it’s important to place the ears correctly. Ears help frame the face and add depth. They are a key feature.
Positioning the Ears
Ears should be aligned with the eyes and nose. The top of the ear should match the eyebrow level. The bottom should line up with the nose base. Accurate placement is key for a balanced face.

Ear Shapes and Features
Ears vary in shape and size. Knowing these differences is crucial for realistic drawings. Some ears are rounded, while others are angular or pointed. Observing the subject’s ear shape makes your drawing more realistic.
Detailing the Ears
Start by outlining the ear’s shape, then add inner details like the helix and antihelix. Notice how light affects the ear for a 3D look. Use gentle, subtle shading to show the ear’s details.
Mastering ear drawing adds realism to facial portraits. This makes them more engaging and lifelike.
Hair: Drawing Techniques
To draw hair well, you need to understand its structure. This includes knowing about different types and textures. Drawing hair can be tricky because of its detailed nature and many styles.
Different Hair Types
Hair comes in many textures and styles. From straight and smooth to curly and full, each type is unique. Knowing these differences is key to drawing hair realistically.
- Straight hair lies flat against the head, with a smooth texture.
- Curly hair has a lively look, with curls from tight spirals to loose waves.
- Wavy hair has a gentle, flowing curve, falling between straight and curly.
Adding Volume and Texture
To make your hair drawings look fuller and more textured, try these techniques:
- Use different line weights to show depth and dimension.
- Try hatching and cross-hatching to add texture and shading.
- Focus on the direction of hair growth for a natural look.
Essential Tips for Realistic Hair
For realistic hair drawings, keep these tips in mind:
- Notice how light affects the hair, creating highlights and shadows.
- Draw individual strands or groups to add detail.
- Practice drawing various hairstyles to learn their unique features.
Here’s a quick summary of important hair drawing tips:
| Hair Type | Characteristics | Drawing Tips |
|---|---|---|
| Straight | Smooth, lies flat | Use smooth lines, minimal texture |
| Curly | Dynamic, varied curl patterns | Emphasize curl patterns, use hatching for texture |
| Wavy | Gentle curves, flowing | Suggest movement, use soft hatching |
Shading Techniques for Depth
Shading techniques are key to adding depth and dimension to your drawings. By mastering these, you can turn a flat drawing into a three-dimensional masterpiece.
Light Sources and Shadows
Knowing about light sources is essential for shading. Light sources decide where shadows fall, making your drawing look deep. Think about the light’s direction, intensity, and type.
A single, strong light source makes deep shadows. But, multiple lights create softer shadows. Try different lights to see how they change your drawing.
Using Different Pencil Grades
Different pencil grades help you achieve various shading values. Pencils range from very soft (9B) to very hard (9H), with HB in the middle. Softer pencils make darker shades, and harder ones make lighter shades.
Start with a light touch using a harder pencil. Then, move to softer pencils for darker shades. This method helps you blend shading values smoothly.
Blending Techniques
Blending is crucial for smooth transitions between shading values. You can use tools like a blending stump, tortillon, or your finger to blend.
Begin with gentle pressure and increase it as needed. Avoid over-blending to keep details sharp. For more drawing tips, including shading, check out The Drawing Source.
Bringing Your Drawing to Life
Once you’ve got the basic drawing down, you can start thinking about how to bring your portrait to life with color and other finishing touches. At this stage, you’re refining your work to make it more engaging and realistic.
Adding Color (Optional)
If you want to add an extra dimension to your drawing, consider using colored pencils or markers. Colored pencils are great for detailed work and layering colors, while markers can provide vibrant, consistent hues. Start with the largest areas first, such as the skin tones, and then move on to smaller details like the eyes and lips.
Final Touches and Cleanup
After you’ve added color (if using), review your drawing for any areas that need refinement. Check for proportions, ensuring that the features are correctly aligned. Erase any unnecessary guidelines or smudges. For a more polished look, you can use a blending stump or a tortillon to smooth out shading and create a more cohesive appearance.
| Tool | Use | Benefit |
|---|---|---|
| Colored Pencils | Layering colors, detailed work | Allows for nuanced color transitions |
| Markers | Vibrant colors, broad strokes | Provides bold, consistent color |
| Blending Stump | Smoothing out shading | Creates a cohesive, realistic finish |
Signing Your Work
Don’t forget to sign your artwork. Signing your name can be seen as the final touch, personalizing your piece and marking it as your own creation. Consider where you place your signature carefully; a common practice is to sign in a corner, usually the bottom right, but it can vary based on personal preference or the style of the artwork.
For more beginner-friendly tips on drawing a face, you can visit Erika Lancaster’s guide for additional resources and insights.
Practicing and Improving My Skills
To get better at drawing faces, you need to practice every day. By doing this, you can keep getting better at it.
Effective Daily Practice
I make sure to set aside time each day to draw. I might sketch different facial parts or work on a full portrait. This regular practice sharpens my skills and improves my observation.
Resources for Growth
Along with daily practice, I use many resources to learn more. Online tutorials, books, and videos are full of helpful tips. I also look at famous artists like Leonardo da Vinci for inspiration and new techniques.
Seeking Constructive Feedback
Getting feedback from other artists and teachers is key. It shows me where I can get better and helps me improve. By always learning and practicing, I keep growing as an artist.


