

Did you know that over 6 million American households include a pet rabbit? This makes them one of the most popular companion animals. Their gentle nature and unique appearance also make them a favorite subject for artists.
I created this comprehensive guide to help you capture the charm of this creature on paper. My approach is designed for artists of all levels. Whether you are a complete beginner or looking to refine your animal illustration skills, this tutorial provides a clear path forward.
The process of creating a realistic animal sketch can seem complex. I break it down into manageable, easy-to-follow stages. Each step builds upon the last, steadily building your confidence as you progress.how-to-draw-a-baby
You will gain a solid understanding of basic shapes and animal anatomy. This foundational knowledge is the key to creating an appealing and accurate illustration. With patience and practice, you will be able to produce a piece of art you are truly proud of.
Key Takeaways
- This guide is designed for all skill levels, from beginners to experienced artists.
- The tutorial breaks the process into simple, confidence-building steps.
- You will learn foundational techniques for animal illustration.
- Gain an understanding of basic shapes and anatomy specific to rabbits.
- The focus is on creating a realistic and appealing final drawing.
- Patience and practice are emphasized as key components of success.
Introduction to My Rabbit Drawing Journey
There’s a unique charm in capturing the gentle spirit of rabbits on paper that first captivated me as an artist. Their expressive, large eyes and delicate features present a wonderful challenge.
This fascination is what inspired me to create a clear, methodical path for others.
Why I Love Drawing Rabbits
I find these animals to be perfect subjects. Their long eyelashes and fluffy fur offer incredible opportunities to practice texture and detail. It’s this combination of gentle charisma and technical challenge that makes the process so rewarding.
You can see more of my animal illustrations in this collection of my work.
Overview of the Step-by-Step Process
This tutorial uses a layered approach. We begin with simple shapes, gradually adding complexity. Each step logically follows the last, building your skills steadily.
While the steps may seem detailed, taking your time with each one ensures a solid foundation. The techniques you learn will be valuable for future drawing projects with other creatures.
You will progress from a basic sketch to a detailed, lifelike illustration.how-to-draw-goku
Materials, Tools, and Preparations for a Successful Drawing

Before your pencil touches the paper, proper preparation sets the stage for success. Having the right tools organized makes the entire process smoother and more enjoyable.
This foundation is crucial for building a detailed and realistic artwork.
Essential Materials and Pencils
I recommend a set of graphite pencils ranging from hard (H) to very soft (6B). Brands like Koh-I-Noor or Faber-Castell offer consistent quality.how-to-draw-a-nose
Each grade serves a specific purpose. Harder pencils create light guidelines. Softer pencils build up rich, dark tones for shading.
For the deepest blacks, a dedicated black coloring pencil is essential. The Faber-Castell Polychromos provides a matte, opaque finish that graphite cannot match.
Your choice of paper is equally important. I use sketching paper with a weight of at least 250 g/m². This heavy paper can handle erasing and blending without damage.
| Pencil Grade | Hardness/Softness | Best For |
|---|---|---|
| H – 2H | Hard | Light sketch lines, initial guidelines |
| HB – 2B | Medium | General sketching, mid-range tones |
| 4B – 6B | Soft | Dark shadows, rich textures, final details |
Setting Up Your Workspace and Reference Photo
Organize your tools within easy reach. Good, natural lighting is ideal for accurately seeing values and details.
The most critical preparation step is selecting a strong reference photo. Print a high-contrast, black and white image of your subject.
Study the photo before you begin. Notice the direction of the fur and the placement of features. This observation guides your entire sketch.
Step-by-Step Process: How to Draw a Rabbit

The most reliable method for achieving accurate proportions starts with simple geometric forms. This foundational approach simplifies the complex anatomy of the subject into manageable parts.
I use a light H or HB pencil for this initial phase. Keeping the pressure minimal ensures these early marks erase cleanly later.
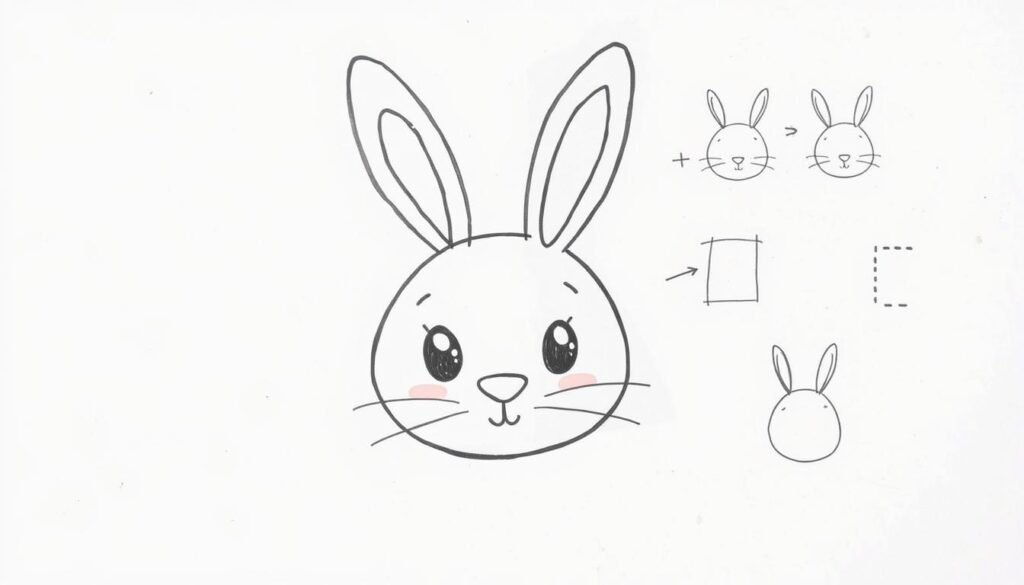
Mapping Out the Basic Shapes and Guidelines
I begin by drawing a long, vertical ellipse in the center of the paper. This shape forms the core of the face.
Next, I add two more ellipses for the ears. They start in the upper third of the head shape and angle outward slightly.
A horizontal ellipse below represents the cheeks. I then divide the head with a cross. The horizontal line marks eye placement. The vertical line guides the center of the face.how-to-draw-lips
My process for the body involves rough outlines using curved lines. This establishes the overall posture before adding detail.
- Establish the head with a central ellipse.
- Position the two ears using angled ellipses.
- Create facial guidelines with a simple cross.
- Block in the body with flowing, connected shapes.
Sketching the Head, Ears, and Facial Features
In the next step, I refine the sketch. Using the cross as a guide, I carefully place the eyes on the horizontal line.
I add the distinctive nose at the center point and sketch the mouth below it. This captures the gentle expression.
The ear shapes are adjusted. Real ears taper at the top, so I soften the ellipses into more natural contours.
I connect the head to the torso with flowing lines. Then I sketch the front legs and the powerful hind legs. The final touch is a round, fluffy tail.
Once satisfied, I lightly soften all the construction lines. This blends the separate shapes into one cohesive form. For more guidance on this process, explore this detailed rabbit drawing tutorial.
Advanced Techniques and Details in Rabbit Drawing

Advanced detailing techniques transform a basic outline into a vibrant, textured animal portrait. This phase focuses on creating depth and realism through careful shading and precise line work.
These methods elevate your artwork from a simple sketch to a professional illustration.
Shading, Blending, and Adding Texture
I begin shading by identifying medium-dark and darkest areas on my reference photo. Using an HB or 2B pencil, I fill these sections while preserving light zones around the eyes and ears.
A softer 4B pencil intensifies the deepest shadows in the eyes, nose, and mouth. I blend these strokes with a tissue to create smooth transitions.
This eliminates roughness between pencil marks. An eraser pencil restores highlights by carefully removing individual hair marks.
Incorporating Fine Details and Creating Realistic Fur
Realistic fur requires attention to length and direction. On the head and ears, I use short strokes with a 4B pencil.
The body receives longer, curved lines following natural contours. For the nose’s velvety texture, I create dots instead of lines.aeroplane-how-to-draw
Whiskers emerge from the side of the face using a hard H pencil. Fast, tapered strokes begin with firm pressure and release gently.
This creates authentic curved whiskers. A black coloring pencil adds final contrast to the darkest areas for dramatic effect.
Using Ink and Layering Techniques for Depth
Ink techniques offer alternative texture options. Directional hatching mimics hair growth patterns when using liners.
A 0.05 liner creates light, long hairs while a 0.1 liner builds contrast. I avoid solid outlines, using broken marks that extend the fur pattern naturally.
Darkening areas between the hind legs and body establishes depth. The back side transitions smoothly into the foreground.
Final adjustments ensure three-dimensional quality throughout the finished rabbit illustration.
Conclusion
This comprehensive guide has walked you through the entire process of creating a lifelike rabbit portrait. You began with simple shapes and progressed to adding delicate features and texture.
You now possess the foundational skills to confidently illustrate these animals. Understanding proportions, positioning the ears and eyes, and rendering the nose and mouth are key achievements.
Mastering the texture of realistic fur through subtle shading and individual strokes brings your artwork to life. Remember, consistent practice is the most important step for improvement.
The techniques you’ve learned here are highly transferable. The approach of breaking a subject into basic shapes, building up form, and adding fine details will serve you well with any animal you wish to draw.
I encourage you to continue your artistic journey. Share your creations and explore new subjects with the confidence you’ve gained.


