

Did you know that the strawberry is the only fruit with seeds on the outside? This unique feature makes it a fascinating subject for artists. Capturing its iconic shape and texture is a rewarding artistic challenge.
I am thrilled to present this comprehensive guide. My goal is to make the process of creating a beautiful strawberry illustration accessible to everyone, regardless of experience. I have broken down the project into simple, manageable stages.
This tutorial will walk you through my proven method. You will learn to capture the fruit’s heart-like form, textured surface, and leafy crown. I focus not only on technique but also on encouraging your personal creative flair.
Whether you prefer a cartoon style or a realistic depiction, this guide provides the foundational skills for success. For a deeper dive into materials and shading techniques, explore this detailed strawberry drawing tutorial. By the end, you will have a completed artwork and valuable techniques for future projects.
Key Takeaways
- This guide is designed for artists of all skill levels, especially beginners.
- Learn to capture the strawberry’s distinctive shape and seed-textured surface.
- The process is broken into easy-to-follow, manageable steps.
- Gain techniques for both simple and realistic artistic styles.
- Develop foundational skills applicable to other fruit illustrations.
- Emphasis is placed on both technical skill and personal creativity.
- You will finish with a complete artwork and increased confidence.
Introduction and Essential Art Supplies
Selecting the right artistic approach can significantly impact your learning experience and final results. This guide focuses on building foundational skills through accessible methods.
Why I Chose This Strawberry Drawing Style
I developed this particular approach because it balances simplicity with visual appeal. The cartoon style maintains essential characteristics of the real fruit while being beginner-friendly.
This way of teaching has proven successful over time. It helps artists create recognizable artwork without feeling overwhelmed.how-to-draw-lips
Gathering Your Materials and Setting Up Your Workspace
Having the right tools enhances your creative process. While you can use any available materials, specific supplies yield optimal results.
| Tool | Purpose | Recommended Type |
|---|---|---|
| H Pencil | Light outlining | Hard lead |
| HB Pencil | Refining details | Medium hardness |
| 4B Pencil | Dark shading | Soft lead |
| Blending Stump | Smoothing gradients | Paper stump |
| Kneaded Eraser | Creating highlights | Pliable rubber |
Find a comfortable, well-lit area for your work. Give yourself adequate time to practice each part of this tutorial.
Did you know strawberries belong to the rose family? This fascinating fact adds depth to your artistic exploration of nature’s designs.
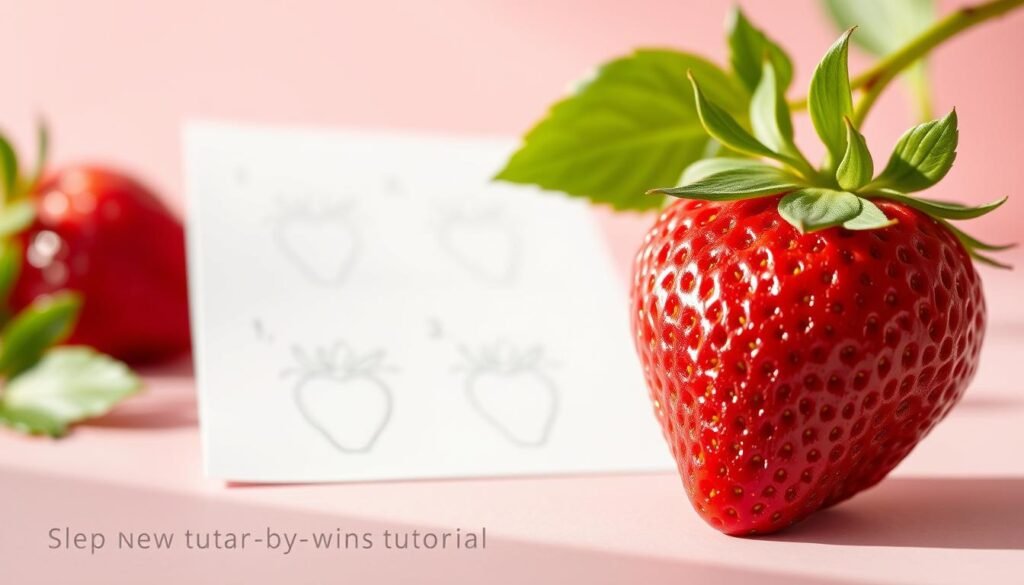
Step-by-Step Guide: How to Draw a Strawberry

With your materials prepared, let’s embark on the creative journey of constructing your strawberry artwork step by step. I’ve organized this process into three clear phases that build upon each other logically.
Sketching the Basic Outline and Shape
Begin with light pencil strokes to create the foundation. Draw a curved line resembling half a heart shape. Mirror this line opposite to form the characteristic body.
The resulting silhouette should taper toward the bottom, creating that distinctive form. Keep your lines gentle for easy adjustments.how-to-draw-a-nose
Adding the Calyx, Leaves, and Structured Elements
Now focus on the crown area. Extend sharp lines left and right from the top portion. These form the base of your calyx structure.
Complete the leafy crown with pointed, curved elements extending downward. Arrange five to seven individual leaf shapes in a circular pattern. Add a thin stem at the center for authenticity.
| Drawing Phase | Primary Focus | Recommended Tool |
|---|---|---|
| Outline Creation | Basic silhouette | H Pencil |
| Leaf Development | Structural details | HB Pencil |
| Seed Placement | Surface texture | 4B Pencil |
Dotting the Seeds and Shaping the Contours
The final phase involves creating surface texture. Place small oval shapes in curved vertical rows following the fruit’s contour. These represent achenes, not actual seeds.
For enhanced dimension, lightly erase tiny oval shapes first. Then outline them with darker pencil pressure. This technique creates realistic texture that makes your illustration pop.
Throughout this process, remember that each strawberry drawing develops its own character. Don’t strive for perfection—embrace the unique qualities that emerge. For additional perspective on botanical illustration techniques, explore this comprehensive strawberry artwork guide.
Techniques and Tips for Enhancing Your Strawberry Artwork

Mastering light and shadow application elevates your fruit illustration from basic to professional quality. This phase transforms your outline into a vibrant, dimensional piece.
The real magic happens when you apply color and texture. I focus on making each element work together harmoniously.
Coloring, Shading, and Texture for Realistic Effects
I begin with a classic red palette for the main shape. Green accents create natural contrast for the leafy elements.
Strategic shading makes your artwork pop. Position your light source and use gradual transitions from light to dark areas.
The 4B pencil works perfectly for deep shadows around seeds. A blending stump creates smooth gradients that enhance the three-dimensional appearance.
This approach to texture development is essential for realistic fruit art. Pay attention to how light interacts with surface elements.how-to-draw-goku
Customizing Your Drawing with Creative Details
Personalization is where the real fun begins. Add playful faces or imaginative color schemes to make strawberry creations uniquely yours.
Experiment with different art mediums for varied effects. Acrylics offer vibrant results, while watercolors provide subtle tones.elephant-drawing-how-to
Consider adding companion fruits or background elements. These details create more complex compositions and tell richer visual stories.
For advanced digital techniques, explore this comprehensive digital art guide. It offers professional methods for enhancing your artwork.
Remember that creative freedom is the most rewarding part of this process. Your personal touches make each drawing strawberry special.
Conclusion
Congratulations on completing your artistic journey with this fruit illustration! You should feel proud of mastering the techniques to create this recognizable subject. Your new skills form a solid foundation for countless future projects.
Now that you understand the process, experiment with different approaches. Try varying the leaf patterns at the top or seed distribution across the surface. This guide gives you the tools to develop a unique artistic style over time.how-to-draw-a-baby
Consider exploring similar subjects using these methods. For additional techniques that enhance texture and dimension, review this comprehensive strawberry art tutorial. Share your creations and continue growing as an artist!


