

Naruto is a beloved anime character who has inspired many fans to draw. With anime and manga becoming more popular, learning how to draw Naruto is now a sought-after skill.
For beginners, drawing Naruto might seem hard. But, with step-by-step tutorials, it’s easier than you think. These tutorials break down the process into simple steps. This way, you can create your own Naruto artwork. Check out this detailed guide to get started.
It’s important to understand Naruto’s character design to draw him right. In this article, we’ll cover the basics of drawing Naruto. We’ll also share tips to improve your skills.
Key Takeaways
- Learn the basics of drawing Naruto with step-by-step tutorials.
- Understand the importance of character design in drawing Naruto.
- Improve your drawing skills with tips and tricks.
- Create your own Naruto artwork using the right materials.
- Follow a detailed guide to drawing Naruto.
Understanding Naruto’s Character Design
Learning about Naruto’s character design is crucial for drawing him right. Naruto, the famous ninja from the anime, stands out with his unique look and lively spirit.
Naruto’s design is made up of several important features. To learn how to draw Naruto, you must focus on these details.
Key Features of Naruto
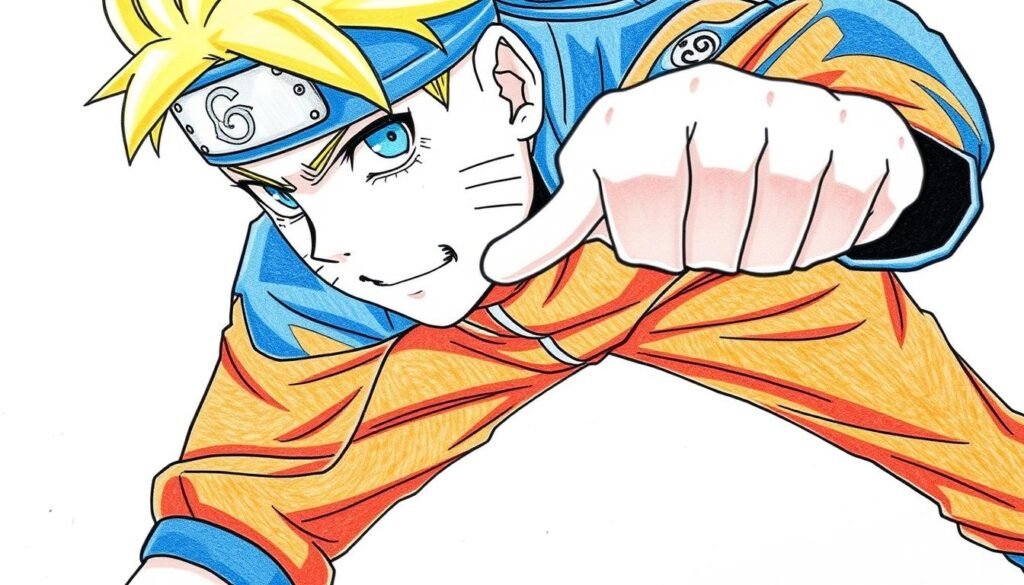
Naruto’s face, hair, and clothes are key to his design. His face shows a bright and focused look. The iconic orange jumpsuit and blonde hair are also vital to get right in a drawing.
For a better grasp, check out step-by-step Naruto drawing tutorials.
Common Expressions and Poses
Naruto is often shown in lively poses that show his bold and eager nature. He has many expressions, from determination to joy. Getting these right is key to making Naruto come alive in your drawing.
“The art of drawing Naruto lies in capturing his spirit and energy.”
By focusing on Naruto’s main features and expressions, artists can get better at drawing him. Trying out different poses and expressions will help you master drawing Naruto.
Essential Drawing Supplies
The right drawing supplies can make a big difference in your Naruto drawings. To create a compelling piece of art, you’ll need the right tools.Click here to learn about how to daw a dog.
Pencils and Erasers
Choosing the right pencils and erasers is key for sketching Naruto. You’ll need a variety of pencils, from HB to 6B. These allow for different line weights and shading depths.
HB pencils are great for initial sketches. 6B pencils are better for darker shading.
- HB pencils for fine details and initial sketches
- 2B, 4B, 6B pencils for shading and creating depth
- Kneaded erasers for erasing large areas
- Precision erasers for fine details
Paper Types
The type of paper you use can greatly affect your Naruto drawing. Smooth paper is best for detailed work. Textured paper can add a unique effect to your artwork.
- Smooth paper for detailed and precise drawings
- Textured paper for creating unique, artistic effects
- Heavyweight paper for durability and handling various media
Markers and Color Pencils
Adding color to your Naruto drawing can make it come alive. Markers are perfect for bold, vibrant colors. Color pencils offer more subtle, layered coloring.
When picking markers and color pencils, think about the following:
- Markers for bold, vibrant colors and filling large areas
- Color pencils for detailed, layered coloring and shading
- Blending stumps and tortillon for smooth color transitions

By choosing the right drawing supplies, you can improve your Naruto drawings. Try out different tools and techniques to see what works best for you.Click here to learn about how to daw a cat.
Step-by-Step Guide to Drawing Naruto
Learning to draw Naruto is easy with a few steps. You can bring this beloved character to life. Drawing Naruto involves several key steps that help capture his iconic look.
Capturing the Face
The first step in drawing Naruto is to capture his facial features accurately. Start by sketching a circle for the head, ensuring it’s proportional to the rest of the body. Naruto’s eyes are distinctive, with three curved lines above them. Pay close attention to the proportions and placement of the eyes, nose, and mouth.
Detailing the Hair
Naruto’s hair is one of his defining features. To detail his hair, start by sketching the overall shape, then add the individual strands. Use flowing, curved lines to capture the dynamic movement of his hair. Remember, the key is to keep your lines smooth and fluid.
Creating the Outfit
Naruto’s outfit is iconic and includes an orange jumpsuit with a flared design at the legs. When creating the outfit, pay attention to the folds and creases, as these add depth and dimension to your drawing. Use reference images to get the details right, including the forehead protector and the design on his clothing.
Finalizing with Accessories
The final step is to add accessories that complete Naruto’s look. This includes his sandals, the scroll on his back, and any other details that make his character stand out. For more detailed guidance, you can learn more about drawing Naruto and explore additional resources.
By following these steps and practicing regularly, you’ll be able to draw Naruto with confidence and accuracy. Remember, the key to improving is to keep practicing and experimenting with different techniques.
Tips for Sketching Naruto
To draw Naruto, you need more than just his design. You also need technique and practice. Here are some tips to help you improve your Naruto drawings.Click here to learn about how to daw hands.
Working with Proportions
Getting Naruto’s proportions right is crucial. Focus on the size and scale of his facial features, hair, and clothes. This will make your drawing more authentic.
Naruto’s eyes are a key feature. Make sure they are the right size and in the right place.
Utilizing References
References are very helpful when drawing Naruto. They help you see the details of his design, like his eyes and hair. You can find references online or in official Naruto media.

Emphasizing Movement
Naruto is known for his energetic movements. Try to show this in your drawings. Use dynamic poses and lines that suggest energy and flow.
Practicing different poses will help you get better at this.
By following these tips, you can make your Naruto sketches better. Remember, the best way to get better is to keep practicing and be open to learning new things.
Adding Color to Your Naruto Drawing
The right colors can make your Naruto drawing pop. As you get better at drawing, learning to color is key. It brings your characters to life.
Choosing the Right Colors
Picking the right colors for Naruto is important. His orange jumpsuit and blonde hair are iconic. Use a color palette with:
- Orange and yellow for the jumpsuit
- Blonde and light brown for the hair
- Navy blue and gray for the outfit details

Techniques for Blending
Blending colors makes your Naruto drawing look pro. You can blend by layering or using blending stumps. For digital art, Adobe Photoshop has great tools.
Here’s a simple table to show basic blending techniques:
| Technique | Description | Tools |
|---|---|---|
| Layering | Applying multiple layers of color to achieve depth | Color pencils, markers |
| Blending Stumps | Using a tool to smooth out colors | Blending stumps, tortillon |
| Digital Blending | Utilizing software for advanced blending options | Adobe Photoshop, digital drawing tablets |
Adding Shading and Highlights
Shading and highlights add depth to your Naruto drawing. Shading creates darkness for volume. Highlights show where light hits.
“Shading is not just about making things dark; it’s about creating the illusion of volume and depth.” –
To get realistic shading, watch how light hits Naruto’s design. Use dark shades for far areas and light shades for near areas.
For highlights, use a light touch. Add a glow to Naruto’s hair top or outfit edges. This makes your drawing lively and interesting.
Practicing Naruto Scenes
To capture Naruto’s essence, practice various scenes that show his ninja skills and friendships. This way, you can master drawing him in different situations.
Start by focusing on iconic and challenging scenes. This will boost your drawing skills and deepen your understanding of Naruto.
Iconic Poses
Naruto is famous for his energetic and determined poses. Practicing these poses can help you capture his spirit. For example, drawing him in a determined stance is a great exercise.
You can find references for these poses in the series or through online tutorials that offer step-by-step guides.
Action Sequences
Naruto is often in intense action sequences. These scenes showcase his ninja training and abilities. Practicing these can help you show movement and energy in your drawings.
Group Shots with Friends
Drawing Naruto with friends like Sakura and Sasuke is fun. It helps you practice composition and character interaction. These scenes are great for exploring relationships and interactions between characters.
Here’s a table with different scene types and their characteristics:
| Scene Type | Characteristics | Tips for Drawing |
|---|---|---|
| Iconic Poses | Determined expressions, confident stances | Focus on facial expressions and body language |
| Action Sequences | Dynamic movements, intense energy | Practice conveying movement and fluidity |
| Group Shots | Interactions between characters, varied expressions | Pay attention to composition and character placement |

Regular practice of these scenes will improve your Naruto drawings. Remember, consistent practice and a willingness to experiment are key.
Common Mistakes to Avoid
Learning to draw Naruto well means knowing what not to do. By avoiding these mistakes, your drawings will get better.
Overlooking Details
One big mistake is missing important details. Naruto’s face is key; his determined look is what makes him special. Pay close attention to his eyes and mouth, as they show a lot of emotion.
Don’t forget the whirlpool pattern on Naruto’s headband either. Getting this right makes your drawing look more real. Check out detailed guides for more info.
Incorrect Proportions
Getting the proportions wrong can mess up your Naruto drawing. Make sure everything is in the right place. For example, Naruto’s eyes should be about one-third of the way down from the top of his head.
| Body Part | Proportion |
|---|---|
| Head | 1/7 of total body height |
| Eyes | 1/3 from top of head |
| Body | Proportionate to head size |
Rushing the Process
Don’t rush your drawing. It can make your lines messy and details missing. Start by sketching lightly and then make changes as you go. Being patient, like when drawing Naruto’s hair and clothes, is important.

By avoiding these mistakes, you can get better at drawing Naruto. Keep practicing and use guides and tutorials to help you improve.
Resources for Aspiring Artists
As an aspiring artist, the right tools can really help. You can improve your Naruto drawing skills with the many resources out there. This includes tools and materials to help you create amazing artwork.
It’s key to find the best resources for your growth. Look into online tutorials, drawing books, and art communities. Each offers something special to help you get better.
Online Tutorials
Online tutorials are a great way to learn. Sites like YouTube, Skillshare, and Craftsy have many Naruto drawing tutorials. They’re perfect for artists of all levels.
- Step-by-step video tutorials that guide you through the drawing process
- Interactive lessons that allow you to learn at your own pace
- Access to a community of artists who share their work and provide feedback

Drawing Books
Drawing books are also very helpful. They offer detailed lessons and examples to improve your skills. Look for books on Naruto character design, proportions, and shading.
Choose a book that fits your skill level and learning style. Many books come with online extras like video tutorials and downloadable materials.
Art Communities
Being part of an art community is great. It lets you meet other artists, share your work, and get feedback. You can find online forums, social media groups, and local art clubs.
Places like DeviantArt, ArtStation, and Reddit’s r/learndrawing are popular. They let you show off your art, join challenges, and talk with other Naruto drawing fans.
Using these resources can help you keep improving. You’ll get better at drawing Naruto and make amazing artwork.
Inspiring Your Own Naruto Style
Now that you’ve learned to draw Naruto, it’s time to get creative. Start by making your drawings your own. Try out different facial expressions and poses. You can also create fan art, imagining Naruto in new scenarios.
Putting Your Spin on Naruto
To add your own twist to Naruto, change his outfit or hairstyle. Include your favorite characters in your art. This way, you show off your skills and honor Masashi Kishimoto’s work.
Exploring Digital Art
If you want to improve your art, try digital painting. Use software like Adobe Photoshop or Procreate. These tools have many brushes and techniques to help you achieve your look. For a detailed guide on drawing Naruto, check out this tutorial.
By being creative and trying new things, you’ll create a unique Naruto style. This style will reflect your artistic personality.


