

Did you know that sketching an aircraft is one of the most popular artistic challenges in our creative community? Mastering this skill unlocks a unique blend of technical precision and free-flowing expression.
I’m thrilled to share my personal journey in this comprehensive guide. My experience has shown that creating stunning aviation artwork is more accessible than many assume. This article breaks down the entire process into manageable steps.
You will discover everything from foundational shapes to advanced detailing techniques. My goal is to make this learning experience enjoyable and build your confidence. This approach has helped countless individuals in our community, regardless of their starting point.
I believe sharing knowledge strengthens our collective abilities. Capturing the majesty of flight on paper is a rewarding achievement. This guide provides the proven tools and methods I’ve refined over years of practice.how-to-draw-a-horse
Key Takeaways
- Drawing aircraft combines geometric precision with artistic freedom.
- This guide offers a structured, step-by-step learning process.
- The techniques are designed to be accessible for all skill levels.
- Mastering this subject can significantly improve technical drawing skills.
- Participating in the creative community enhances the overall experience.
- The process is broken down from basic shapes to complex details.
- The aim is to build confidence and make the journey enjoyable.
Overview of Materials and Inspiration
Before putting pencil to paper, establishing a solid foundation of materials and inspiration is crucial. This preparation phase significantly impacts your final results and overall experience.
Having the right resources available streamlines the creative process. It eliminates unnecessary interruptions and allows for focused work.how-to-draw-a-pumpkin
Essential Tools and Supplies
Quality paper forms the foundation of any successful artwork. I recommend selecting a type that handles erasing well during practice sessions.
A reliable HB or 2B pencil, sharpener, and good eraser are essential. These basic tools support the entire drawing process from start to finish.
For adding color, keep colored pencils, markers, or watercolors nearby. They bring your planes to life with vibrant details.
Finding Inspiration and Reference Images
Studying real airplanes provides a lot of valuable insight. Photographs, airport visits, and aviation videos offer excellent reference material.
The core idea behind using references is understanding structure, not copying. Analyze how light and perspective work on different aircraft models.
Building a collection of images helps with various aircraft illustration techniques. Always have extra paper available for experimental sketches.
Understanding the Basics of Airplane Drawing

The secret to creating realistic aviation artwork lies in understanding the simple shapes that form complex aircraft structures. This fundamental approach transforms intimidating subjects into manageable components.how-to-draw-a-tree
I’ve discovered that every aircraft, regardless of its complexity, builds upon geometric foundations. Recognizing these core elements simplifies the entire creative process.
Key Shapes and Lines: The Foundation
The main body, or fuselage, typically begins as an elongated oval or cylinder shape. This central form establishes the aircraft’s primary proportions and flow.
Wings extend from this core structure as modified rectangles or trapezoids. Their basic shape determines the plane’s aerodynamic characteristics and visual balance.
“Geometry is the foundation of all painting. I am convinced of it.”
The tail section incorporates vertical and horizontal stabilizers. These components often take triangular or trapezoidal forms in initial sketches.
| Aircraft Component | Basic Shape | Primary Function |
|---|---|---|
| Fuselage (Body) | Cylinder or Elongated Oval | Main structural frame |
| Wings | Rectangle or Trapezoid | Lift and stability |
| Tail Section | Triangular forms | Directional control |
Light guiding lines serve as the invisible framework for your composition. These preliminary marks establish proper angles and proportions before final detailing.
This geometric approach works for various aircraft types. From simple single-engine planes to complex jumbo jets, the foundation remains consistent.
Repeated practice with these basic shapes develops spatial understanding. This muscle memory enables confident creation from imagination or reference materials.
My Process: How to Draw the Airplane with Precision

My personal methodology for creating aviation artwork focuses on precision from the very first pencil stroke. This systematic approach ensures consistent results whether working from reference materials or imagination.how-to-draw-a-butterfly
Constructing Guiding Shapes and Outlines
I always begin with light guide marks that establish overall proportions. An X-shape grid helps position elements correctly on the paper surface.
The fuselage takes form as a long, curved shape with distinctive front and back characteristics. Maintaining light pressure allows for easy adjustments during this initial phase.
Step-by-Step Breakdown of the Drawing Process
After establishing the main body, I add wing forms on either side. Careful attention to symmetry prevents common proportion errors.
The tail section follows, completing the basic aircraft structure. This foundation supports all subsequent detailing work.
I gradually introduce smaller elements like cockpit windows and engine placements. This methodical progression from general to specific maintains structural integrity throughout the creation process.
My approach mirrors techniques found in comprehensive aviation drawing guides. Refining lines and erasing guides finalizes the clean image before adding character details.
Exploring Different Drawing Methods and Perspectives

Exploring multiple perspectives transforms your aviation artwork from flat diagrams to dynamic illustrations. I’ve discovered that mastering various techniques significantly expands creative capabilities. Each method serves distinct purposes in the artistic process.
Traditional Side and 3D Sketches
The three-view method remains invaluable for technical precision. This approach displays top, side, and front views simultaneously. It reveals the complete dimensions of airplanes with remarkable clarity.
When creating a side plane profile, I concentrate on the fuselage contour and wing placement. The top perspective equally matters for understanding wingspan. Sometimes combining just these two views effectively communicates design concepts.how-to-draw-sonic
“The artist’s world is limitless. It can be found anywhere, far from where he lives or a few feet away. It is always on his doorstep.”
Three-dimensional sketches offer more realistic representations. I begin with light marks for major shapes before defining lines. This method captures the dynamic nature of planes in flight.
Simplistic and Complex Approaches
Quick concept sketches use minimal detail to explore multiple ideas rapidly. This simplistic approach focuses on essential shapes and proportions. It’s perfect for initial brainstorming sessions.
The complex method involves careful rendering of every detail. From panel lines to individual rivets, this technique creates finished pieces. I often start with simple thumbnails before developing promising sketches.
This versatility allows adaptation to different purposes. Whether creating technical diagrams or artistic renderings, various methods enhance the final result. Experimenting with approaches makes the creative process more engaging.
Enhancing Your Drawing with Details and Colors

Details and colors represent the final stage where technical drawing becomes artistic expression. This phase transforms basic outlines into convincing aircraft representations that capture both form and function.
Adding Windows, Wings, and Engine Details
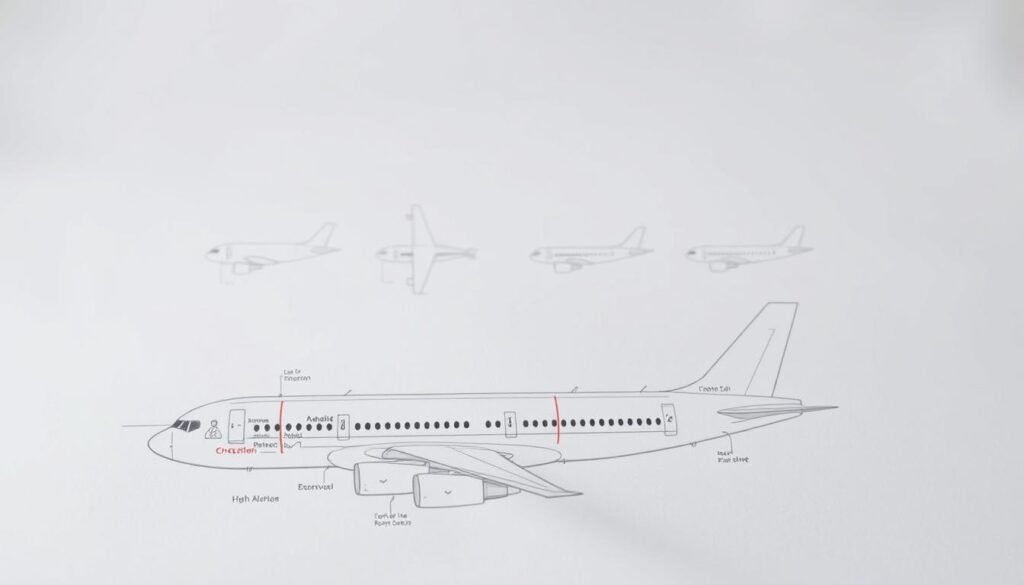
I begin detailing with the cockpit area, establishing the aircraft’s forward section. Passenger windows follow as evenly spaced ovals along the fuselage side. For a 747 with its 232-foot length, multiple rows create realistic scale.
The wings receive careful attention to their impressive 196-foot span. I add flap lines and subtle contour variations that suggest aerodynamic efficiency. Engine cylinders beneath the wings feature intake and exhaust openings.
The tail section requires both vertical fin and horizontal stabilizers at the rear. A center line on the fin indicates the rudder mechanism. These components ensure stability for aircraft reaching 45,000-foot altitudes.
Incorporating Color Theory and Shading Techniques
Color theory dramatically improves final image quality. I reference primary colors—red, blue, yellow—understanding their combinations create vibrant secondary hues. Mixing red and yellow produces orange for accent details.
Shading adds dimensionality through strategic light application. Darker tones on bottom and side surfaces contrast with brighter top areas. This technique creates realistic depth throughout the aircraft body.
Windows receive subtle blue tints suggesting glass, while engine intakes use deeper shading. Gradient effects follow wing curves, with shadows enhancing three-dimensional appearance. These finishing touches make each piece uniquely expressive.
Conclusion
Your artistic journey with aircraft illustration begins with the first sketch and grows with every practice session. I hope this comprehensive guide has given you valuable skills and inspiration for your own projects. The techniques shared here have transformed my simple line work into detailed plane illustrations.
Consistent practice remains the key to improvement. Keep a sketchbook for your aviation ideas and progress. Watching a concept evolve from basic shapes to finished airplane artwork is incredibly satisfying. Each attempt builds confidence and teaches valuable lessons.
Remember that every artist starts at the beginning. The creative community thrives when we share experiences and encourage growth. I’ve learned a lot from experimenting beyond tutorials like this step-by-step tutorial.
Your drawing experience should focus on progress, not perfection. Share your work with others and enjoy expressing your fascination with flight. These techniques apply to all types of planes, giving you a versatile foundation for continued artistic development.


