

An African elephant can weigh over 12,000 pounds, making it the largest living land mammal on Earth. Their sheer size presents a unique artistic challenge. Capturing their immense weight and sturdy structure on the page requires a thoughtful approach.
This guide simplifies that process. I will share techniques developed through my experience to help you learn to draw these magnificent creatures. We will break down their complex form into manageable stages.how-to-draw-a-rose
The tutorial focuses on fundamental shapes and anatomical details. You will gain the skills to illustrate realistic features like the powerful trunk and column-like legs. This method makes the process accessible for artists at any skill level.
Key Takeaways
- Elephants are the largest land mammals, requiring special techniques to capture their scale.
- Breaking the complex form into basic shapes is the first step to a successful illustration.
- Understanding anatomy, like the trunk and feet, is crucial for realism.
- This guide is designed for artists of all experience levels.
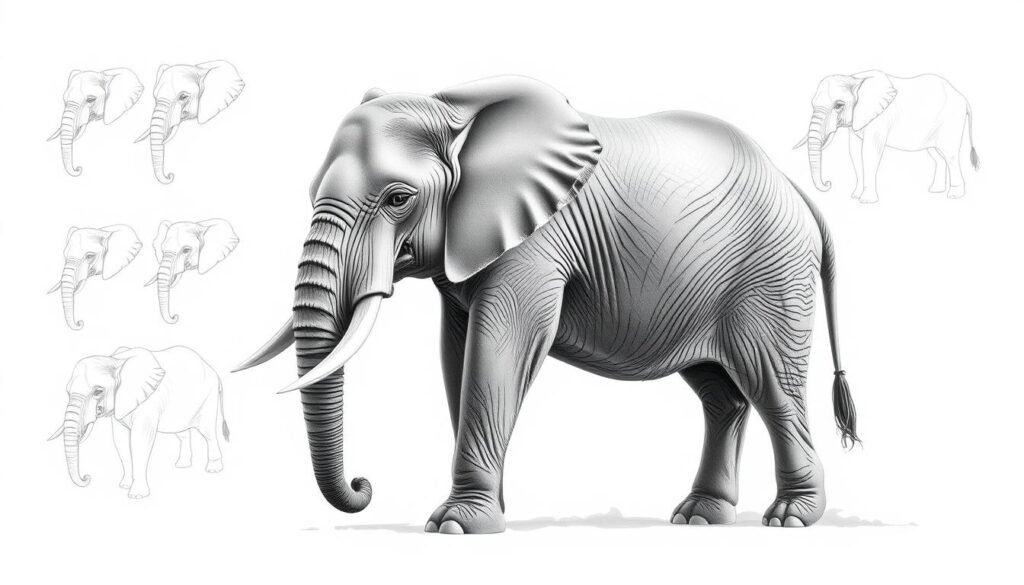
- Following along with reference images will enhance your learning process.
- The final result will accurately represent the animal’s weight and character.
Understanding Elephant Anatomy for a Realistic Drawing
Elephant anatomy reveals remarkable evolutionary adaptations that directly influence their visual representation. My approach emphasizes anatomical knowledge as the foundation for creating believable illustrations. Understanding skeletal structure helps artists capture the animal’s immense weight and distinctive silhouette.
Identifying Key Features and Proportions
The spine runs remarkably flat along the back with visible bumps where vertebrae protrude. This supports the massive ribcage occupying most of the torso. The scapula wraps around this structure, extending to spine height.
I find the foot structure particularly fascinating. These creatures walk on toe tips with round, disc-like feet containing thick padding. This natural shock absorption system balances their tremendous weight.how-to-draw-people
Exploring the Trunk, Ears, and Leg Structure
Facial features require careful observation. Cheekbones protrude dramatically, creating characteristic sunken areas along the jaw. The nasal structure sits directly above eye level, with tusks emerging from incisor teeth.
Leg proportions follow distinct patterns. Front limbs drop straight from elbow joints to large wrists. Hind legs connect from the hip bone with knees positioned slightly lower than elbows.
| Feature | Front Legs | Hind Legs | Artistic Significance |
|---|---|---|---|
| Attachment Point | Bottom of scapula | Back of spine/hip bone | Defines shoulder and hip placement |
| Joint Positioning | Elbows at scapula base | Knees below elbow level | Creates characteristic stance |
| Foot Structure | Straight to large wrist | Angled from hip connection | Affects weight distribution appearance |
Ears resemble large butterfly wings covering the neck area. They droop past the chin and tuck toward the head’s center. This unique configuration requires attention to proportion and attachment points.
how can i draw an elephant using Simple Shapes and Lines

The most effective method for capturing a creature’s bulk on paper is to deconstruct it into a series of connected shapes. This approach makes the process manageable and builds a solid foundation for details.
My technique focuses on establishing proportions first. This ensures your final illustration has the correct weight and stature.
Blocking Out Basic Shapes for the Elephant’s Form
I start with a large circle for the main body mass. Dividing this circle in half provides a key measurement for the torso.how-to-draw-a-girl
Next, I extend a bean-like shape to the left. The belly side slopes downward naturally. From the torso’s center, I measure the distance to the ground for leg placement.
Constructing the Overall Body and Limbs
The legs are visualized as distinct shapes. Front limbs resemble tall glasses, tapering toward bulging feet. Hind legs have an hourglass form, tapered in the middle.
For the head, a rhomboid shape matching the shoulder width works perfectly. Dividing it into quarters helps position the trunk, which starts from the middle and droops down.
Observing a timed drawing exercise can show how these shapes flow together. This foundational way to learn is accessible for all artists.
The ears are large, wing-like shapes covering the neck. This simple shapes method provides a strong framework for refining your artwork later.
Refining Your Drawing: Adding Details, Wrinkles, and Shadows

My favorite part of the process involves rendering the unique skin texture and defining form with strategic shading. This is where flat shapes gain depth and character.
It is the most rewarding stage. Your illustration transforms into a living, breathing creature.
Incorporating Textural Details and Wrinkles
I concentrate wrinkle formations at joint areas. These include elbows, wrists, ankles, and knees. Skin bunches up here, much like it does on human joints.
The trunk requires special attention. I render it like an accordion with rings of deep crevasses. This technique suggests flexibility and movement.
Always vary the length and thickness of your lines. Adjust the spacing between wrinkles based on how tightly the skin folds.
For clear reference, you can download high-quality photos. Creating an account on art resource websites provides excellent material for study.
Cross-hatching builds up the leathery texture effectively. Layers of intersecting lines create depth and dimensionality on the page.
Enhancing the Drawing with Light, Shadow, and Final Touches
Strategic shading defines volume. Areas like the spine and cheekbones catch light. The jaw, belly, and areas between legs recede into shadow.how-to-draw-hello-kitty
Final touches include delicate veins running through the large, thin ears. Add crescent-shaped toenails that sit flat against each massive foot.
To see these techniques in action, review a dedicated video tutorial. You can download these videos for offline study and repeated viewing to master the concepts.
Conclusion
Your artistic journey with wildlife illustration has now reached an important milestone. The comprehensive techniques shared provide a solid foundation for creating stunning representations of magnificent creatures.
Consistent practice will significantly enhance your ability to capture character and majesty. I encourage joining art communities where fellow artists share progress and feedback.
Consider exploring complementary video resources that you can download for convenient reference. Always review the privacy policy when creating accounts or accessing new materials.
The experience gained through repeated practice benefits all aspects of your artwork. Bookmark this page for future reference as you continue developing your personal style.


