

Believe it or not, chickens are one of the most commonly drawn animals in the world. Their familiar shape makes them a fantastic subject for artists at any level. I created this comprehensive guide to unlock your artistic potential and make the process enjoyable.
My approach focuses on breaking the process into clear, manageable steps. This method builds confidence for beginners. It also provides a solid structure for experienced artists to refine their skills. You will learn to create everything from a cute cartoon to a detailed traditional chicken.
This tutorial covers three primary styles. You can explore a cartoon chicken with distinct features, a simple hen illustration, and a realistic bird with detailed feathers. Whether for an art class, personal joy, or a project like children’s book illustrations, this resource serves both educational and creative purposes.
I combine clear visual guides with written instructions. This ensures every part of the drawing, from basic shapes to final coloring, is easy to follow. My goal is to make your learning experience both rewarding and fun. For another great example of breaking down a chicken drawing into 6 simple steps, check out additional resources online.
Key Takeaways
- This guide is designed for artists of all skill levels, from absolute beginners to advanced illustrators.
- The process is broken down into simple, manageable steps to build confidence and ensure success.
- You will learn to create three distinct styles: cartoon, simple, and realistic chickens.
- The tutorial serves various purposes, including school projects, personal art, and professional illustration.
- Clear visual and written instructions make the entire process, from sketching to coloring, easy to understand.
- Mastering this subject improves your overall ability to draw animals.
- The structured approach provides a foundation you can apply to many other drawing projects.
Introduction to My Chook Drawing Journey
Over 192,000 aspiring artists have explored this comprehensive approach to creating chicken artwork. My passion for this subject developed through years of studying vintage instructional materials.
Purpose and Overview
This resource transforms beginners into confident illustrators. The guide builds skills progressively from basic shapes to detailed feather work.how-to-draw-fire
Original instructions come from early 1900’s drawing books. I’ve adapted these classical methods for contemporary learners. Practice worksheets support skill development through repetition.
What You Will Learn
You’ll master fundamental techniques and proportion understanding. The tutorial covers three distinct approaches suitable for various applications.
Each method serves different artistic goals. They range from whimsical cartoon styles to realistic traditional renderings. This chicken drawing resource complements our structured approach.
| Method | Style Characteristics | Best For | Skill Level |
|---|---|---|---|
| Cartoon Chicken | Exaggerated features, playful expression | Children’s books, whimsical art | Beginner-friendly |
| Simple Hen | Clean lines, minimal details | Quick sketches, basic illustrations | All levels |
| Traditional Chicken | Detailed feathers, realistic proportions | Portfolio work, advanced projects | Intermediate/Advanced |
These techniques adapt beautifully for educational settings and personal creative exploration. The systematic steps ensure consistent improvement throughout your artistic journey.
Mastering the Basics: How to Draw a Chook

The secret to a confident start lies in selecting simple tools and understanding basic forms. This foundation makes the entire process more manageable and enjoyable.
Materials, Tools, and Tips
You only need a few items to begin. A standard pencil, a good eraser, and quality paper are essential. For color later, options like markers or colored pencils work well.
My top tip is to use light, smooth lines initially. Gentle pressure lets you erase and adjust easily. This approach builds confidence with each step.
Initial Guidelines and Shapes
Every complex drawing starts with simple shapes. For your chicken, think of a large circle for the main body and a smaller one for the head. An oval can represent the wing.
Connecting these forms with light guide lines establishes proper proportions. This framework ensures everything is in the right place before adding details.how-to-draw-a-skull
| Essential Shape | Represents | Drawing Tip |
|---|---|---|
| Circle | Head and Body Mass | Practice smooth, continuous lines. |
| Oval | Wing and Body Shape | Keep the form soft and rounded. |
| Triangle | Beak | Use short, sharp lines. |
Mastering these basic elements is the most important step. It transforms a blank page into the beginning of a recognizable drawing.
Exploring Step-by-Step Drawing Methods

Different artistic goals call for distinct approaches to illustrating a chicken. I present three structured methods to suit various skill levels and desired outcomes.
Each technique builds upon the basic shapes we mastered. You can choose the path that best matches your creative vision.
Method One: Cartoon Chicken with Distinct Features
This approach emphasizes playful, exaggerated characteristics. Start with a small circle for the head, placing an eye oval inside.how-to-draw-a-christmas-tree
Create a bold beak from joined triangles. Add a dramatic comb using stacked ovals on top.
Connect the head to a large oval body with straight neck lines. Finalize with a wing oval and angular tail.
Method Two: Simple and Clean Hen Illustration
Ideal for beginners, this hen uses minimal details. Begin with a small head oval and a much larger body oval.
Join them with straight lines for the neck. A simplified tail uses three connected lines.
Finish with a basic beak, a simple comb, and straight legs. This easy-to-draw chicken guide offers a similar clean approach.
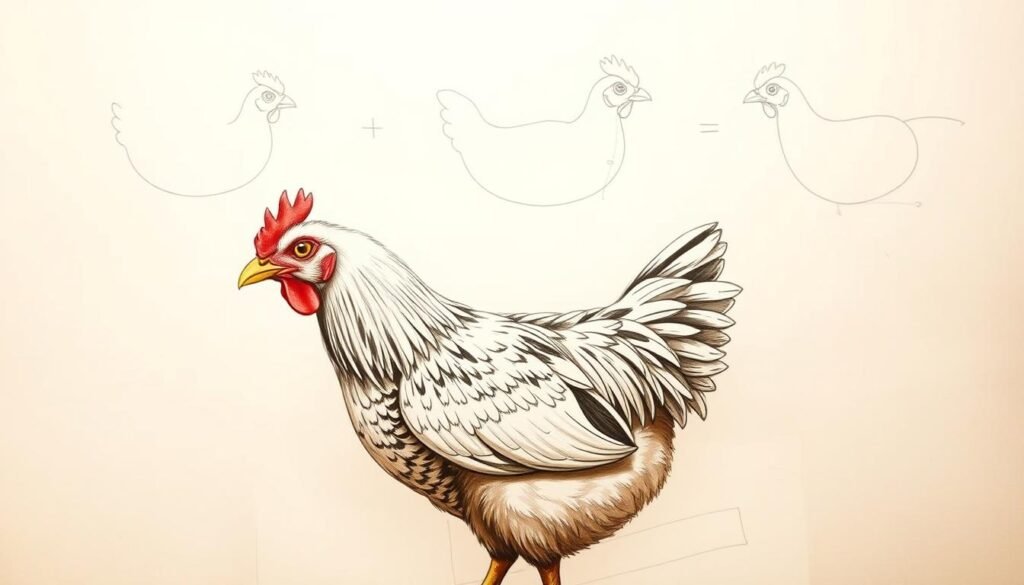
Method Three: Traditional Chicken with Detailed Feathers
This method creates a realistic bird. It starts with precise guidelines for the beak, comb, and eye.
The body structure uses connected ovals and circles for natural proportions. The wing and tail are based on curvy triangles.
Authentic feather texture is key. Add narrow strokes on the neck and define feather groups on the wing and tail.
| Method | Primary Focus | Complexity |
|---|---|---|
| Cartoon | Exaggerated shapes, character | Low |
| Simple Hen | Clean lines, minimalism | Very Low |
| Traditional | Realistic feathers, anatomy | High |
Visual video demonstrations are available for each step. They allow you to learn at your own pace.
Techniques for Adding Color and Enhancing Details

Color selection and detail enhancement transform a basic sketch into a vibrant, professional-looking chicken illustration. This final stage brings personality and depth to your artwork.
Coloring Your Chicken: Pencils and Markers Tips
I recommend several coloring tools for different effects. Markers create bold, vibrant colors. Colored pencils offer precise control for detailed work.
Crayola crayons work well for beginners. Oil pastels produce rich, blended effects. Each medium serves unique purposes in your chicken drawing.
Realistic colors include browns, blacks, and whites for feathers. Use orange-yellow tones for feet. Some breeds display grey legs.how-to-draw-anime
The comb and wattle typically feature vibrant reds. Beaks often appear orange or yellow. Study real chickens for accurate color reference.
Final Touches: Shading, Erasing, and Refining Lines
Clean erasure of construction lines reveals your finished work. Use a gentle touch to avoid damaging the paper.
Refine outlines with ink pens or fine-tip markers. This step creates crisp, defined edges. It elevates your entire drawing.
Shading adds dimension to your chicken. Identify light sources and add darker tones to shadowed areas. Leave highlighted sections lighter.
Practice hand steadiness exercises for straighter lines. Consistent practice builds confidence with each tutorial session.
| Tool Type | Best For | Skill Level | Effect Created |
|---|---|---|---|
| Markers | Bold, vibrant colors | All levels | Solid, opaque coverage |
| Colored Pencils | Detailed shading | Intermediate | Precise, layered colors |
| Crayons | Beginner projects | Novice | Soft, textured application |
| Oil Pastels | Rich blending | Advanced | Smooth, painterly effects |
Add small spots and patterns for authenticity. Build up color gradually through layering. This approach creates depth in your final illustration.
Conclusion
This comprehensive journey through chicken illustration techniques has equipped you with versatile skills. You now possess three distinct methods suitable for various artistic goals and experience levels.
Continue building your confidence using the practice worksheets included. Share them with family, classrooms, or creative groups. Over 192,000 readers have successfully followed this guide.
Artistic growth comes through consistent practice. Experiment with different styles and coloring methods. For advanced digital techniques, explore this comprehensive digital art resource.
Expand your animal illustration repertoire with additional tutorials. Explore subjects like pigs, owls, dogs, and roses. Each follows similar structured approaches.
I hope you found this tutorial clear and enjoyable. Revisit any section as needed and most importantly, have fun creating unique poultry artwork.


