

Nearly 80% of aspiring artists identify the female form as one of the most challenging subjects to master. Capturing its unique curves and proportions requires a keen eye and dedicated practice.
In my career, I have spent countless hours illustrating women, with a special focus on mermaids. This specific work has given me extensive experience with this particular anatomical feature. My goal is to make this knowledge accessible to you.
This guide breaks down the process into simple, manageable steps. You will not be overwhelmed by complex technical jargon. We focus on the foundational shapes and concepts every artist needs.
Approaching this subject with the right mind set is crucial. We concentrate on artistic development and anatomical accuracy. Consistent work is the true key to improvement.
Whether you are just starting your artistic journey or looking to refine your skills, this tutorial provides a clear path forward. With patience and practice, you will see significant growth in your ability.
Key Takeaways
- This guide simplifies a complex aspect of figure drawing for artists of all levels.
- Personal experience from illustrating female forms, like mermaids, informs the instruction.
- The tutorial focuses on essential anatomy without overwhelming technical details.
- A professional and respectful mind set is emphasized for artistic growth.
- Clear, actionable steps are provided for immediate application.
- Mastery comes from dedicated work and consistent practice over time.
- You will gain the confidence to depict this feature in various poses.
Getting Started with Your Drawing Journey
Success in anatomical illustration starts long before the first mark appears on your working surface. Proper preparation transforms the intimidating blank space into an inviting creative opportunity.
Setting Up Your Workspace
I strongly recommend beginning with a 10-minute warm-up session. This dedicated time helps relax your mind and loosen your hand muscles. The goal is building confidence, not creating perfect sketches.
Focus on having fun during these preliminary exercises. They serve as mental preparation for the main tutorial. This approach reduces anxiety about making mistakes.
| Media Type | Preparation Needed | Key Advantages | My Recommendation |
|---|---|---|---|
| Traditional (Pencil & Paper) | Quality drawing paper, pencils, eraser | Tactile experience, no technology required | Excellent for beginners learning fundamentals |
| Digital (Procreate/Apps) | Tablet, stylus, app installation | Time-saving, easy corrections, no scanning | My preferred method for tutorial creation |
Choosing Traditional vs. Digital Media
You can follow this guide using either traditional or digital tools. Each way offers unique benefits for artistic development.how-to-draw-a-horse
I use Procreate for my tutorials because it saves significant time. Digital workflow eliminates the scanning step. Free brush sets are available for digital users.
Regardless of your choice, the fundamental principles apply equally. Gather your preferred materials beforehand. Having the right things prepared ensures a smoother learning experience.
Understanding the Anatomy of Boobs

Before attempting any artistic representation, developing a solid understanding of the underlying anatomy is essential. I cannot overstate the importance of studying real breast structure. This knowledge forms the foundation for creating believable artwork.how-to-draw-a-pumpkin
Gathering Reference Images from Pinterest and Stock Sites
I recommend Pinterest as an excellent starting point for reference gathering. The platform allows you to create organized inspiration boards. You can collect multiple images of breasts in one accessible location.
When searching for references, exercise caution with website selection. Reputable stock image sites like Shutterstock provide professional content. These platforms offer appropriate images of natural breasts for artistic study.
I have created a curated inspiration board specifically for this tutorial. This saves you search time and ensures access to quality references. The board shows breasts from various angles and different size variations.
Basic Feminine Proportions and Anatomy
Understanding basic feminine proportions is crucial for accurate representation. The female body typically features wider hips compared to the upper torso. This proportion helps maintain feminine appearance in your artwork.
Breast shape changes significantly based on size, position, and individual anatomy. Studying smaller breasts alongside larger ones reveals natural variation. This prepares you to depict different body types accurately.how-to-draw-a-tree
I personally use several anatomy books for reference study. “Drawing: The Head and Figure” provides excellent foundational knowledge. “Human Anatomy Made Amazingly Easy” offers clear visual guidance.
| Reference Source | Best For | Access Level | My Rating |
|---|---|---|---|
| Inspiration boards & variety | Free | Excellent | |
| Shutterstock | Professional quality images | Paid | Very Good |
| Anatomy Books | Fundamental structure | One-time purchase | Essential |
Spend adequate time studying your references before beginning your work. This observation period significantly improves your ability to capture accurate breast anatomy. Understanding the relationship between breasts and the overall torso structure is essential for realistic results.
Sketching a Basic Torso

Constructing a solid foundation begins with mastering the basic torso structure. This framework serves as the essential scaffolding for all subsequent anatomical features.
I guide you through establishing proper proportions using simple geometric forms. These initial shapes create the underlying structure for realistic figure work.
Drawing the Rib Cage, Pelvic, and Torso Outline
Start with loose, light marks to sketch the rib cage as an oval shape. Create a concave curve at the bottom where it transitions toward the waist area.
Draw the pelvis as a trapezoid with gently bowed segments. Leave appropriate space between these two main shapes to represent the flexible waist region.
For digital artists, I recommend using blue for sketching marks. Traditional artists should keep pencil strokes light on their paper surface.
Establishing Guidelines and Proportions
Add a centerline running down the front of the torso for symmetry reference. This guideline ensures proper placement of all anatomical features.
Remember that feminine proportions require wider hips than the upper body. This characteristic creates the distinctive silhouette at the bottom of the torso.
Position clavicle lines angled approximately 20 degrees at the top of the rib cage. Indicate shoulder blades using simple triangle marks on the upper back area.
These structural elements form the complete framework for your torso construction from the front view. Proper placement now makes subsequent steps significantly easier.how-to-draw-a-butterfly
Mastering How to Draw Boobs

The next critical phase in our artistic journey involves placing the distinctive curves that characterize female anatomy. With your torso foundation established, we focus on the essential technique for how to draw breasts accurately.
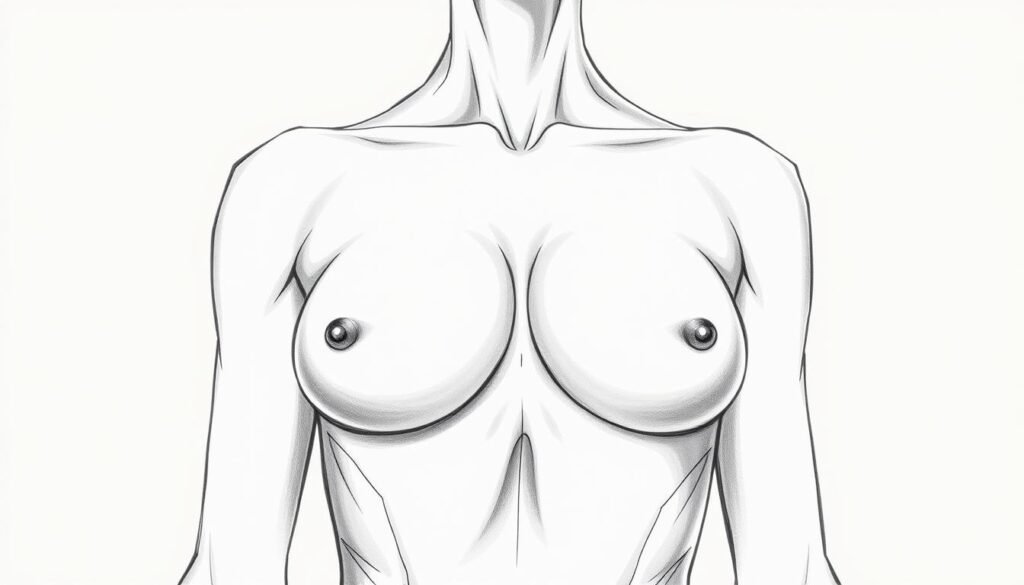
Placing Egg Shapes and Aligning with the Torso
I guide you to represent breasts using simple egg-shaped forms. This approach captures the natural teardrop contour beautifully. Position these shapes on the rib cage area of your sketch.
Angle each egg shape toward the center of the clavicle. This directional placement creates realistic positioning for drawing women. Avoid pointing them straight forward.
The bottom of each breast should end slightly above the rib cage’s lower edge. This landmark ensures proper vertical placement and size proportion. The technique works for various breast sizes.
Adding Center Lines for Accurate Angling
After establishing the basic shape, add a center line to each breast. This line must follow the angle and curvature of your egg form. It maintains dimensional consistency throughout your work.
You can also position the belly button at this stage. Place it at the top or slightly above the pelvis area. This completes your torso reference framework.
Mastering this egg-shape method simplifies complex organic forms. It provides a solid foundation for depicting different body types accurately in your artwork.
Refining Your Drawing: Details, Shadows, and Techniques

The refinement stage transforms your foundational sketch into a finished illustration. This process brings dimensionality and realism to your work through careful detailing and shadow application.
Begin by reducing your layout layer opacity to 30% for digital work. Traditional artists should ensure their initial marks remain light. Create a new layer for refined line work.
Detailing Clavicle, Shoulder Blades, and Soft Curves
Focus your refinement on the breasts, clavicle, and overall torso contours. Be selective about which lines to strengthen. Omit construction guidelines that served their purpose.
This selective approach maintains clean, professional results. It emphasizes the actual anatomical features rather than your working process.
Tips for Adding Shadows and Depth
Shadow work creates the illusion of three-dimensional forms. Don’t hesitate to add a prominent cast shadow beneath each breast where it meets the rib cage surface.
This specific shadow makes the breasts appear to project forward from the torso. It adds crucial depth to your illustration.
Apply a lighter shadow below the clavicle around the upper chest area. Be cautious with this application to avoid muddy results. Observe how light interacts with curved surfaces.
Reference your photo studies during this stage. Notice how real shadows fall across actual breasts and surrounding anatomy. This observation ensures accurate shadow placement.
These tips for shadow application will elevate your drawing from flat shapes to convincing forms. Proper light and dark values create the depth that brings artwork to life.
Conclusion
Completing this artistic journey marks a significant milestone in your development as an artist. If your finished work doesn’t match my examples perfectly, remember that mastery takes time and consistent practice.how-to-draw-sonic
Keep these fundamental tips in mind as you continue drawing women. The anatomy knowledge you’ve gained applies whether depicting the nude body or figures in clothing. Understanding how gravity affects breasts beneath clothes and bras adds realism to your art.
I recommend the three anatomy books mentioned earlier for further study. Subscribe to my email list for future tutorials. Follow @howtodrawdojo and @dreampigment on Instagram for ongoing inspiration.
Most importantly, maintain a positive mindset and enjoy the creative process. Your dedication to learn draw skills will yield wonderful results over time.


