

Did you know that firearms appear in over 80% of top-grossing action films? This prevalence highlights a massive demand for artists who can render these complex objects with skill. Mastering this subject opens doors to exciting creative fields.
I created this comprehensive resource to help you build that skill with confidence. Whether you are starting from scratch or refining your technique, this page contains everything you need. We will break down intimidating forms into simple, manageable stages.
My approach focuses on clarity and progression. You will learn about fundamental anatomy, proper proportions, and professional detailing. This process demystifies the subject, making it accessible and enjoyable for all artistic levels.
By following the structured content in this guide, you will develop a solid foundation. The techniques covered will empower you to create realistic and dynamic illustrations. Let’s begin this artistic journey together.how-to-draw-a-crown
Key Takeaways
- This guide breaks down complex gun forms into easy-to-follow steps.
- You will learn fundamental anatomy and proportioning techniques.
- The content is designed for both beginners and artists looking to refine their skills.
- Mastering this subject opens creative possibilities for various art forms.
- Clear instructions and visual references make the learning process enjoyable.
- You will gain the knowledge to create realistic and visually striking artwork.
Introduction and the Importance of Gun Drawing
Throughout my career, I’ve discovered that tackling complex mechanical objects like guns builds foundational skills that benefit all areas of art. This challenging subject pushes artists beyond their comfort zones in the most productive way.how-to-draw-a-fish
My personal experience with firearms illustration has transformed my approach to technical drawing. The precision required creates a strong foundation for all artistic endeavors.
Why I Embraced Drawing Guns in My Art
I embraced this specialized area because it opens doors to diverse creative works. Many artists find that firearm illustration skills translate beautifully across multiple disciplines.
From concept design to character illustration, this skill enhances professional opportunities. The technical challenge pushes creative boundaries in remarkable ways.how-to-draw-a-crown
Enhancing My Skills Through Detailed Practice
Regular practice with complex mechanical subjects strengthens overall artistic skill. Over time, I’ve seen how this learning process improves my understanding of form and perspective.
The discipline required to accurately render firearms develops keen observational abilities. This attention to detail benefits all aspects of my creative work, making me a more versatile artist.
For those looking to master this valuable technique, the journey begins with recognizing its broader artistic value.
Understanding Gun Anatomy and Key Components

A realistic depiction of any firearm begins with a deep appreciation for its individual components and their relationships. I never start sketching until I understand what makes each part unique. This knowledge transforms a simple shape into a believable mechanical object.how-to-draw-a-frog
For artists, grasping this anatomy is crucial. It ensures every line serves a purpose. My approach involves breaking down the firearm into its essential elements.
Breaking Down the Barrel, Slide, and Grip
I always examine the barrel first. This long tube dictates the weapon’s profile. Its length and angle vary greatly between different guns.
Next, I study the slide on semi-automatic pistols. This component houses vital mechanisms. Its shape is a defining characteristic.how-to-draw-a-tulip
The grip demands special attention. This is the point of human contact. I observe its texture, angle, and contours closely. These details sell the realism of the illustration.
Recognizing the Role of the Trigger and Sights
The trigger and its guard are small but critical. Their placement affects the entire silhouette. I ensure their proportions are precise.
Finally, I focus on the sights. These aiming points must be scaled correctly. On some models, I also note the hammer‘s position for added narrative detail.
Studying a comprehensive gun parts guide for beginners can accelerate this learning process immensely.
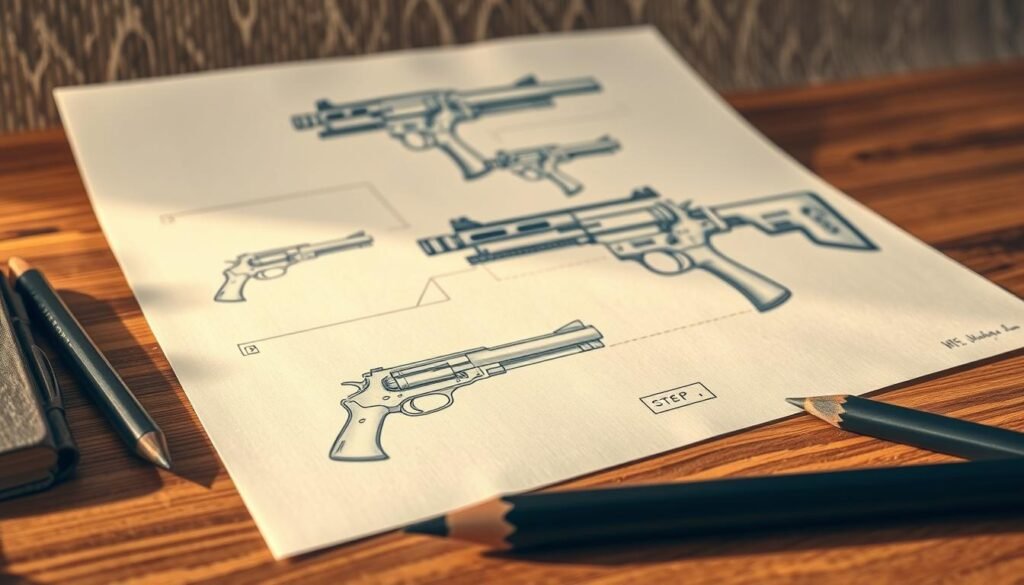
Step-by-Step Process: Drawing the Gun

A successful depiction hinges on a solid foundation. My initial focus is always on proportion and basic geometry. This disciplined approach ensures accuracy from the very first line.
Starting with Basic Shapes and Proportions
I begin every project with light, loose lines. These initial marks define the overall shape without commitment. This first step is all about establishing correct angles and size relationships.
For a standard handgun, I sketch a horizontal rectangle. I then add a second rectangle for the grip, angled slightly back. This creates a foundational L-shape. I carefully note the proportions between these two primary forms.how-to-draw-flowers
Next, I define the trigger guard area. A small rectangle at the inner corner, with an oval inside, marks the space. Getting these basic lines right early prevents major corrections later.
Adding Details and Shading to Bring Depth
With the foundation set, I start refining the drawing. I add a horizontal line across the top rectangle to separate the slide. A small rectangle at the barrel’s end represents the muzzle.
I progressively incorporate finer details like sights and grip texture. Each new element adds character and authenticity to the piece. The gun begins to take on its distinct identity.
Finally, I apply shading to create a three-dimensional effect. I observe how light interacts with metallic surfaces versus textured grips. Highlights and shadows bring immense realism. For a full breakdown, you can master this step-by-step process.
I often use silver or grey tones for metal components. The grip typically gets a dark color like black. This final step completes the realistic illustration.
Mastering How to Draw a Gun

The true mastery of illustrating firearms emerges when an artist transitions from copying references to understanding mechanical logic. This advanced stage moves beyond a simple step-by-step guide. It involves developing an intuitive feel for proportion and form.how-to-draw-a-squirrel
Integrating Tactical Techniques from Holster Drawing
I dedicate time to studying real guns and high-quality photographs. This practice is essential for capturing authentic details. I observe how light interacts with different surfaces, from polished metal to textured grips.
Shading techniques like cross-hatching bring immense depth to the artwork. Using a range of pencils, from soft to hard, allows me to create realistic surface qualities. This attention to detail makes the illustration appear three-dimensional.
Transitioning from Beginner to Advanced Styles
My learning process involves drawing various types of guns. This experience builds a versatile skill set. It deepens my understanding of how different firearms are constructed.
I often practice creating these objects from my imagination. This exercise strengthens my grasp of anatomy and helps develop a unique artistic style. The goal is to create distinctive works that reflect personal interpretation.
Regular, focused practice is the most effective way to improve. For artists ready to master this advanced technique, the journey is one of continuous exploration and refinement.
Conclusion
You have now completed a comprehensive journey into the world of firearm illustration. This page provided a complete step guide, from basic anatomy to final rendering. The content aimed to build your confidence with each progressive step.
Mastering this form of art requires dedication and a sharp eye for detail. The skills you develop through this drawing practice are highly transferable. They will strengthen your ability to render any complex mechanical object.how-to-draw-a-cake
I encourage you to continue exploring. Experiment with different styles and challenge your perspective. Let your unique artistic voice shine through in every piece you create.
Remember, consistent practice is the key to growth. Use the foundation built here to create artwork that is both technically sound and personally expressive. Your journey in gun illustration has just begun.how-to-draw-batman


