

Many aspiring artists believe rendering realistic hair is one of the most challenging artistic skills to master. This perception often holds them back from creating truly dynamic portraits.
I want to change that. Mastering the art of depicting braided hair completely transformed my own portrait work. It added a new layer of realism and personality to my characters.
This comprehensive guide is designed to demystify the entire process. I will walk you through everything, from selecting your basic materials to applying advanced shading techniques. You will learn to create professional-looking results.
We will explore multiple styles, including three-strand and box braids. My goal is to provide manageable steps that anyone can follow, regardless of their current skill level. The techniques I share are born from years of dedicated practice.
By the end of this tutorial, you will possess the confidence to incorporate beautifully rendered braids into your artwork. They can serve as a subtle detail or become the powerful focal point of your next piece.
Key Takeaways
- Drawing realistic braids is an achievable skill that can significantly enhance your portraits.
- This guide breaks down the process into easy-to-follow steps suitable for all levels.
- You will learn techniques for various braid styles, expanding your artistic repertoire.
- Professional shading methods will be covered to add depth and realism to your work.
- The tutorial focuses on practical tips to help you avoid common beginner mistakes.
- You will gain the confidence to use braids as both subtle details and main focal points.
Introduction to Drawing Braids
Braided hairstyles represent one of the most fascinating elements in portrait art, blending cultural significance with complex visual patterns. This section explores why these intricate forms captivate artists and shares my personal evolution with this artistic challenge.how-to-draw-luffy
Overview of Braid Drawing and Its Appeal
The appeal of creating braided hair in art lies in its intricate, interwoven nature. Each strand tells a story about structural understanding and organic movement. This artistic element demonstrates an artist’s ability to capture complex forms.
Braids have rich historical roots dating back to ancient Egypt around 3500 BC. They served both practical and social purposes during their creation. This cultural depth adds meaningful context to portrait work.how-to-draw-an-owl
My Personal Journey with Braid Sketching
Throughout my years of experience, I’ve discovered that braids offer a unique artistic challenge. They combine technical precision with fluid, natural movement. Mastering this skill has significantly improved my overall approach to hair rendering.
I’ve learned that hairstyles can function in multiple ways within portraits. They can serve as subtle background elements or become commanding focal points. This versatility makes braid mastery essential for portrait artists.
| Braid Function | Artistic Impact | Skill Level Required |
|---|---|---|
| Background Element | Adds completeness to portrait | Beginner |
| Main Feature | Draws viewer attention | Intermediate |
| Focal Point | Defines entire composition | Advanced |
| Cultural Expression | Adds storytelling depth | All Levels |
The process of learning braid representation taught me patience and attention to detail. These skills transfer to all aspects of portrait work. Each drawing session becomes an opportunity for growth and cultural exploration.
Essential Materials and Tools for Braid Drawing

The quality of your final illustration is directly influenced by the materials you choose at the start. Using the right supplies gives you greater control and helps achieve a more realistic result. This foundation is critical for detailed work.how-to-draw-roses
Pencils, Erasers, and Paper Recommendations
I recommend a range of graphite pencils for this type of drawing. Each pencil grade serves a unique purpose. An H pencil is perfect for light sketching, while softer leads like 2B, 4B, and 6B create deep shadows.
For paper, Strathmore Bristol offers a smooth surface that lets your pencil glide effortlessly. A kneaded eraser is my most versatile tool. You can shape it to create highlights or make precise corrections.
I often use kneaded erasers as a drawing instrument itself. In my video tutorials, I show how to form them into points for fine details. A blending stump is another helpful tool for smooth shading.
Lightly textured sketch paper also works well. It provides enough tooth for graphite to adhere properly without being rough.
Setting Up Your Drawing Workspace
A proper workspace ensures comfort and stability. A sturdy drawing board secured with bulldog clips keeps your paper flat and steady. This setup is essential for long sessions.
Additional items like pencil extenders and a soft paintbrush are useful. They help you use every bit of your materials and apply graphite smoothly across large areas.
Understanding the Anatomy of a Braid

The key to rendering convincing braids lies in understanding their underlying anatomical blueprint rather than just copying surface details. This structural knowledge transforms complex patterns into manageable components.how-to-draw-the-airplane
Before diving into specific styles, I emphasize that every braid follows fundamental geometric principles. Recognizing these patterns first makes the rendering process much more intuitive.
Breaking Down the Structure of Three-Strand Braids
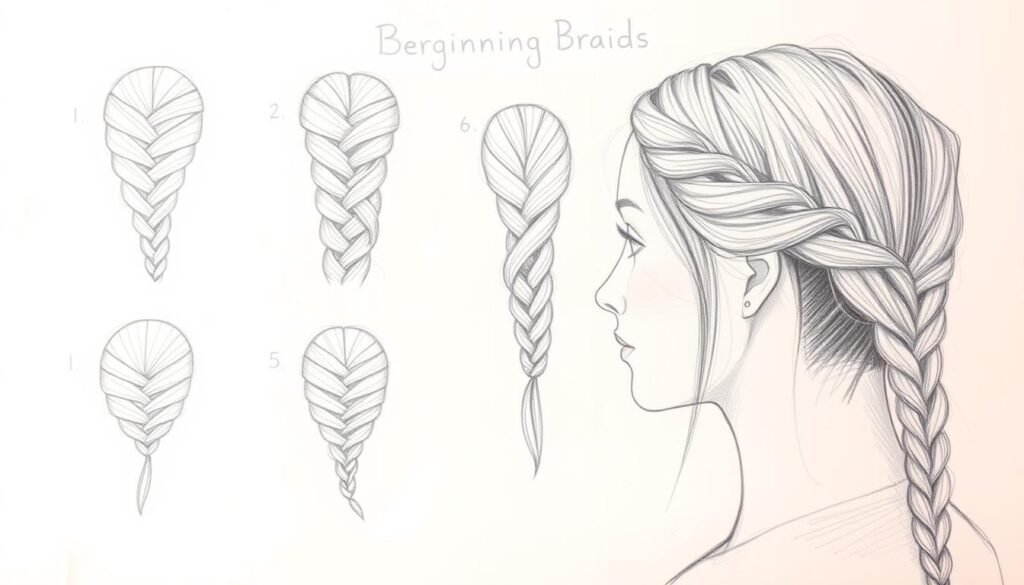
The classic three-strand braid consists of interlocking curves that resemble parentheses. When placed together, these sections create a distinctive “Y” shape pattern that repeats throughout the length.
I’ve learned that understanding this anatomy is crucial before attempting to render one. The fundamental structure involves three locks of hair woven in an overlapping pattern.
Each strand alternates between being on top and tucked underneath. This creates the characteristic woven appearance. Braids are wider at the top near the scalp and gradually narrow toward the bottom.
Exploring Other Braid Variations
Beyond traditional three-strand braids, numerous variations exist. These include box braids, French braids, Dutch braids, cornrows, and fishtail braids.
Box braids gained particular popularity in the 1990s. Each type has distinct structural properties while following the same fundamental principles of overlapping forms.
Studying braid anatomy improves not just your ability to render them. It enhances your overall understanding of complex, interwoven forms in any subject matter.
Mastering the Basics: Gesture, Curved Lines, and Proportions

A truly convincing braid illustration begins with its underlying gesture and proportions. These foundational elements create the framework for all subsequent details.
I focus on capturing the energy and flow first. This approach prevents a stiff, unnatural final result.
Finding the Right Gesture for Dynamic Lines
Gesture refers to the flow of one line into another. It creates a sense of continuity and natural movement.
I always start with light, erasable lines. This allows me to explore the overall flow without commitment.
Even with straight hair, I use curved lines. They add life and visual interest to the composition.
I look for major angle changes in the braid. I indicate these shifts with slightly curved lines to capture its dynamic quality.
Establishing Proportions and Flow
Accurate proportions are essential for realism. The top of the braid is wider, tapering toward the bottom.
I use comparative measurement to check my work. For example, I compare the width to the height.
This initial planning stage ensures the entire structure feels organic. Every line should flow naturally into the next.how-can-i-draw-an-elephant
- Start with gesture: Use light lines to map the primary flow and movement.
- Embrace curves: Avoid straight lines to keep the drawing lively and believable.
- Check proportions early: Establish the tapering shape from the top to the bottom.
Step-by-Step Guide on How to Draw Braids

Strategic placement and initial sketching determine your braid drawing’s success. This systematic approach transforms basic curves into convincing hair patterns.
I emphasize starting with light, exploratory lines rather than committing to final details immediately. This foundation ensures proper flow and proportion.
Planning Your Composition and Block-In
The first step involves sketching a vague outline of your braid’s position. Consider where it will sit on the page for optimal composition.
Remember that braids taper naturally from wider tops to narrower bottoms. This proportional awareness creates immediate realism.
Visualize the interlocking curved sections before making permanent marks. These parenthesis-shaped forms create the characteristic “Y” pattern when connected.
Translating Curved Lines into a Realistic Braid
Following your guidelines, begin drawing each interlocking piece. Leave small gaps where hair naturally twists around itself.
I recommend “drawing through” forms by continuing lines even when overlapped. This technique maintains structural integrity.
Each step builds logically upon the previous one. Make sure you periodically step back to assess overall gesture and proportions as you work.
The process requires patience but yields professional results when followed systematically.
Block-In Techniques: Laying Out the Braid Structure

Proper block-in methods create the essential framework that supports all subsequent details in braid artwork. I approach this critical step by carefully establishing the overall structure while paying close attention to negative space relationships.
The technique of refining negative space involves moving from general to specific observation. First, I notice the overall shape and tilt, then identify the widest points and distinct angle changes within that space.
I always practice “drawing through” the forms, imagining I can see through the entire braid. This approach ensures each line flows naturally into another, even when sections overlap. The technique creates cohesive structure where every element relates logically.
After completing the first pass of my block-in, I physically step back from my drawing to view it as a whole. This distance helps catch proportion issues or lost gesture lines that close inspection might miss.
A successful block-in should convincingly resemble the subject while maintaining accurate proportions. The contour lines must relate meaningfully to the interior information of the braid structure.
I recommend taking breaks during this step to let your eyes rest. Returning with fresh perspective often reveals previously missed elements. Making sure your foundation is solid before moving to values saves significant time later.
This careful approach to the initial braid layout establishes the groundwork for all subsequent detailing. A weak foundation makes achieving realistic results nearly impossible.
Refining Details: Overlapping Lines and Shading

The transformation from a flat line drawing to a three-dimensional form occurs during the refinement stage. This phase brings depth and realism to your work through careful attention to overlapping elements and value application.
Mastering these details is what separates a basic sketch from a professional piece.
Techniques for Overlapping Hair Strands
I focus heavily on mastering overlapping lines to create the convincing illusion of hair weaving over and under. When one lock is interrupted, its contour line should not simply end.
Instead, I ensure it continues naturally on the other side of the intersection. This technique creates vital interconnectivity, making the entire braid appear cohesive and believable.
Properly connected lines prevent a disjointed look. They are fundamental for showing how each section interacts within the complex structure.
Adding Highlights and Defining Shadows
When I begin the shading process, my first goal is to simplify values. I group them into three categories: light, half-tone (the middle value), and dark.
Squinting at the subject helps eliminate distracting details and heightens contrast. This makes the overall value pattern much clearer.
Each section of hair has predictable shading. It appears darker near the ends where it folds under other sections. The middle of each section is typically lighter where light hits directly.
I strategically add highlights to emphasize the cylindrical form of each hair section. This brings dimension to the drawing. Defining shadows requires attention to both form shadows and cast shadows for maximum depth.
This entire process of refining details through overlapping lines and thoughtful shading is crucial for realism. These techniques are also essential when applying digital illustration techniques.
Adapting Different Braid Styles for Your Art
Box braids and cornrows present distinct challenges that require specific approaches to capture their authentic appearance. I approach each style by first analyzing its unique segmentation pattern across the scalp.
Techniques for Drawing Box Braids
My process for box braids begins with dividing the hair into four horizontal sections. The top two layers are largest, creating a foundation for the grid pattern.
I subdivide these areas with vertical lines and add curved connections. This creates individual segments where each braid will form. The middle sections typically contain the longest braids.
Within every segment, I draw small circles or ovals as anchors. Then I attach horn-like shapes to represent the braids themselves. The side braids become progressively smaller toward the top of the head.
For texture, I add vertical zig-zag lines in the middle of each braid outline. Then I intertwine them with opposite-facing zig-zag patterns to create the woven appearance.
Tips for Rendering Cornrows
Cornrows require a different approach with vertical sections rather than boxes. I keep the middle sections longest while sections near the ears become gradually smaller.
Within each section, I draw thin rectangle-like shapes with soft lines. These forms become narrower closer to the neck, following the head’s natural contour.
I add zig-zag lines along these shapes to represent the tight braiding pattern. The hair partings between cornrows also receive zig-zag treatment rather than straight lines.
This technique shows how hair naturally parts and adds realism to the final artwork. Both styles demand attention to how sections connect across the scalp.
Tips and Tricks for a Realistic Braid Drawing

The difference between amateur and professional braid renderings frequently comes down to mastering a few essential adjustments. These subtle techniques can transform your artwork from stiff to strikingly realistic.
Utilizing Kneaded Erasers and Adjustment Techniques
I consider the kneaded eraser my most versatile tool. Before adding values, I use kneaded eraser to lighten block-in lines. Dark contours can detract from realism once shading begins.
These kneaded erasers adapt to any need. Shape them into pencil points for highlights. Flatten them for sharp edges to lighten specific value lines.
When working on precise details, I make sure my hand stays anchored. This provides stability for controlled marks. Starting faintly with your pencil allows easy corrections without paper damage.
Common Mistakes and How to Fix Them
Many beginners press too hard from the start. I recommend a light touch initially. Use your elbow and wrist for loose, natural strokes.
Don’t get discouraged if early attempts disappoint. This is normal. Take breaks and return with fresh perspective.
| Common Mistake | Artistic Impact | Recommended Solution |
|---|---|---|
| Pressing too hard initially | Creates irreversible marks | Start with light pencil pressure |
| Stiff, controlled strokes | Hair appears unnatural | Use elbow/wrist for loose movement |
| Focusing only on details | Loses overall composition | Step back periodically to assess |
| Expecting immediate perfection | Leads to frustration | Accept that skill develops over time |
Every artist was first an amateur. The patience to learn separates those who create from those who only dream.
Remember that a little bit of controlled chaos makes hair look more natural. Give yourself time to develop this skill through consistent practice.
Integrating Color and Advanced Shading Techniques
Color integration represents the final transformation that brings braided hair to life with dimensional realism. I begin this process by creating a new layer beneath my line work. This establishes a clean foundation for applying color without affecting the underlying structure.
My approach starts with a flat base color or gentle gradient across the entire braid. This initial tone sets the mood for the final artwork. Each section requires thoughtful attention to light placement and shadow depth.
Layering Colors for Depth and Texture
I carefully observe how each hair section interacts with light. The middle areas receive direct illumination while ends appear darker where strands fold underneath. This creates natural depth throughout the composition.
Understanding light source location is crucial for consistent shading. In my example, I position the light on the upper left. This means the left side receives more direct illumination than the right side.
Advanced techniques involve strategic color saturation. I make highlight colors slightly less saturated than the main hair color. Shadow colors become more saturated for lifelike results.
I often experiment with colored highlights and shadows to enhance vibrancy. Adjusting hues suggests different lighting conditions or environments. This adds visual interest beyond basic monochromatic shading.
Building up layers gradually gives me better control over value relationships. I make the braid darker progressively through multiple passes. This method allows adjustments rather than committing to dark values too early.
When rendering details like hair ties, I consider contrast options. Coloring them differently creates visual separation. Keeping them the same tone blends naturally with the braid.
My video demonstrations show how to add highlights to thicker hair sections. They also illustrate strategic dark shading where strands slip beneath others. These techniques create cohesive three-dimensional forms.
Conclusion
Mastering the art of braided hair representation opens new creative possibilities for portrait artists. This guide consolidates techniques developed through years experience with drawing hair specifically.
Remember that developing these skills requires time and consistent practice. Each drawing session builds your understanding bit by bit.
The principles learned here for creating braids apply to other complex forms too. They enhance the rest of your artistic abilities significantly.
I encourage sharing progress with others in the artistic community. My supplementary video resources demonstrate each step of the process for clarity.
Successfully rendering a braid structure shows advanced observational drawing capability. Keep practicing these braids and other styles to grow your portfolio.


